Home › Forums › Destiny of an Emperor › Making DoaE1 Portraits Using Feidian.
- This topic has 75 replies, 8 voices, and was last updated 12 years, 6 months ago by
MiDKnighT.
-
AuthorPosts
-
July 12, 2010 at 3:05 pm #5069
MiDKnighT
ModeratorCan you zip the programs you use for editing portraits so that they are available for DL in one spot? I've been working on an XP CPU but have Windows 64 bit as well. Going to tinker with it
July 12, 2010 at 3:05 pm #38050ModeratorFor me using Feidian was infinitely easier than Tile Maker Pro (thanks to Niahak for pointing this out). I am now able to swap portraits in a minute or two. Before we start. Here are some things to know about DoaE1 portraits:
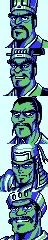
– They are basically stored in rows of 6 8×8 pixels. In the rom the portrait is stored as <top left tile> <top middle left tile> <top middle middle left tile> <top middle middle right tile> <top middle right tile> <top right tile> then onto the next row. CaoJay outlined this pretty well in this post –> Tile explanation
– The portraits are made up of 4 colors (blue green black white). The game has a custom palette that translates those 4 colors into the portrait colors.
Software used (for me):
– Php –> http://www.php.net/archive/2010.php#id2010-03-04-1
– Feidian –> http://feidian.sourceforge.net/download.html
– nes8 template –> Download tiles.rar
– Infranview –> http://www.irfanview.com/
– Nana –> http://www.romhacking.net/utils/137/
– MS Paint
– Destiny of an Editor (DoaE tool)
Put feidian in the Php folder and extract nes8 from tiles.rar and stick it in the Phptiles folder. Also put the rom in the Php folder for simplicity.
OK so here's what we do next.
1. Find the tiles in the rom. You can use Nana to do this. Open the rom with nana at a dos prompt like "nana destiny.nes" and look at the tiles by pressing "t" and change to NES format by pressing a number (forgot which number but it will say NES). To see the portraits right you have to use the "<" key to make the graphics 6 tiles wide then use pagedown or down arrow to find the portraits. You may have to use the right and left arrow keys to align it correctly. Then find the starting address of your portraits. To save time I found these already in the DoaE1 rom. They are at:
0x8810
0xC810
2. Use Feidian to unload those portraits at the DOS prompt (Start–>Command Prompt). Syntax is:
Code:cd <folder where php and feidian live>
php feidian.php -cr nes8,6,128,0×008810 doae.nes outputnes8 = template
6 = # of tiles wide
128 = number of lines
0x008810 = starting address
doae.nes = rom
output = bmp output file
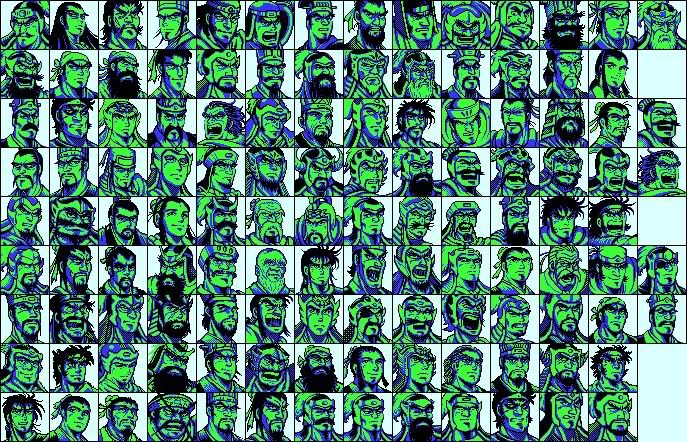
Once you run this you should have an output file that is basically a bitmap. If you open it up in paint you should see the portraits clearly in a blue/green/black/white state. It should look like this:

3. Now you'll want to pull portraits from another Rom. DoaE2 is the easiest… Use nana to find the starting addresses for the portrats in DoaE2 but I found some already at:
0x10
0x4010
0x8010
So the syntax would be:
Code:php feidian.php -cr nes8,6,128,0×10 doae2e.nes d2Now you'll have a d2 bmp file.
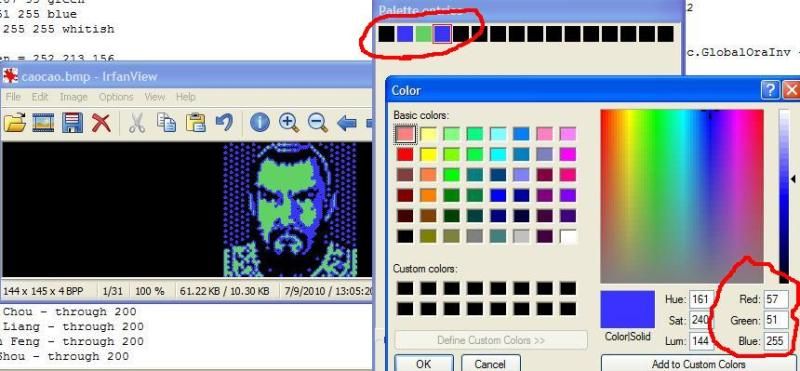
4***. The problem with DoaE2 portraits is that the colors are swapped. So if you try to directly use a DoaE2 portrait and put it in DoaE1 it won't look right. To fix this we can use Infranview to swap colors. Edit the palette on your DoaE2 bmp and switch the colors. The skin color of your characters should be green. The colors (specifically) should be:
0 0 0 black
97 207 99 green
57 51 255 blue
220 255 255 whitish
Now save your bmp.
Original DoaE2 colors:

Fixed colors (change green to white, blue to green, white to blue, and black to black (right color codes):

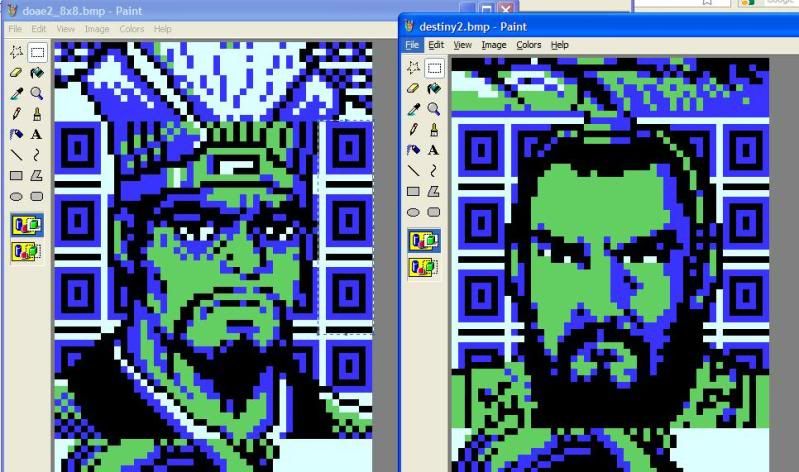
5. Open your DoaE1 bmp and your DoaE2 bmp in paint. Zoom in on both. Cut your portrait from your DoaE2 bmp and paste it exactly over the DoaE1 portrait you are replacing. So for example you would cut DoaE2 Ji Ling and put him on top of DoaE1 Pang Tong.
6. Save your DoaE1 bmp after doing this (don't do save as, just save). For example here's how my 1st bmp looked for the Yuan Shao mod:

(Note that I painstakingly added backgrounds to some of the portraits in MS Paint using some of the DoaE1 original backgrounds).
7. Now you can load your bmp back into the rom with feidian. Example:
Code:php feidian.php -ci nes8,6,128,0×008810 output.bmp doae.nesNote: If your portraits in the ROM look garbled after this it means that somehow during your process your bmp ended up in the wrong format. It needs to be the exact same format as the one you unloaded (DPI, resolution, colors, etc…)
8. Open Destiny of an Editor and change your general to the portrait you replaced. In this example it would be Pang Tong. It will look like Pang Tong in the tool but in the game it will be your new pic.
You're done!
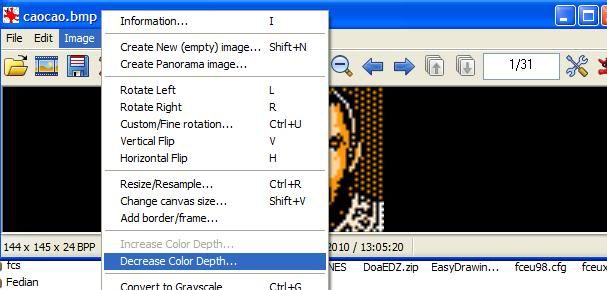
*** If you want to use pics from other games, it can be trickier. Other NES games are fairly easy like ROTK1. You'll just have to pull the portraits out (either via screenshot or feidian) and change the colors to the blue/green/white/black format using the color codes I provided before by editing the palette in Infranview. If the pic has more than 4 colors (pretty much all SNES portraits do) you'll have to "Diffuse" down to 4 colors in Infranview. This could really mess up the pic if it's a SNES portrait or more complicated portrait because it uses more colors. However, you could always touch it up with MS Paint.
If you want to test and see how your portrait will look in the game (with a white background), edit the palette in Infranview and replace the colors with this:
green = 252 213 156
black = 0 0 0
white = 253 253 250
blue = 256 108 80
It's not exact but close enough… If you want to see how it would look with a different color background change white to whatever background color.
Example from Yuan Shao mod with a white background: (ooh pretty…)

(NOTE: Don't save the bmp with these colors. The game won't recognize them)
Then export this palette for later reference.
Also note that anything that is white will use the background color you use in the DoaE tool. So if their eyes are white and you change the background color to purple their eyes will be purple (not good). To fix this either leave the background white or fill in the white colors in the portrait (besides the background).
EXPANDING YOUR ROM AND USING NEW PORTRAIT BANKS FOR UP TO 340 UNIQUE PORTRAITS
NOTE: I do not recommend that anybody does this yet… Because if you do then you will no longer be able to use "Destiny of an Editor" as it will chop your ROM back down to 256k when you save (until it supports a 512k ROM).
TO EXPAND YOUR ROM:
1. Back up the ROM.
2. Open your hex editor and expand the ROM to 80010 bytes. (ie…add 0's to the end until the last byte is 80010).
3. Copy all the data that currently exists at $3C010-$40010… and paste it to $7C010-$80010 (this is the "master" code of the game, for lack of a better term. It must stay at the end of the ROM).
4. Change offset $00004 from $10 to $20 (to show that you've doubled the size).
Now you have a 512k ROM. This allows us to add more portraits and other stuff!
Now…a little about how the portrait system works. A portrait is made up of 6 horizontal slices. Each slice is indexed from 00 to FF and they are stored in 2 banks in the ROM at 0x8810 and 0xC810. The reason we could never have more than 255 slices before was because of this two character index system. In order to have MORE portraits we need a 2nd pointer, a place to put our new slices, and new code in the game to allow it to use our new banks.
USING NEW PORTRAIT BANKS:
1. The 2nd pointer. Each general has a little "profile" if you will in the ROM. I'm going to borrow an old post from Niahak to show this:
Quote:Officer structure notes (from various sources, as well as DoaEd code)STR
INT
Region
Sprite
Sprite color (AP as enemy)
DP as enemy
Soldiers (Enemy)
Soldiers (Ally)
Tactics
AGI
portrait 1
portrait 2
portrait 3
portrait 4
portrait 5
portrait 6
portrait BG (single-color BG only)
unknown <
unknown
Name spacing
Officer name
See the 2 "unknown" slots? We have never found any use for these 2 slots and it is likely that these were used for Japanese characters. I am using the 1st "unknown" slot for the 2nd portrait slice pointer.
With that said I will be using the following values for that byte:
00 = Use the original DOAE portrait banks.
F1 = This officer's portrait lives in new ROM page 16 or 17 (hex: 10 or 11)
F3 = This officer's portrait lives in new ROM page 18 or 19 (hex: 12 or 13)
F5 = This officer's portrait lives in new ROM page 20 or 21 (hex: 14 or 15)
F7 = This officer's portrait lives in new ROM page 22 or 23 (hex: 16 or 17)
F9 = This officer's portrait lives in new ROM page 24 or 25 (hex: 18 or 19)
FB = This officer's portrait lives in new ROM page 26 or 27 (hex: 1A or 1B)
FD = This officer's portrait lives in new ROM page 28 or 29 (hex: 1C or 1D)
2. The assembly part (nasty). OK for the short version, just open your hex editor and paste this into 0x3CFE4 and 0x7CFE4: "4C3083000000". You'd be pasting this over "10044980E6F1".
Then copy this into 0x30340: "85158425A011B1F31004E9E085F1A51510064980E6F18515A4254CDACF"
That's all the magic right there.
The first copy is changing the code that adjusts the ROM lookup for any slice at index 80 or greater to just jump to $8330 where I put my new code. Here's what the new code is doing and *this* is what took the most time to do:
00:8330:85 15 STA $0015 = #$DA
00:8332:84 25 STY $0025 = #$00
00:8334:A0 11 LDY #$11
00:8336:B1 F3 LDA ($F3),Y @ $AE29 = #$F1
00:8338:10 04 BPL $833E
00:833A:E9 E0 SBC #$E0
00:833C:85 F1 STA $00F1 = #$02
00:833E:A5 15 LDA $0015 = #$DA
00:8340:10 06 BPL $8348
00:8342:49 80 EOR #$80
00:8344:E6 F1 INC $00F1 = #$02
00:8346:85 15 STA $0015 = #$DA
00:8348:A4 25 LDY $0025 = #$00
00:834A:4C DA CF JMP $CFDA
Essentially it has to figure out where to look in the ROM for the slice based on what the index number is and if that new bit is set.
3. Loading your portraits! Of course my preferred method is feidian. The two existing banks you'd load at 0x8810 and 0xC810. Note that any slice at hex:80 or above will go to page 2.
The new banks you can load into will be at:
0x40810 (F1)
0x44810 (F1 – 2nd page)
0x48810 (F3)
0x4C810 (F3 – 2nd page)
0x50810 (F5)
0x54810 (F5 – 2nd page)
0x58810 (F7)
0x5C810 (F7 – 2nd page)
0x60810 (F9)
0x64810 (F9 – 2nd page)
0x68810 (FB)
0x6C810 (FB – 2nd page)
0x70810 (FD)
0x74810 (FD – 2nd page)
And with these new banks you can load 128 rows for each page (the first page has slices 00-7F, the 2nd page has slices 80-FF). Example commands which would load up banks F1 and F3:
php feidian.php -ci nes8,6,128,0×040810 F1_1.bmp doae.nes
php feidian.php -ci nes8,6,128,0×044810 F1_2.bmp doae.nes
php feidian.php -ci nes8,6,128,0×048810 F3_1.bmp doae.nes
php feidian.php -ci nes8,6,128,0x04C810 F3_2.bmp doae.nes
If you were to go nuts with it you could load 340 unique portraits in a couple minutes if your bitmaps were ready.
4. Assigning a portrait to a general. Just like in "Destiny of an Editor" you assign your six slices, however, if you're going to use a new portrait bank you have to set that bit to F# to tell it which portrait bank to use. For example, slice 00 of F1 will be at 0x040810, slice 80 of F1 will be at 0x044810.
July 12, 2010 at 3:22 pm #38051ModeratorI'll add some pics to the above post later to make it easier.
July 12, 2010 at 4:38 pm #38052Zhuge Liang
ParticipantI HAVE TO say, it's definitely a great job that you're doing.
:huohu: will grant you a wish someday.
DoaE gave birth to Huo Hu.
July 12, 2010 at 5:05 pm #38053ModeratorThank you sir. It took me a while to figure out the feidian stuff so sharing what I know. I really didn't want to piece each pic together with Tile Layer Pro. I would have gone postal after a few portraits.
Once you get used to the feidian method I talked about, you could theoretically swap every portrait in the game in a matter of minutes.
July 12, 2010 at 6:49 pm #38054Lord Yuan Shu
KeymasterAwesome. This does sound more reasonable than Tile Layer Pro. I'm going to have to take a look at this and probably make some changes to my roms with this at some point. Good work MidKnight
Welcome to Lord Yuan Shu Walkthrough Guides ·
Huo Hu's Adventure started Destiny of an Emperor hackingJuly 12, 2010 at 7:01 pm #38055ModeratorYes it takes some getting used to then once you get the hang of it you can zip through portrait changes. I'm gonna post what I did for the Cao Cao portrait in a min…
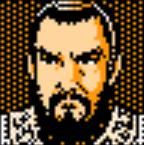
July 12, 2010 at 7:29 pm #38056ModeratorThe Cao Cao portrait came from ROTK1. Here's what I did.
1. Loaded ROTK 1 in an Emulator and chose Cao Cao as the ruler.
2. Opened up his page and took a screenshot (PrntScrn).
3. Cut out his portrait in MS Paint.
4. Opened the file in Infranview. It looked like this:
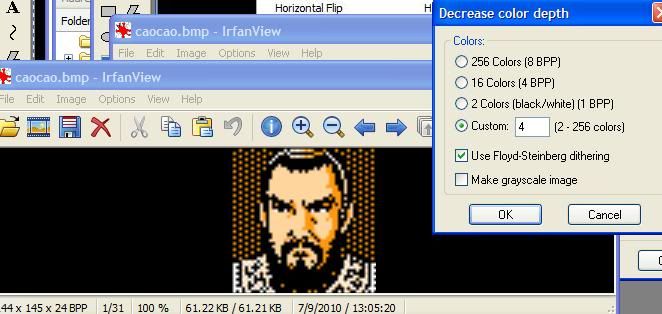
5. Diffused the colors down to 4 colors like so:
6. Now have to change the colors to match DoaE1 colors:
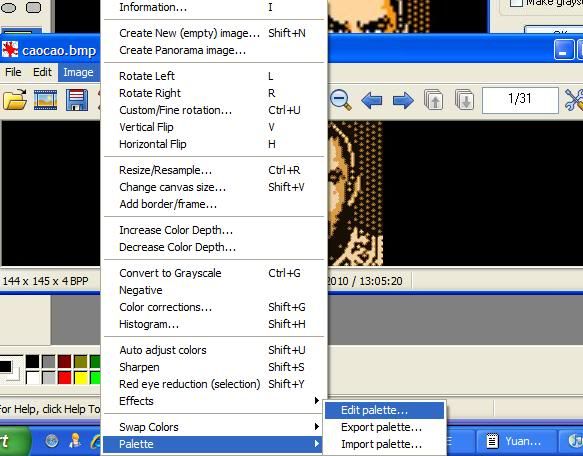
Couldn't use white in this one because it didn't look right. So just used blue/green/black:
7. Now after saving as a bmp it looks like this:

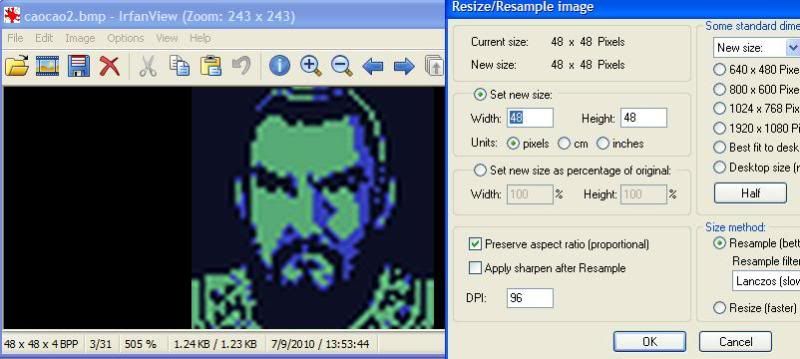
8. Now resize to 48×48 (destiny portrait size):
9. Pasted him over Sima Yi in my 2nd destiny bmp in paint.
10. Opened the original DoaE1 pics then pieced together Sima Yi's background behind Cao Cao in MS Paint (zoomed at 800%). (I'm sure there's a faster way to do this in photoshop but I don't have photoshop right now) Also made Cao Cao's eyes white:
11. Then loaded him into the ROM with feidian!
Color test:
 July 12, 2010 at 9:09 pm #38057
Niahak
ModeratorThis is awesome! You really hit on the Feidian thing exactly right, I think – it's not hard to deal with, you just need to do a little math to get things in right. This is a really great explanation.
And – more fool me – I didn't even think to import the whole portrait set at once. Nice work!
July 13, 2010 at 3:08 am #38058Paulberios
ParticipantQuote:php feidian.php -cr nes8,6,128,0×008810 doae.nes outputWhen I put this in a get the feidian.php file script. Nothing for doae.nes at all. I have all the associated files in the same dir.
July 13, 2010 at 1:21 pm #38059ModeratorNo idea but my guess is that your version of Dos and Php don't get along.
What version of DOS do you have? To find out run this at a DOS prompt:
> command /C ver
Mine is 5.00.500 (on XP)
To run an older version of DOS you could try using PC-DOS or FreeDOS.
July 13, 2010 at 3:09 pm #38060ModeratorI am uploading the Destiny 1 and Destiny 2 bmp's. The Destiny 2 bmp's have already been color converted.
July 13, 2010 at 3:10 pm #38061ModeratorErrg trying to figure out how to upload…
July 13, 2010 at 3:17 pm #38062KeymasterYea sorry I should take the upload function off to prevent confusion. A week or two ago I tried to get the feature going for our bbpress forum but after you upload, nothing happens. So yea, doesn't work unfortunately.
If you have image files you'd like me to host just send it to my name (lordyuanshu) at g mail and I'll post them.
Welcome to Lord Yuan Shu Walkthrough Guides ·
Huo Hu's Adventure started Destiny of an Emperor hackingJuly 13, 2010 at 3:23 pm #38063ModeratorOK I can link to them:
Destiny 1 1st bmp (128 lines) – location: 0x8810

Destiny 1 2nd bmp (128 lines) – location: 0xC810

Destiny 2 1st bmp – converted (168 lines) – location: 0x10

Destiny 2 2nd bmp – converted (168 lines) – location: 0x4010

Destiny 2 3rd bmp – converted (30 lines) – location: 0x8010
CaoJay's pic (converted) – note that their eyes aren't white so you *can* use colored backgrounds for these.
-
AuthorPosts


- You must be logged in to reply to this topic.