
Saiyuki Journey West
The game is based on a popular Ming novel where a chinese monk travels to India. Anyway, start a new game and choose either the male or the female. It matters little in terms of the actual story.
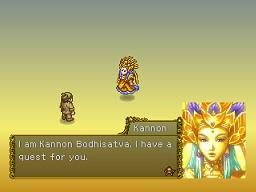
The main character Genjo will be encountered by Lady Kannon. After this it will have seemed like it was a dream as a Priest comes in and tells you to go to the main hall. A sword appears in front of Genjo.
Gold Temple
You are now at the Gold Temple main hall. Some more scenes with the elder as they don’t believe Genjo’s dream. Genjo will have a chat and later appear in his monk’s journeying outfit.
Chapter 1 – Journey’s Companions – Monkey Rock
Some enemies will show up. Your guards will attack some enemies but eventually be overcome themselves.
A voice from a rock is trapped.
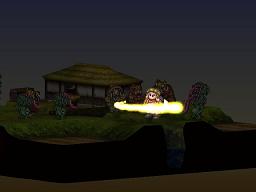
This is your first battle with just Sanzo. You are to make your way across the bridge to the northeast and search the charm being protected by the Imp. When you cross the wood bridge, choose the Use option to destroy it. Look towards the treasures and use to get a Healing Potion.
Go up to the Imp now. Three hits and it should be dead. You can press Use in front of the charm to end the battle but instead go back a space and face away so that the coming monsters have to attack you from lower elevation. By doing this and casting Heal, Sanzo should be able to take a few of these enemies down and gain a level or two. The Centipedes have a ton of HP and high defense though so it may be time to get the charm when they hit the front line.
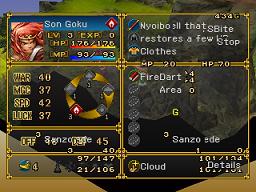
The rock will explode and you release your new friend – the battle is now over. After the battle your buddy turns small, it is Sun Goku. Another visit from Kannon occurs as she puts the initially unwilling Sun Goku under his control. You can look at his stats and then you’ll gain control on the world map.
Mt. Darkwind
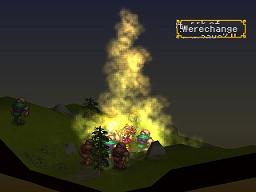
Some more talking between Sanzo and Goku and then thieves ambush them. This battle may seem intimidating but you’ll learn about Were Change. WereChange allows a character to change forms until the Were Gauge in the northwest is 0.
Anyway, when you gain control have Sun Goku go in between the three green thieves and use the Were Change for area damage on all. Most of the enemies will damage Sanzo so be prepared to heal when the time comes. Outside of that, just keep attacking with Sun Goku until his Were Gauge reaches 0 and he turns back into a human. He’s a little weaker but the enemy’s advantage in numbers should be negated at this point. Try to get some EXP for Sanzo at the end.
Ko Lodge
You’ll see a scene as you enter with Hakkai. Sanzo feels bad for him so he follows him and the two go in the river. Some enemies then ambush Sanzo, Hakkai and Goku. Hakkai morphs like Goku and turns into a big, killing the three enemies behind your characters. He can’t last for long and returns to human form, and you gain control.
Fight like you normally would but you’ll notice you cannot control Hakkai because he is a guest. He’ll just go around and use Rockdrop so he’s pretty useful. This battle can be a little difficult at first actually, because the enemy will gang up on a character. Son Goku and Hakkai are too powerful for the enemies to stay alive for too long, just make sure to heal with Sanzo and get the Leather Jerkin behind the Magic Potion.
You get Cho Hakkai forever after the battle. Might want to equip the Leather Jerkin to Son Goku and maybe buy another one for Hakkai at the shop.
Hawk Isle
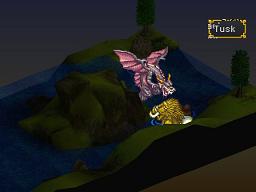
As you enter you’ll see Ryorin, and she quickly doesn’t trust you. She morphs into a dragon like creature and then the battle begins – you also get to position your characters here.
Ryorin can fly and has huge range so she can hit whomever she likes, but she chose Sanzo to start off with. Her attacks are pretty rough, taking off about 80 (half of Sanzo’s HP).
Have one of your characters WereChange (yes, only one can Werechange at once). I’d choose Hakkai as the Raging Boar can handle the dragon on it’s own. Sanzo should just heal and Sun Goku can use the Fire Dart or attack.
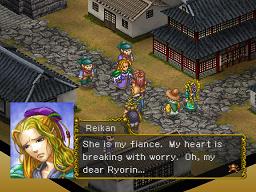
Shu Ryorin introduces herself as the daughter of the Dragon King afterwards. She was forced into marriage so she fled. And now she asks to join and Sanzo can’t refuse.
Chin Lodge
Save and head to Chin Lodge. It’s very quiet here and the party sees lots of sleeping people and a young one crying. He tells you of a spring that has water to wake the villagers but the hermit who put them to sleep dwells there.
Grace Spring
This is where the hermit is. Actually when you get here, Gojo will be getting water. He gets ambushed by four enemies and he kills two off only to find two more. The party gets here so position them.
In the middle is a rock (Healing Scroll) and tree (Monk’s Cap). You’ll notice a lightning symbol over them, so Ryorin can use her second ability to reveal the chests (might want to clear some enemies out with her first though).
The enemies aren’t too tough here although the Lizards can attack from a distance. Make sure your new friend Gojo gets backup although it seems the enemies will get distracted with one of your other characters.
After Gojo is able to flee, he’ll call you all monsters and can’t believe he was helped by you. Sanzo and the party head back to the village while the Hermit Nyoi confronts the enemies who let you take water.
Chin Lodge
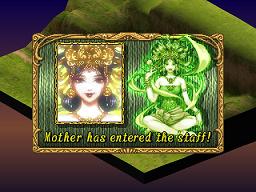
Back at the village you get a Healing and Cure Potion. The elder then takes you to a new area and Sanzo’s staff reacts and Mother appears. Her name is Sei Obo or the Guardian, Mother. Sanzo then has a dream about another guardian in trouble.
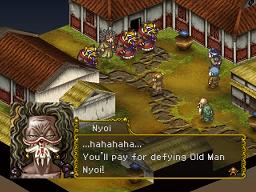
Sun Goku wakes him up as a battle is ensuing in the middle of town. Old Man Nyoi is attacking the villagers and they start with the little girl who is crying. A Sahagin type Were is here to help her but he gets beat down and has to revert to human form – it’s Gojo.
This battle is tricky but there are no treasures to distract you. Old Man Nyoi can be difficult with his drain attacks (Life Steal) and may paralyze you. You will learn about summons here (Mother is a summon). Basically they can be called upon for a few turns to provide some sort of effect for those close to Sanzo.
I tend to use the Raging Boar Hakkai in this one but Shu Ryorin is very weak as a human here so you may wish to have her WereChange. GroundWave can pummel the wolves though. There is no sense fighting the frontliners right away so you’ll want to take the Flyman out right away or they’ll keep healing. Do note that you can just defeat Nyoi right away to end the battle, but defeating the lesser enemies will make this easier and you’ll gain more EXP. Surround Nyoi at the end to defeat him and he’ll retreat.
The village is scared of your party now. You’re a bunch of monsters (Wereism). Gojo runs up to say that’s how it is, and that’s why he pretends to be human. Sanzo says something smart and Gojo will eventually joined – incase you didn’t notice Sa Gojo is the Water Were so to speak (like Ryorin being lightning based and Hakkai being earth-based).
Save and leave for Mire River.
 Mire River
As the party laughs through the water, Sanzo gets too far ahead and some imps capture him. They take him to Rhinon who is a scary sight, and is far from the rest of the party.
As you begin the battle, Sanzo will absorb some hits and then you’ll want to retreat back to the party with him. The other members should charge up as fast as they should. Sa Gojo is a beast in this battle since he’s water-based and his HP goes up each turn.
Even when you reach your party this battle is tough because basically the entire enemy force is there with you. You’ll definitely want to summon Mother to act as Regen once a turn. Still, the fact that Rhinon the boss is at the front lines immediately means you may lose a character or two. Take out the Flymen and careful of the Centipede, if it gets to the battle.
Go into Mire River as you can buy lots of stuff. Go to the Smith to get your weapons forged (Sanzo is already at level 2).
Moon Hill
The party heads to Moon Hill and camps, but Sanzo has a dream. There is a female in danger and the party decides to go north just as the girl in Sanzo’s dream directed.
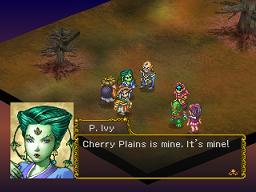
Cherry Plains
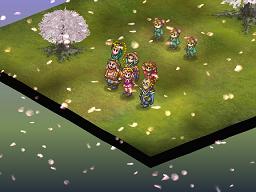
You’ll meet P. Ivy and some enemies. Your party sticks up for the little Driad kids and a battle begins.
Position your characters like you normally would, sticking Cho Hakkai and Goku up front. The objective is to defeat Madame P. Ivy. Fortunately she is a measly bow and arrow wielder and on top of that she spends most of her time putting up Rock Shields for her cohorts. She can use RockGuard, an earth-based area attack, but she’s pretty weak besides that.
This is a good battle to cast Howl with your Great Ape Goku. This attack goes after a large range of characters near Goku and can stone them or take off high damage. Continue with the other characters and you should have P Ivy surrounded.
Kill all the enemies and complete the stage.
Afterwards the girl from Sanzo’s dream shows up. The party decides that maybe she’ll up if they sleep there. As they fall asleep, they’ll wake up in Dream World.
Dream World
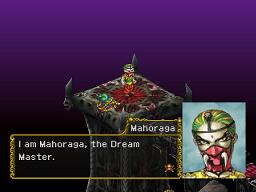
Sanzo is disturbed about waking up here. A boss is here unfortunately, named Mahoraga. He is the dream master. Kikka the dryad is being held captive here by Mahoraga. He beats Kikka but the party doesn’t back down.
You are preset here with an enemy on one side and the stairs and a bunch of enemies on the other. The battle starts off slow, so just let the Wolfman come to you and kill him.
Careful if you go after the Imp and the Chest. You’ll get shot by some weaker enemies and by Mahoraga. The Emperor Helmet is worth it though. Having Goku go might be best since he can just use Cloud to get out of there whereas the others will get stuck because of the elevator.
Making your way up the elevators can be brutal with the plethora of archers raining down on you.
Because of this, this will be a slow methodical stage. A fast yet powerful character like Goku can really work his magic on this level. Because of this, you should probably WereChange Ryorin or Hakkai to allow human-Goku to dominate. Use his Cloud to maneuver through the elevators but the damage will still take it’s toll here.
 After the battle, you get Hei Reiko the Guardian, Warrior. After you are teleported back to the real world you also get another new character, Kikka, who turns into a WereButterfly. Finally another healer to pair with Sanzo.
A scene with the enemy as you meet a boss of the last few bosses you’ve been fighting and he sends his men to capture you.
Chapter 2 – Western Overlord
Yuimen
The road splits here, either through a creepy water area or a hot volcano area, and some characters express their concerns.
Ryorin will hide as Reikan is here looking for her. When you get the chance, blow all your money on new defensive equipment and spells.
Now outside of town you see both paths. Each have 3 stops, and if you have the time you should probably do all six. Head south first.
South Path – Mist Mountain
After some talking with the villagers, the party goes into an open area and imposters show up. This battle can be difficult because you’re fighting 2 duplicates of each character so you’re outnumbered badly like usual. There are some items in the trees but I doubt you’ll have time to mess around with Ryorin’s Were over there.
Send your party away from the duplicates by the trees and just try to clear out the ones near you. The Goku and Ryorin from the other side will creep up on you quick so beware. While the enemy basically has the same ability’s, they seem a bit slower and less apt to use ability’s on you (they generally just attack). Another good battle for Goku’s Howl to clear out several enemies. Don’t both with Warrior since you’ll need Mother to recover from all the damage you’re bound to give up in the first few turns.
Afterwards the impostor Goku shows himself as a baboon named Jiko. The party tries to figure out who is after them and in the meantime Taurus is shown. His wife goes after you instead now.
Biku Tiger Cave
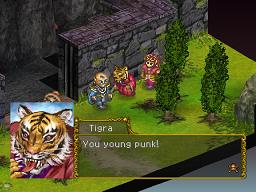
Some strange things are happening here. The party learns that children are being killed to save the king’s illness. This is too crazy so the party confronts the king. Turns out there is some master who is controlling the king and Goku gets him to reveal his true identity. It is Tigra and he flees.
You begin battle in a weird area that is gated and blocked by trees. You’ll have to waste some Tail Whip’s from Ryorin to get by the trees. Or you could have Son Goku use Cloud to get to the red switch to open the gate. This is more efficient and better for your party to attack through the center.
Master Tigra gets to you quick and this is a bad thing because he’ll abuse ThunderStrike. You need to get behind him for some treasures. Before this though you’ll want to make sure only Tigra is alive and preferably without magic.
He’ll cast Thunderstrike until he runs out so just have Mother out and heal (might be wise to have Kikka as another healer).
If you use a WereAttack on the throne it’ll reveal a Noble Hat. Have Goku use Cloud over to the treasures in the opposite corner of the throne. One of them is an Emperor Armor and the other is Magic Potion. There are two trees that reveal chests. If you look at the middle dirt path, there are a bunch of trees to the right and three trees to the left. The tree closest to the gate on the right is a Chain Mail chest and the tree on the farthest away in the left corner almost is a Strength Scroll.
Now that you have all the treasures, beat Tigra down. He’s still tough with his physical attacks but it’s nothing like the danger of ThunderStrike.
The king rewards Sanzo with a Wind Crystal and then you can go on to Helmet Peak.
 Helmet Peak
The party finds a crystal and the staff reveals the Guardian Luna. They ask about Mahoraga of the Dream World and she knows him. However this guardian gets shot by Apsara.
Apsara and her husband Vala then begin a battle against you. You can use all six of your characters actually. There are no treasures to sidetrack you.
Start going up the hill towards the Lizardman side so you can take the archers out quick. Vala will provide some tough resistance with his SoulSlash and physical attacks that are brutal. Take him out as fast as you can because you’ll be getting sniped and charmed during this (use Cure to cure charm).
Now rush up to defeat the Operators and Lizardmen. Apsara should be your last target. Afterwards Luna will go into your staff and you will have her to call upon (for a bow attack or to restore MP) as a summon.
You are at the end of the south path now. I advise you take the north for the experience, but if you want to continue just control f Mt. Cloud.
North Path – Turfan – Lucky Temple
The party will hear about a dead little girl.
This is a strange battle. There are five blood spots and five Bugs to deal with, but even with four characters the bugs should be easy.
Have someone use a WereChange right in front of that rock (which is right in front of where you start). It is a Steel Cap. Also the rock in the northeast corner (sandwiched by the pillar) yields a Luck Stone. Meanwhile, you can only use Sanzo to clean the blood spots, which you have to go next to and then select Use. No sense killing all the Bugs since they’ll return, just get the treasures and clean the blood. After the battle, Hakkai finds a Spring Comb.
Firetop
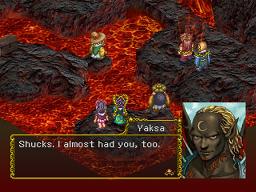
Yaksa ambushes your party here, looking for the staff. Your party is separated, with Sanzo on an island with a treasure, Ryorin / Cho / Kikka on another island and the other two where the enemies are. Your party will take 10 damage every turn but if you have Mother out this shouldn’t be an issue.
Use the WereChange to get Ryorin across and then WereChange back. Next, do the same for Kikka. Watch the moving platform. You can use it with Sanzo (get the Fireball Scroll first) and Cho to get them back on land. Meanwhile, kill the lower enemies and use a WereAttack on the molten rock by where you start for a Speed Potion.
By the time you clear out the Wolfmen, Lizardmen and Birdmen, the rest of the enemies will probably rush you. However there is still one item to get so send a fast character like Ryorin or Sun Goku to where the enemies started off and destroy the nearby rock with a WereAttack and get the Charm of Defense.
Yaksa isn’t really difficult especially if Cho is at the front line. Yaksa just uses Rockdrop and the Conjurer’s go around and heal. Sanzo gets the Guardian Summon Fool after the battle, who raises attack power temporarily (a nice summon).
 Infidel City
All monks here are being seized. Goku has a plan.
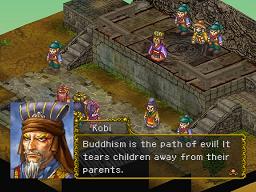
At the Executioner’s Block, Sanzo is ready to get executed but Goku confronts King Kobi. Goku gets stoned unfortunately.
Hopefully you have a Destone Potion, if not you’ll have to do this without Goku. Plus, King Kobi has a stonebell attack that can stone another character. This isn’t too big of a deal but the treasure in the far corner is a Destone Potion. Two more treasures are in this area in trees. One is the tree on the lower area that is near the Destone Potion treasure.
Have you ever wondered about Sanzo?
Great guide