Guardiana
The game starts with a short dialogue with Various the Knight. Go to the king after that to hear that you are to check out the Runefaust army at the gate, as there seems to be some activity. You can check out town, but not much to do (or buy at this point).
You do get Ken (Knight), Luke (Warrior), Tao (Mage), Lowe (Healer), and Hans (Archer). Ken and Hans start off well but don’t age quite as good as some of the other characters – notably Luke, who should be a solid character throughout. Tao too is useful with her speed and Blaze ability.
Return to the king for 100 gold, and then leave town.
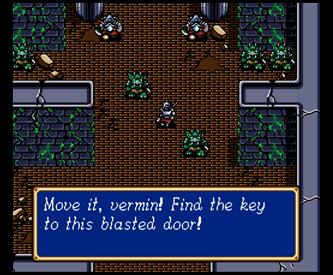
Guardiana Gate
Near the gate you will see the Runefaust army. The enemy will go into a set spot and wait for you to advance – this is the way it is in most battles, though in some they pursue quickly.
Anyway, try to snipe the three Goblins with long range users (Tao, Ken, Hans), as if you get too close you’ll incite the other enemies. Once those Goblins are done, try to move north just enough to get the rest of the Goblins and Dwarves after you. This will make clearing that Knight at the top less of a risk for Max and the others. Having Lowe get some finishing shots helps to keep him leveled up – you’ll notice Healers are difficult to level up otherwise.
To Guardiana
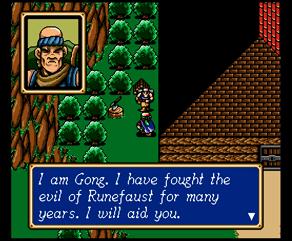
Once outside, you’ll see the enemies have Guardiana under control after you left. You need to work your way back north to get there. Before you do any of that, go into the hut east of the Gate Ruins. There is a priest, Jogurt, and Gong! Gong the Monk joins you. He is a healer but of course is more physically inclined. Still though, he is not the best threat physically so it is in your best interest to level him up with some finishing shots as well.
Back to the battle, advance through the Goblins again with long range users. Hans should be a dominant ally in the woods with decent movement compared to the rest. The clutter of Goblins and Dwarves might be a mess but you should be able to mow through them one or two at a time while the other enemies sit back and wait their turn. You are best off being patient at the end with the two Rune Knights and the Dwarf. If you use Hans / Ken / Tao to kill the knights from across the river, storming the dwarf should prove easy.
Inside Guardiana, you should raise anyone who may have died, and then buy an Axe for Luke if you wish (you can buy weapons here now). Head to the northeast to the library, as Gort will join you. He is basically a Luke clone which is a good addition.
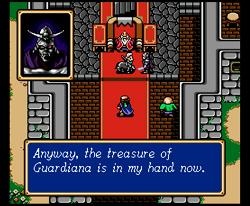
Hurry to the King. As you get there Kane is murdering Varios, and the king dies shortly thereafter. Mae however joins, the daughter of Varios. She is another Knight like Ken but has a lance instead of spear so you’ll need to get up close with her to attack.
To Alterone
Northeast of Guardiana is Alterone. You need to get here to continue your journey but of course you have Runefaust Knights barring your way. Bats are also scattered about. You’ll quickly realize how annoying they can be, putting you to sleep and dodging attacks at ridiculous rates. Burning them with Tao helps.
Notice that as you get further north, those three Bats and then five Runefaust Knights come charging at you. So you’ll definitely want to clear the Dwarves before traveling too far north. If you fall asleep with a character they’ll have to wait a few turns to wake up.
Alterone has all sorts of treasures if you check around town. The first house in fact has 70 Gold and a Bronze Lance (Ken). The pub has a Healing Seed and 100 Gold. If you push the cart north of this building at the lady and then talk to her, she pushes you into the lake and you can get the Power Potion to raise ATP for someone. Scrounge around some more for a Medical Herb, Healing Seed, and Middle Sword. Give that sword to Luke or something. Talk to all the villagers and you’ll be let into the castle.More treasures here to get first. Some Healing stuff, Wooden Arrow, Bread of Life, Defense Potion, 100 Gold, Middle Sword and Wooden Staff. Talk to the king as shady stuff appears to be going on. Sure enough he’ll take you to Kane, who he has already surrendered to.
Max is thrown in jail. Save your game and then search the bars. Khris will save you and join the party. She reveals a path that leads to headquarters and back to Alterone town. Take it and you’ll find yourself in the last battle of Chapter 1.
 Alterone
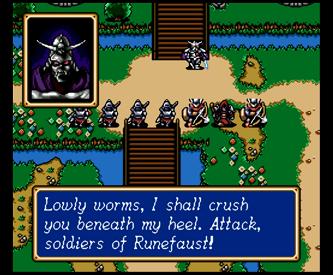
You are at the southwest part of Alterone, and Kane is waiting for you when you reach the surface. He has plenty of enemies including new enemies in 2 Sniper’s and a Dark Mage.
You can head north or east, but I generally head east to take out the easier enemies first. As you pass that bridge, the bats will come flying at you from the lakeside. This may put your Healers in danger so fall back with the front lines if necessary. Mopping up this area should be a breeze though.
Then you’ll catch the attention of the 5 or so Rune Knights. They shouldn’t be so hard at this point. Khris is probably a level or two behind so maybe she could get some of them (she is good for Dwarf mop-up too).
The Snipers and Dark Mage do not move so save them for last. Snipers can only attack from two spaces away while the Dark Mage can pull off some dangerous Blaze spells on the party if you’re clustered. Wait for the Dark Mage’s turn and then after that charge in and kill the three to end the battle.
Talk to the King of Alterone and forgive him – he had no choice due to Kane’s power. He gives you a hint to search the dragon head southwest of him. Do so then follow it to a teleport to Rindo.
End of Chapter 1 – Runefaust Invasion
Beginning of Chapter 2 – Spirit of the Holy Spring
Rindo
You start off in Rindo. First of all, there are Power Staves to buy for Lowe, Khris and Tao to make them decent with physical attacks. Also check the northeast building for a Speed Ring. Speak with the mayor in the north part of town to hear you can’t have his boat quite yet – might as well head to Anri in Manarina.
Road to Manarina
Manarina is being blocked by Dark Mages and Zombies, among others. The Dwarves are really easy at this point and the Bats are obsolete too.
Your biggest challenge is the terrain in this level. The desert is not kind to many, only really Luke and Gort. And they’re likely your two strongest characters anyway so you need your lesser ones to catch up. In turn you’ll need to be slow making your way and be careful not to set yourself up for a disastrous Blaze 2 from a Dark Mage.
The area with the Zombies and Dark Mages is far and away the hardest battle within the battle you’ve faced yet. The Zombies can poison you with their attack, and it’s generally for brutal damage unless you have Mae or one of the Fighter’s taking the hit. The crappy terrain means that it’ll be hard for you to be efficient and maximize your party’s potential. You may find yourself vulnerable but again be wary of Blaze 2. If you want just send Max into Manarina to end the battle.
Manarina
Talk to Anri to the north. She can’t believe the news of her father and goes running off.
Take the east path to get to the northeast corner of floor 1 in that building. See that weird amphibian-like machine? Search it for a Domingo Egg. This will prove useful later. Go up the stairs and speak with Arthur, a timid Knight. Anri is near him and she’ll join you. She’s like Tao, but a Freeze specialist (though she starts off with Blaze herself).
Cavern of Darkness
Back to floor 1. Speak with Otrant in the northwest and then go down a few sets of stairs. You will be at the Cavern of Darkness.
Lots of treasures in this battle. New enemies too you’ll see, as these Skeleton’s are like Zombies but stronger and with better defense (can’t poison you though). Before you set forth into that area though, have Anri gain some levels casting Blaze on the first two Zombies. Then get the Wooden Staff and a Power Staff. The southern part of the screen has a Medical Herb and Power Ring. The Power Ring is arguably the most useful support item in the game as you get it early and it bumps up any members attack by 4. And if you cast it in battle, it raises someone’s attack by even more (for a temporary time period though).
Again, the Bats shouldn’t prove an issue save for a minor annoyance with Sleep. The three Dark Mages should be taken out by your weakest characters since pretty much anyone can do damage on them physically. The Skeleton is guarding the Orb of Light treasure. It has a high defense but Blaze will eat it up.
After returning with the Orb of Light, go north and use it at the pool. A spirit will talk to you about Max’s destiny. Return to Otrant to learn more. When you regain control, head to Arthur and he’ll join now. He’s incredibly weak starting off but is rare in that he learns spells much later.
Rindo Circus
Back in Rindo, the circus is going on. Speak with the mayor and he’ll say that you can have his ship if you find his grandson who has been missing today. Head to the circus and enter.
Of course enemies ambush you. A boss is here too, a tough one at that. Marionette has Freeze 3 which is just ridiculous at this point.
The puppet enemies are weird to say the least. The yellow Evil Puppets cast Freeze so you may wish to kill them quick. The bats are for Arthur to hunt down. The Evil Clowns don’t move so just have Hans and your magician pick at them to death. You may wish to get the treasure FOUR spots away from Marionette to the east, as it’s a Steel Arrow for Hans. Once all the other enemies are killed, have the Power Ring user use the Power Ring on one of your best attackers. Then have that character run in and do the first blow, while having your other characters gang up on him too. The characters that attack him from afar will get destroyed by Freeze 3 but if you can get Luke or Gort to score a few Power Ring augmented hits, you may see half his damage go down in one swing. That other chest next to the Steel Arrow is 50 gold, so that’s not worth going after until the battle is over. A Defense Potion is to the east also.
Go back to the mayor for your ship reward. Now go to the ship and it seems all is well. But of course it’s not that easy – in fact it’s easy for Mishaela to burn down the ship and make you walk the long way around the continent. Return to the mayor and his son to hear about Shade Abbey and Uranbatol a long ways away. Revive anyone that died in the previous battle (surely someone did) and get ready for Shade Abbey.
Shade Abbey
This place used to give me the creeps really bad when I was younger. Honestly even now it does. Amon begs for help at the very beginning.
Everyone says weird stuff, and then they follow you! Slowly preventing you from going south. Uh oh. Eventually to the far north you’ll see Balbaroy, the fellow Amon was looking for. It is now that you realize you are screwed, stuck in Darksol’s trap.
This battle isn’t as intimidating as it seems, though having Max sitting there alone is never fun to see. Whatever you do, do not retreat back in the corner, as you’ll get ganged up on and beat down. Just run as far south as you can with him and have the other characters rush in. You’ll take heavy damage but it’s the only way to get Max back to the party.
Rely on your Mages in this battle. Their Blaze spells are really the only option for penetrating the Skeleton’s and Zombie’s hide. There are a lot of Skeleton’s and you’ll realize how difficult they are in this battle. Just try to use your best defensive stalwarts like Mae and Gort in the front lines and heal them continuously as they absorb the brunt. You’ll thin their forces eventually.
The Ghoul never moves. Even if you cast spells a space away, it won’t chase. But it’s attacks do do a decent amount of damage and the Ghoul dodges physical attacks well. Arthur is about as good as dead if he gets hit by a Skeleton – once. Tao is who you really need to lean on as her Blaze 2 can really screw these guys over when they inevitably cluster themselves together.
After the battle, you have Amon and Balbaroy on your forces. They can fly! But are a tad on the weak side. Anyway, it’s the end of Chapter 2.
End of Chapter 2 – Spirit of the Holy Spring
Beginning of Chapter 3 – Secret Weapon of Runefaust
Bustoke
You start off in the mining village of Bustoke. First things first, revive anyone that died. Then go to the weapon shop. Remember how you couldn’t pierce the Skeleton’s armor? Buy some Power Spears and see the difference. The Axes are also worth your time to purchase.
Go up to the castle like area. There is just a maid there, and an archer lady named Diane. She joins you. There will be more stuff to do after we finish this Quarry incident. You will probably want to go to headquarters because now you have more than 12 active characters, so Diane, Amon and Balbaroy are in the reserves. Depending on Hans’ level, I generally either dump him for Diane or keep him if he’s far enough ahead. However Hans is weak towards the end of his first class and only gets better towards the end of the game, so you may wish to take Diane who is more balanced throughout. I also generally switch out Arthur here or a Healer for Amon or Balbaroy because the flying element is useful. Though the Birds will be weak for a bit as they only have Middle Swords to use (hint, if you use one you may wish to give them the Power Ring for a little boost). We need to help this Zylo monster with Moon Stone. If you head east and a little south you’ll talk to the chemist and then just go to the Quarry.
Two Skeletons greet you. This upcoming part is best if you have a flying ally as you can attack the Dark Elves from the sky. They have a weak defense but extremely dangerous attack so watch out. Also you meet Dark Priest, basically enemy healers. The most annoying part about them is that they dodge far too many of your attacks. The Mage at the bottom has more HP and is capable of Freeze 2 – plus there is a Lizardman down there, tough brute enemies.
The enemies towards the bottom don’t really move (notice a trend in this game?) so you’ll want to peg away at that priest and the Skeleton / Lizardman combo first before getting the powerful mage involved.
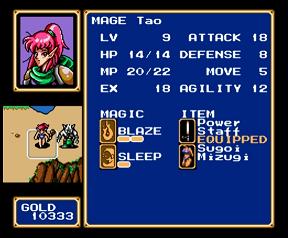
Afterwards, enter the mine. Go up a few spots then left to that southwest wall. Face south and search for Sugoi Mizugi, an interesting outfit for Tao. Get the Moon Stone too of course.
Back to Bustoke and the chemist specifically. He’ll hook you up with Lunar Dew and then you gotta go to Zylo’s quarters in the far northwest of Bustoke. Use the Lunar Dew as you face Zylo and he’ll return to his senses and join you. He is an absolute monster that only slows down for a short time when promoted, which leads us to another topic.
Promotion is coming up as any character who reaches level 10 can be promoted to their next class. Some things to keep in mind though. It is recommended you take most characters at least a few levels past 10 as each character loses stats when promoted initially. This may seem annoying but once you start gaining levels and seeing the stat increases you won’t mind. But if you promote characters too early they can become ineffective (especially those without weapons to compensate like Zylo).Check out the other houses in Bustoke to meet Kokichi. Search his machine and then talk to him. Go out back and watch him crash his stuff. Make sure you do this. Before taking the north exit towards the bridge, you may wish to bring in characters who move well in forests.
As you get out, you’ll see why. You have a long ways to go north to the bridge. Fortunately the enemies up front are incompetent. The Skeletons are barely hanging on, and the Dark Elves act weird here (they just move a space at a time, never toward you).
The Pegasus Knights fly around the area and dodge your attacks like crazy. Easily the toughest enemies here. Not much to note about this battle other than the traveling to the bridge doesn’t take too long once you kill all the Peg Knights.
 Make sure you are prepared for the Laser Eye battle. This thing takes about 4 – 5 turns to warm up and then shoot – and it hits everything in it’s path. When it’s turn is up you can see the radius for the gun that you’ll want to avoid. Those five spots east along the path and nestled south mean that you can only have 5 characters avoid the laser beam at once time (of course unless you have someone who flies, as they can easily fly south to avoid it. Your other characters should wait and charge in afterwards. Have your best Knights with Power Spears go to the spots as they can kill the Dark Elves.
After the first shot, rush through with everyone and kill the remaining enemies near the Laser Eye. Once it is isolated, just pound on it with your best characters to destroy it. Not much else to mop up, only a Lizardman, Priest and Knight. Pelle climbs his way up and joins you. He’s a top knight – make sure to put him in once Chapter 4 starts.
THIS IS A GOOD THING WE HAVE THIS
When I try to give Zylo the Lunar Dew all he says is what do you want go away or I’ll tear you up