Final Fantasy VI First World End


Narshe re-visit and other random things
Before going back to Narshe like everyone suggests, go to Tzen and talk to the guy in the northeast part of town, in the woods-area. He’ll tell you about a group of people breaking into the magicite factory (that’s you) and he’ll say how he managed to get an esper, Sraphim. He sells it to you for 3000 GP – a good deal for the best early healing-based esper.
It’s been a while since we’ve had a chance to go to the Veldt, so all the enemies you have defeated since then will show up there. That is a good place to build up Gau’s Rages as well as learn some magic. If you’re interested in quickly building up magic for your characters, you can go to a strange island in the northeast with Leafer’s, Dark Winds, and the occasional Intangir. The Intangir is a Behemoth-looking creature who starts the battle off invisible and already has a ton of hit points. If you can manage to kill him, you get a massive 10 magic points. You can learn even the most frustrating magic abilities up to this point (like Drain) with only 10 battles. What’s the trick? You need someone with the Doom spell, but it is costly on your MP so I suggest you learn that with as many characters as you can (Shoat Esper). Intangir will always counter with Meteo, but it misses sometimes (maybe 10-20%). If it hits, it’ll take off roughly 900, probably killing you at this point in the game.
Not much else to do, so back to Narshe and a guard escorts you to the Elder’s house where Banon and Arvis are also present. Banon suggests getting Terra to form a bond with the Esper’s, and Terra agrees to go to the sealed gate and get in, whether the empire is protecting it or not.
Before you leave Narshe, go back to that house in the very southeast, where all the treasures were (including a locked one). The thief Lone Wolf will have opened that treasure, and he’ll then leave. Follow him north to the caverns (you’ll know you’re going the right way because he’ll come out every once in a while and say something) and eventually through the snow field to the peak of the mountain by Tritoch. He’ll be holding a moogle hostage – just don’t do anything and the moogle will get out of this predicament but into another one. Both the moogle and the wolf are on opposite ends hanging on by a thread.
So you can choose, Mog or a Gold Hairpin? While you can never learn Water Rondo (not that you’d ever use it anyway) Dance with Mog if you don’t pick him here, that extra Gold Hairpin is probably more valuable at the end of the game. You’ll still be getting Mog, it’s just a bit later on. Both are good choices but it’s up to you.


Sealed Cave
Time to move on to the Sealed Cave, which is just east of the Imperial Base (which is east of Albrook). If you went here earlier, you were kicked out, but now there are no soldiers. Of course bring Terra, and I had Cyan, Setzer and Sabin with too, three characters I haven’t used in a while.
There is an Assassin Dagger in the first area, so grab that and go south. Get the Tempest on the west fork and then go east for the exit. You’ll come across many undead monsters around here, so Cure and Life will work on them. Ing’s have a Lifeshaver ability that can kill your characters in one shot (and drain your hp in the process). Careful of this, it might be wise to single them out because of this.
In the lava / bridge area, just sit back and watch the pattern for a while. It only switches twice so make sure you’re on a safe spot. The Coin Toss relic is in the southwest corner and an X-Potion in the northeast. The Coin Toss relic is a good one for Setzer, turning Slot into Coin Toss. Just remember, that’s your money he’s throwing so as powerful as it is, remember you’ll never have any money if you use it too often.
Continuing on, take the right path for an Ether and the left one to continue. Go up the hill area and hit that skull switch and you’ll fall. Go left for a Genji Glove and then right to continue. You’ll come to an area with three switches, so go to the two that are near eachother (to the north). If you choose the left one, you’ll come a path, and if you choose the right one, a Ninja will fall down and you’ll fight him. He’s pretty difficult with his Skeans, and strangely enough you can continue to push that button and more Ninja’s will fall down and say the same thing as him. Anyway, inside is a Save Point and a Tent.
Go outside now and right and hit the switch – a path will open up, and grab the Ether when you can. Return east and walk through the wall going north, and get the Elixir as you get out. Ignore the switches and go south and then west to hit a switch. This opens a path just east of this switch into a cavern with two Magicites, an Ether and the Atma Weapon. The Atma Weapon is a unique weapon that’s power is based on your HP level.
Further right and you’ll have to hit two switches (and return west to hit a switch in a treasure), allowing you to get on land, where you can get a Magicite and continue east to the final room. Now you’ll be at the gate and Terra will call on the espers, but Kefka will be there at the same time (he followed you). You’ll battle Kefka for a turn or so and the espers will spill out of the gate, and then the gate will be shut.
Kefka is gone so return south and take the south exit to leave. Back through the Imperial Base and into the airship and you’ll have a scene. The airship will go down from damage and you’ll end up by Maranda. Walk to Vector.


Vector
When you go in, the city will be trashed. You’ll see Banon and Arvis walking around too. Further north and you’ll be greeted by a Gestahl goon. He’ll take you to Gestahl, who will tell you he intends to end the war as he’s scared of the espers. It’s time for dinner, but first you are supposed to talk to as many soldiers as you can. You have four minutes to do so and this is actually important as some important items are at stake. Talk to all the soldiers immediately south of you and then go outside via the south to talk to some more. Return inside and go left and in the first room for a Back Guard and X-Potion.
Up a flight and you’ll be in a room with lots of soldiers. One will fight you in here and one will fight you in the bathroom to the north. Easy fights but be quick. Grab the Tincture and leave and continue of the stairs. You’ll be on the roof and you can talk to some more guys here and further north is one more soldier who will fight you. Return and make your way east and then start going down the stairs and enter the first room. You’ll be in a library of sorts, with a Gale Hairpin in here and then a Revivify in the room just south of that. This should be the end of it, you can go see Kefka in the prison below but you talked to your 24 soldiers.
At the banquet, you need to say all the right things to Gestahl. I’ll make it simple, here are the answers to the questions.
1. To our hometown.
2. Leave him in jail
3. That was inexcusable
4. Celes is one of us
5. Ask the first question to Gestahl. He’ll then want to talk about espers, but first ask him the other two questions. Be sure to remember which of these three questions you asked first (and do not ask these questions more than once). Agree to talk about espers now
6. Yes the espers have gone too far.
7. Gestahl will then ask you which of the three questions you asked him first. Hopefully you remembered…
8. Cid will ask you for a break, and agree to take one. Go on the other side of the table and talk to the soldiers to fight three SP Forces.
9. Return to the table and ask him “That your way is truly over”.
10. He’ll ask you to go to Crescent Mountain with Terra. Agree.
The banquet will be over now and Locke and Terra will go to Albrook and then will ride a ferry with General Leo to Crescent Mountain. The other members fear that they are being fooled by the empire so they are prepared for that scenario. Unequip everyone and then get Locke and Terra ready to go.

Imperial Base / Albrook
Before going to Albrook, stop by the Imperial Base first. Gestahl backed his troops out of here if you did well enough at the banquet. Start by going in the first building to the right and searching the oven for a Flame Sabre. The treasures are; 13,000 GP, Wall Ring, 20,000 GP, Running Shoes, Elixir, Ether, Cherub Down, X-Potion, Back Guard, 8,000 GP, and the Cure Ring. Quite a haul I’d say.
Now at Albrook, go to the port to find Shadow and Celes. Leo will explain things and then it’s time to rest for free at the Inn. Locke and Celes will have a scene at night and then it’s time to go back to the port the next day to leave. As you sail to Crescent Island, there will be more dialog with Terra and Leo, and then Shadow as well. Eventually you’ll get to the island and it’ll be Locke, Terra and Shadow ready to go.


Thamasa
This is an interesting village. If you investigate you’ll notice they know about some weird magic. You can buy some great weapons and armor here if you’re interested, but the Inn is very expensive.
Instead go see Strago (older guy) and then Relm. These are two new characters, and Strago plays dumb about the magic thing. Relm sort of spoils it but Strago still denies anything. Go back to the Inn now and since you’re not a stranger you can rest for 1 GP instead of 1500 GP. In the middle of the night, Strago will come in and ask for your help as Relm is trapped in a nearby house that is on fire.
Inside, you’ll see little fire balls that are battles against (you guessed it) fire-based enemies. Ice and Aqua Rake (Strago) can take them out easily. At the first choice of doors, the left one is an endless pincer attack from four monsters, while the right door continues on. Then choose the right twice to find a Fire Rod and then an Ice Rod. The left path in both cases is the exit. Further north is the Fire Eater.
The Fire Eater calls upon the support of four little fire monsters, who are easily wiped out by an Aqua Lore or an Ice 2. Soon he’ll go down and Shadow will save the party from a peril. The next day Strago agrees to help the party look for the espers, accepting Terra’s request. There is now a mountain to the west that appeared, which you should visit when you are ready.


Crescent Mountain
Upon entry, grab the Heal Rod and give it to Strago. Now he can full-cure anyone on your party with one attack. Ignore the left and north paths as they are a loop, and go northeast instead (you’ll see Relm running about). Further along and you’ll get to some statues that you’ll examine, and then Ultros will get the jump on you.
Use your best spells on him and he’ll go down, but Relm will join in. You have to Sketch Ultros’ portrait to win, so do so. Now you can continue on to a room with three holes to drop down. Take the north one for a Tabby Suit and Chocobo Suit. Then take the east one for an X-Potion and the south one to meet the espers.

Thamasa
They’ll all be in the town talking about peace with General Leo heading the talks. Eventually Kefka comes in and spoils the party, turning all the espers into magicite. Espers will rush from the sealed gate but they suffer the same fate. Kefka has gone corrupt again and has taken control of all the espers.
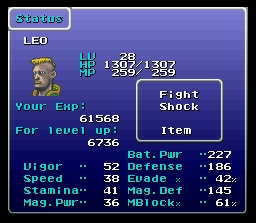
General Leo can’t stand this so he fights Kefka. You can look through Leo’s profile to see how good he is – defeating Kefka is easy, but it’s a fake Kefka, and the real one kills Leo no matter what you do. The party mourns his death and apparently Shadow has passed also. Fortunately the rest of the party has already flown over here, having heard of the coup beforehand. When the party gets back in the airship, Kefka and Gestahl will be by the three goddess statues in the Floating Continent (way up in the sky where the Imperial Base once was).


Floating Continent
You can choose to get here through the airship commands. First though you’re going to want to make sure you have all the sidequests done around here, like getting treasures (Beads) at Doma, buying Golem and ZoneSeek espers at Jidoor auction, and fighting the Intangir to get magic. If you chose Mog you might want to get the Water Rondo dance as you won’t have another chance to get it.
Three characters need to be chosen, and I’m taking Edgar, Strago and Gau, because I like them and because Strago can get some Lore Magic up here.


You’ll fight Spit Fires and Sky Armor for a while until a Curious creature emerges. This creature is Ultros and Chupon. They work their way to the right side of the ship, where you should meet them for a battle. Ultros starts it off and after a bit of damage with level 2 magic and other good abilities, Chupon comes to aid him. Continue to work on Ultros until he dies, which will make Chupon a lot easier. Chupon will eventually Sneeze you away into another boss battle.
Okay so you’ll want to kill the side parts first with your best attacks quick. Soon a Speck will be launched that absorbs all magic you use, and you’ll want to use the Drill or physical attacks on it quick. About this time the main unit will be attempting a countdown attack, so be full health if he is to get it off. After the battle you end up on the actual Floating Continent.
Yep that’s Shadow next to you, talk to him and he joins.
Go east and get the Murasame and then farther east to reveal a path to a new treasure. Note that these treasures are blue dots, not normal treasures. Rest up before you get this though as you’ll be fighting Gigantos. He is weak against Bio but it’s hard enough to get a few spells off. Your reward is a Hardened for Shadow, and then you can take the elevator just west of this.
Go south and hit the switch, and then go south again and then east (the only path you can take). You’ll get to an elevator, which will take you to two more elevators. The right one is a dead end so take the left one. Hit the switch by you and then go north and hit another switch.
Circle around by going west and then south, so you can take a new path (the floor that got lowered) and make your way east. Continue going all the way east until you get a Beret, and then go south. Here you can find a Save Point, and then you can return west and hit a switch that opens a new elevator. This takes you to the airship if you want to return. Remember, Shadow will not come back with you.
If you want to continue, go west through the wall and you’ll come to Atma Weapon. He has some powerful attacks and counterattacks, most notably being Flare, Quake and Quartr. Keep your HP above 600 and use your best attacks. It’s all dependent on who you bring, but Shadow throwing Skeans works well and you can steal an Atma Weapon from him if you’d like. Shadow will leave the party after the battle and further north are the statues.

Floating Continent Base
Kefka and Gestahl are admiring the power of the statues as you come up. Celes joins you but Kefka knocks her off and locks up your other three members. Celes is then given a sword to kill your three characters, but she turns around and stabs Kefka instead. He goes insane and starts messing with the statues, causing Gestahl to get upset.
Gestahl then fight Kefka, but Kefka can’t get hurt by Gestahl’s spells. Uh oh. Kefka instead gets the goddesses to go after Gestahl, and eventually lightning strikes right on top of Gestahl and he is out. Kefka kicks him off the Floating Continent and then messes with the statues some more. It is not until Shadow comes out to stun Kefka that you get a chance to escape.
Celes and your three chosen members will be on a new area of the Floating Continent and you will be timed to leave. You’ll have to fight lots of random battles against “Naughty”. Not very difficult, they are Ice-based so you may want to use Fire magic to get him dead quick. You’ll see a blue treasure at the end – but don’t go straight east to get it, instead go south, east, north and then west (basically, circle around it or else that part will fall through). It’s only an Elixir though. The flashing blue light to the east is a boss, Nepara, who will use Condemn (Strago can learn it). Other than that he’s not too hard, don’t use magic just your best physical attacks.
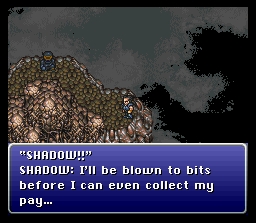
When you go to the part where you can jump to your ship, choose to Wait. It won’t be until the 5 second mark that Shadow makes his appearance, but make sure you wait for him otherwise you won’t have a chance to get him later.
Everyone jumps on the ship and the world is disintegrating in front of everyone’s eyes. The land is being ripped and the world map is changing. The airship is ripped into two and everyone goes their own way.


For any wanting to know ZoneSeeker ran me 10k Gil and from the looks of it Golem will run you 20k Gil. I’m not sure about golem cause I only had 19k during his auction figured it would be enough