The Dorgenark
You’ve finally made your way to the Dorgenark. Find the transporter ahead and save. East of Steve you’ll see an elevator, so choose to use it. When you get off take the south path and that’ll lead you to the deck. After a scene with Kisala – Dorgengoa’s daughter, the one who saved Jaster, you’ll get in a battle against three Deviler’s.
Just use jump attacks to get these things on the ground and then pummel them. Your ship will be out of control after the battle and you’ll crash on the planet Juraika.

Jungle Planet Juraika
Kisala and Zegram join Jaster as you begin to look at this new planet. You’ll get a quick tutorial as this is where your first real exploration begins. Go to Simon and he’ll add some things to the Info Edge. To exit the ship you need to go to the Landing Gondola on the deck.Save at the transporter at the bottom. You are in the Rhyzas Swamp.
Run ahead and speak with Uttaro if you want a shop, and get the Graverosse next to him. Further ahead until you get to a sign and you’ll be on your way to Burkaqua Village. More south and you’ll reach some treasures, like Sanchez Fruit x4 and Bolt Shuriken. Soon you will be greeted by the Burkaqua Tribe. Save at the transporter and you can go east or west now.
Take the east path all the way for a Myriad Branch. Eventually you’ll come to a transporter and then a house. A treasure is in the house but it’s locked (Star Key). In the far southeast is a Heal Potion x2.
Back to the west path now, and at the very west edge is a battle against a Mimic. These creatures are incredibly tough and will take off around 150 if you get up close. Use your abilities and try to block his attacks, and be cautious of his fire as well. The Graverosse will be a tremendous help for you, once you’re able to block / evade his attacks. Having your party Step Back should enable Jaster to single out the Mimic with it’s gun. After this fight you can go north on the minimap and you’ll see two more treasures – one another Mimic and the other a Dreamflower Ash (the mimic is the one to your right as you run up to the fountain, if you’re wondering). For defeating Mimics you acquire Hunter Coins.
Take the north path now and you’ll have a challenge battle (defeat all monsters within 30 seconds). You’ll get a Hunter Coin for doing so (it’s easy, against three Gorra’s). Up ahead is an Earth Key treasure and a gigantic statue blocking your path. Look on your minimap and you’ll see a red arrow heading to the house. It is actually Filio’s house. Filio has the Power Glove and he’ll give it to you. He also speaks about Burkaqua. Back to the north part and to the big statue blocking your way. You’ll be prompted to use an item so find the Power Glove and use it. You will open a path.
Jump through and you’ll see a Cumulus Pendant and Resurrection x3. Follow the path and you’ll see another transporter across the river. Continue south this way and another challenge will come up – it is for Zegram to defeat only (in 36 seconds, four mushrooms). Kisala had the same challenge shortly after. Back to the transporter and go west along the river.
The first treasure you see is a Silver Bangle. A shop is nearby – you might want healing items, and you will definitely want Pirate’s Glaives, Half-Moon Rising, Shuriken Deux, and maybe the Rock Crusher. Shortly past the shop is another chest, which is another Mimic. Use the Bolt Shuriken or Shuriken Deux and the Graverosse too.
Move along and you’ll come to a battle where the enemies drop the Ancient Scroll. Use this to learn the Burning Strike. A treasure will be up soon, a Spirit Bell, and then a transporter. You’ll see a house ahead and you’ll meet a guy who makes Bombs. Dario will give you the Bomb and then a letter for the Burkaqua elder. Time to go back to that stone barring your way. Before you get there though, go north of Dario’s house to find a Queen Bee Stinger.
After bombing the southwest wall, continue south and you’ll find Heal Potion x3. Shortly after, a four way intersection; take the left path (east). Right away you’ll see a Tri-Heal treasure. You’ll get to a spring with two treasures, the right one is a Mimic and the left some Pirate’s Grog. This is valuable for getting Drunken Burst. Return the other way and go west. You’ll come to a transporter and then two treasures, Divine Healing x2 and Yago Milk. To the far west is an Earth Key treasure.
To continue onward, go north and you’ll see another treasure. It’s a Mimic and a difficult one at that, as the screen is very thin so you don’t have much room to manuever. As you continue east you’ll find two Hellpot Flames and then a scene with a little kid from Zerard and he gives you an Insector Trap I and Rearing Cage I. Also, some Sanchez Fruit. For the Insectron Tournament. A bit ahead and you’re at the village.
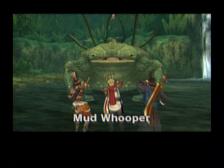
They’ll turn you away, so follow the red arrow until you get to the transporter, and then save. Up ahead you’ll see Miri and Lilika. Eventually the Mud Whooper will grab Kisala. For this battle against Mud Whooper you get Lilika and you’ll want to start off the battle by stepping back and firing shurikens or guns at it. Spam some of your long range abilities at it and then just start hacking with your entire party, using Healing Potions when needed. Lilika kills the Mud Whooper and then Kisala is freed. You get a Rock Crusher for your efforts. You’ll talk with Lilika and Miri some more and then regain control.
Walk towards the red arrow and you’ll meet Toady. He can fuse together two different items. You get a Ridge Crusher. He can make cooler items for you if you let him come along. You now have Synthesizer Toady. You can now use the Frog Log to synthesize similar weapons to create stronger ones.
As you get close to the village you’ll see the effect of the Dark Fruit on a native. Save at the Transporter. Go across the bridge and in the house for Dreamflower Ash and Mellow Banana. A bit west and you’ll see a ladder, climb it and find the Recharge Drink x3. Go east and on the ground you’ll see a Juraikan Coffee Beans x3 treasure. The nearby house has Star Earrings and an Earth Key treasure. Go further south and up a huge ladder for an Ancient Scroll I. The shop by this has plenty of things for Kisala, Zegram and the others. Up some more and in the southeast corner you’ll see a Spirit Bell treasure. Go to Ugozi’s, the Chief. Some scenes with the chief and others. Miri will be the sacrifice.
Path to the Altar
Go to that lower right house with the yellow star. More scenes, and then it’ll be day time. Follow the path north east in front of you, the Path to the Altar. You reach an intersection so go north (down). You’ll get to another intersection so go northeast to get to a shop and a transporter. Save and go all the way north for a Queen Bee Stinger x2 treasure. Go to the northwest this time at the previous fork and you’ll see a treasure, and it’s a Mimic. All the way north and you’ll be at a transporter. Go east to continue. You’ll meet a guy who might let us in, for a present. He does have a Ruby next to his house and Myriad Branch x2 before you pass the bridge. You’ll notice a red marker and Yellow Star far to the south (the other path at the initial fork). Go here. You’ll come to a transporter. An Earth Key treasure is just south of here. A huge ship is crashed here. Jaster finds a Freeze Shot.
There are treasures in the far east, like Magic Lipstick and Heal Potion x3. On the other side of the crashed airplane from here is a Frozen Slasher. This weapon is sick for Zegram. Also on raised land just west of here is Hoho Bird Feather x4. Teleport near Sherio’s now and go to his house. As you get there, Sherio throws out our purple-haired buddy. Sherio then sees the Freeze Shot. He fixes it and Jaster tries it out on Sherio and it definitely works. Thanks alot for fixing that Freeze Shot Sherio. You can try to get the treasure on the 2nd floor in Sherio‘s but you don’t have a Star Key. Now with the Freeze Shot you can go to the Waterfall (take the east fork to get to the northeast part – you’ll have to swim to the red question mark. Use the Freeze Shot here obviously. However you need to check it again and use the Monography Shot to shoot several platforms up. You’ll see a Jungle Coat for Jaster. Make your way to the top, then start swimming east. Along the south end you’ll see a Snow Crest treasure.
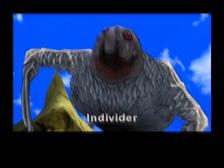
Zegram will disappear as you run along. He’s on his celly. Run south and save at the transporter. You have a boss fight coming up and you don’t have Zegram to help. It’s the Star God, Individer. He doesn’t look easy. The key is to use the Freeze Shot and then hack away with your best offensive abilities like Flash Sword and Illusion Sword. When he rolls around he’ll take off massive damage so have everyone defend when your Freeze Shot is charging up. Lilika comes in midbattle to help you. Zegram conveniently shows up afterwards. Lilika is banished from the village. Zegram found some Booster Oil. Lilika is waiting by the ship and she wants to come with. Inside you hear about a Galactic Passport. You are given one but it is an Expired Galactic Travel Visa. It’s time to leave to Zerard. You shall see a scene among some people that you don’t know, named Norma and another mysterious figure. Soon you make your way into Zerard, a metropolis with airships flying everywhere.