Vedan
After some scenes you’ll end up in Vedan with Kisala. Before going onto your Vedan Mining adventure you should teleport into the control room after hearing about Interplanetary Travel. You can now travel to the previous planets you’ve been to.
Zerard
Go to the deck and you can travel to Zerard. At the Galaxy Corporation you can check your completion percentage and also trade in your Hunter Coins for a Silver License (if you have over 20). You can come back later for a Gold License at 40 and Platinum at 60. The better the license the better deals / items you’ll come across. On the other side of the desk you can buy information on Hunts. You might as well sign up for the Tomb Guardian and Cave Bandit hunts. Teleport to the Star Ship Factory. If you talk to the people around here you’ll get various blueprints and you can also find some new treasures. Warp to the Assembly Line 1 specifically and enter the door. Use the south elevator and then go to the northeast of the upper area. You’ll have to fight very dangerous Assault Walkers and especially tough since you have two characters. I was only able to penetrate their defense with a Burning Strike so I saved this sidequest for later.
Juraika
Head out to Juraika the Jungle Planet. You land in a different area. Go north to the new transporter and get the Heal Potion x2. Teleport to the Star God’s Altar. Go straight east for Magic Lipstick and Antidote x2. Go to the elder’s house and you’ll see a treasure shining ahead – it is the Earth Key.
Teleport to the Creekside now. North of here is the Dynamite Hands, an Earth Key treasure you can now get. Go to Near the Spring now, and go southwest. In the corner is another Earth Key treasure, Thunder Stone x2. Teleport to Burkaqua Village and go to the 2nd house you see (second going south) and you’ll see a Wishing Stars pair of boots. One last Earth Key chest in Juraika – teleport to the Crashed Cruiser and go south for an Ancient Scroll I.
Zerard
There should be Earth Key treasures in Zerard. Teleport to the east side and go southwest to the shop, and at the top level is an Earth Key treasure (another Ancient Scroll I). Teleport to Assembly Line 2 in the factory and go to the southwest for an Earth Key treasure, an Electric Eel.
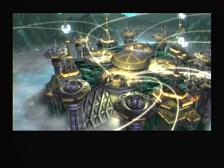
Planet Vedan
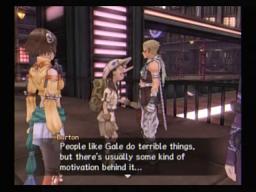
Ride in through the platform and ride another platform and you’ll be on Vedan. Talk to the shop guy and look to see he has shields. Go to the northeast for Ruby and Mirror Unit x2. In the southwest area is another chest, Lubricant x3. Begin heading south, looking on the east for a Super CPU. Now go south some more and look west for Lapis Lazuli x2. Go inside the train bound for Myna Station. In the southeast you’ll see a Star Key chest. A bit after you see a trapped chest so choose to untie the thieve’s trap. You won’t lose your money and you receive Combat Master. Further ahead and you’ll be at Myna. You run into Burton. He tells you of Angela’s Bar. Then you run into the Morarty Clan. Six of these hitmen will fight you. They are not too difficult although they can pester you with quick attacks. Save at the transporter. Head west and drop down, then head south along the west wall. Against the south wall you’ll see a Dustbox treasure. Go all the way east and then south and you’ll come to a Sun Key treasure and Electric Eel. A bit farther east for a Snow Crest. You’ll reach an east / south intersection, so go south and it’ll continue east a little. As you go further south look east for a Carbon Alloy chest. Further east for Yago Milk x2. If you went south at the transporter then you’d reach a Mellow Banana and Star Key Treasure on your left. South a bit more and you’ll have a scene with the mafia, as they knock down Chie and her mom. When you regain control go east along the wall, getting the Flame God’s Stone x2. Turn towards the center to see a transporter. West of here is a Stella Crystal and Perfect Heal x2. Southeast of here for another Dustbox. Further east and you’ll see a transporter. This is Zax Morarty’s Mine. Northeast of here for yet another Dustbox treasure fight
Take this path along until you see a four way intersection. Go across and northeast to a Stella Crystal. Go northwest along the map until you reach a transporter and a shop. Inside there is a Primeval Beef chest but it is trapped so you’ll need to choose to untie it (thieve’s). On the other side there is a Diamond. Back to the fourway and go northwest and you’ll see a transporter and a shop. Inside are plenty of quality weapons for you. Head all the way west if you wish to get to the beginning, or head west a little and south to get to the middle area. At the fourway again, jump down and talk to the guy to get a blueprint. Save at the west transporter. East there is a Tri-Heal x4 treasure. Go north for Max Heal x2 and Fire Shield. Continue to head in the northeast direction and you’ll come to a transporter. Southwest of the transporter is Hard Candy x2. In the northeast here are Mercy Sprites. Most of Vedan is explored, but teleport to Angela’s Bar yet don’t go in. Go west of here. Out here you’ll see a Snow Crest x2 after going up a ramp. There is a transporter here too. Teleport back to the bar and go in.
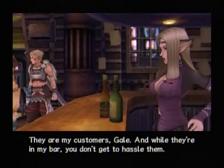
You’ll see Deego and Angela. And Gale. Deego joins you and you are to go to the black market to get an ID Card. You’ll want to get Deego’s Revelation Chart up to speed and then save. Teleport near the X, the black market. Inside is a rigged chest, so untangle thief’s trap for a Walkie-Talkie. Another chest is an Energy Charger. Talk to the shop guy for a Mine ID Card for 1500z. Leave the shop and you’ll have a battle. Back to Angela’s now. More scenes with Deego and then you are to go to the mines. Before that, go to the northeast. The Tomb Guardian Flabergazer is here. Save at the Observation deck and then go to the thinking circle. Use a Mirror Unit and the Flabbergazer will appear. You will want to use Flash Sword, and probably just have everyone else stand back and be ready to heal Jaster. You can’t knock the Flabbergazer down but if you jump high enough and are a decent distance away, you can do all three jump attacks and dodge Flabbergazer’s double punch. His earthquake can also be evaded by jumping. You get Guardian 44 for defeating him. This is a pretty good secondary weapon to throw in the mix for Deego.
Rockbelter Mine
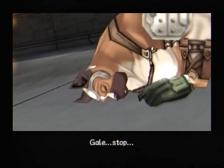
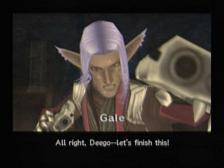
Enter the mines from the southeast. Get the first treasure you see, although it’s a Star Key chest. Get on one of these trains to the mines. You’ll be at the Rockbelter Mine Station. You’ll see two chests to the east, a Lapis Lazuli and Flame God’s Stone x3. Further ahead for a Ruby. Soon you’ll reach some Morarty mafia members, and Deego will give them the ID card. You’re in, so go straight ahead for Dragon God Skull. Continue north and you have yourself a Mimic treasure. You’ll reach a fourway where you can drop down and go north or south if you want – choose to go south and get the treasure, a Tri-Elixir x2. Make your way northeast (you’ll see the drop down / bridge paths intersect here) and you’ll eventually see a Lapis Lazuli. If you fight a Volcano around here make sure to jump and attack it. Anyway, further east is a transporter and the elevator. Don’t use the elevator yet though, go west and south and under the bridge is a Medusa Lock. Not much else so go northeast to that elevator. You’ll be on the Mine 2nd Strata now. There is a Myriad Branch treasure outside. Go south – the east / west path leads to nothing. Further south is a shop, and then you can jump down and go east. Another intersection, so go south for Premiere Toy Box. That’s about it over here as it comes back to south of the shop. Directly south of the shop is a bridge, underneath having a Hellpot Flame x2. Further south and you’ll see a Star on the map, but nothing is there. Continue along southeast to the elevator. Save and use it. You’ll be at the Excavation Site. Get the Electric Eel. A bit ahead and a battle against Gale and his Early Model Drill Rig. You’re going to have to jump attack his arms, maybe shoot them if you’re at the right angle. Once his arms are gone you can attack his center. Just heal up and be wary of his attacks and rolls toward you. Well now it’s time for a boss battle against Gale. You only have Deego to use. He shoots his guns at you rapidly and also just once. You have to be quick to block basically (which is right after you’re done with the axe). As you do more damage he’ll switch his attacks up (and actually gets easier). He’ll jump and shoot, and he counters you less.
After the battle, some scenes with the tablet and Gale. Gale gives you an Officer’s Coin. When you gain control get the three north treasures, Alluring Lamp, Ancient Scroll II (trap), and Lapis Lazuli. To the south is a Thunder Stone, and a Star Key chest. Go west in the next room to find a Retro Boombox. Further to the west is a Heavy Attachment. In the southeast is a Flame God’s Stone x3. If you signed up for the Cave Bandit, and ? will be on the tablet altar. Going up to it and using a Stella Crystal brings out Paul the Ripper, the Cave Bandit. Just a hint, he’ll probably work you because he has a really high defense and will basically kill you in one hit. Fight him later on. Deego wants to go back to Angela’s now. She has left. Leave the bar area and teleport towards the trains to the north. When you get there Angela will be leaving. Some scenes with Zax Morarty and Gale. You’ll be leaving with Dorgengoa after Daytron to get the Tablet. Dorgengoa flips Jaster a Dorgengoa’s Coin. All the space pirates get this. It seems Daytron is going toward Rosa. Some more scenes here and at the transporter. If you didn’t get the Star Key here you’ll have to wait a chapter or so to get it.