Adlehyde
The party is at a stand still in Adlehyde, not knowing how to aid Rudy. Well, go to Rosetta and talk to Mariel in the southeast. She wants to go to the Forest Mound southeast of here, and when you do she teleports 1000 years back in time.
Tarjon Village – 1000 Years Earlier
As you go south, you can go left and right to explore for items like Crest Graphs and Full Libra. Furthest south is a group of Elws that greet you and bring you to the head around here. Emiko will look at Rudy but not be able to do anything. Cecilia and Jack talk to Emiko in the basement and eventually Mariel comes down to talk about the Guardian Blade and using that could fix Rudy’s arm.
When you get the chance to leave, search the village for treasures first (and you don’t have the aid of the Radar). Anyway, there is a Magic Carrot in the house you’re in, north of this for a Mega Berry and east of this for a Mystic Berry. By this treasures is a hut with four elders, one of them gives you the Spirit Key. Check the southwest for a Sunbird Hat and Blue Ribbon and then save and leave.
Forest Prison
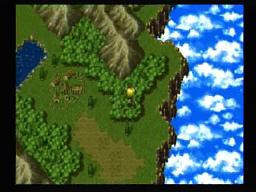
Southwest of Tarjon is the Forest Prison. Head left and southwest for the first few areas. Soon you’ll meet an animal, so use the Wand and it tells you to just go left or right through the maze ahead. So begin going south, then east, then north for a Crest Graph. Go back south and continue with that east path until it goes south (this will be a three way). Keep heading south until you reach a Crest Graph.
Go north three screens and east when you see a more open area with a cut log in front of you. You’ll reach a Warrior Vest and go north for a Mirage Coat. South a little and east for a Crest Graph. Go back to the Mirage Coat chest, and go right from here. You’ll see a treasure and save point under you but you will have to continue going east to the wall, then south to jump off the ledge. Grab the Prairie Coat and then go east for a long while and north to return to the area with the save point. Keep going east until you can go south, and then northwest to a huge chest. Don’t do anything yet, but go northwest to get a Crest Graph and save point. Then use the Spirit Key on the big chest and follow the spirit to see the Life Rune Odoryuk, the Guardian of Life. Do not cast Escape – instead move to the previous fourway and then go south all the way until you exit. Head south and east to Vassim’s La.b
Vassim’s Lab
Save and get the Mega Berry on the west part of the building, and go in. A Duplicator is in here, and upstairs for a Magic Carrot and Hyper Gear.
Talk to Vassim about what to do. He has a solution, but you need the Life Guardian (which you have) and the Illusion Guardian (in De La Metallica).
Curan Abbey
Teleport to Forest Mound to get back to your world. Then teleport to Curan Abbey.
Use the Teardrop in the north, and go through this all the way to where you fought the Book Monster Nelgaul. In the northwest of this room is the De La Metalica book, and it teleports you there.
De La Metalica
Go east and into the room. The next area you’ll go up and down a few sets of stairs and exit in the southwest. In this area, you’ll have to go counter clockwise until this upper door is open.
Just a word about De La Metalica. You’ll see Necronomic enemies, and if you Hi Prison – Lucky Shot one of them you’ll get the Necronomicon, Cecilia’s best book (very much worth your time to get this).
Look at the earth book to the east, and then go south to exit. Go south in this new area and look at the blue book, and then go west up the stairs and northwest up the stairs again for the Fire Book. South for the exit and a save point.
East a bit for two more staircases, a room and a tablet. Take the stairs going up and left for a door. You’ll reach some bookcases but only read the middle bookcase and the one just right of that. Then, go back to the locked door and go right down the stairs. Open the third and fourth chests from the left and go back to the door, and it’ll be open.
Look at the green Wind book on the left, and then leave through the door. Next you’ll see the Lightning book and the door. In the next area, search all the books for Jack’s Phazer Zapp fast draw. Go through the door on the east, and then another east door.
This area is tricky, you have to do it right or you could get caught in an endless loop. Read the inscriptions if you want, but just go left, right, right, left, and right, and you’ll be in a long area. At the end you get the Hades Rune, Duran Drum’s Rune. You’ll then teleport out, so use Escape and the Teardrop to return to Curan Abbey. Then, teleport to the Forest Mound and back to Vassim’s Lab.
When you just have control of Cecilia, speak with Rudy. Cecilia teleports into his dreams and see’s Elizabeth eating Rudy’s dreams. Cecilia will get in a battle with her, one on one. This is a good battle to show you the power of the Necronomicon if you got it earlier – get her High Guardian Force up and use Heavens Rune for about 9500 damage. Use Saint up until then, and Heal.
Afterwards you get the Love Rune and Rudy back in your party. Put him in front and talk to Vassim for some parting words, and you’ll get his fourth force, the Fury Shot. As you return to the forest mound you’ll be greeted by Jane and McDullen on the other side.
Adlehyde
Before you know it, you’ll be in Adlehyde watching a test run of the Metal Bird. You’ll learn that it needs some Gemini Circuits to fly high above. So, go west of Court Seim with your Protowing and you should see the Gemini Corpse.
Gemini’s Corpse
Go north and bomb through the wall – you’ll meet the Sword Guardian Equitis. Jack will learn the Cosmic Nova Fast Draw. Go down the stairs now.
Bomb through the nearby wall and put out the fires with the vase. Up ahead is a Jewel you should take out. Go further to the right until you reach another wall you can bomb through on your left. Another jewel to remove here.
Return back to where you bombed this wall, and go east all the way for a Black Pass and Crest Graph. Take the stairs just west of this, and have Hanpan get a Magic Carrot to the west. East of this is another wall to bomb, and a statue to put a Jewel in. Go up the stairs and get the Phaser for Rudy. Return to where you put the jewel in, take it back out, and go south to a new area. Use the vase to extinguish the fire and get the Lucky Card, then expend another Jewel to go down the stairs.
Continue along, getting the Mega Berry east of you with Hanpan and the Pouch in the next room. Bomb through the wall and put the jewel you have in the statue. This will lead to two more Jewels you can take out of the statues. Return back and take the third Jewel from the statue that opened this path. Then, head south along the exterior path to get to another statue you can put a Jewel in. Return to the previous section and take the south path just east of this one. Pour water to get through and go east, taking the south path for a Save Point when you can.
Continue with the east path, putting jewels in the statues to take the stairs down. Grab the treasure that lands by you, it’s a P. Glove tool for Rudy.
In the next room, use the Power Glove to knock the treasures off the pillars. They are an Ambrosia and a Duplicator. Bomb through the weak walls behind the guardians for two Secret Signs. Use the P. Glove on the purple pillar to get it to the other side, and grapple across. Rest up before trying to get the treasure in the next room.
Mech Drake is here. It will cast Silence on you, Resonance Wave (900 damage on each), and Laser Breath (400 damage on one). Have Rudy use Rocket Launcher (unless you built the Phaser up), Jack can heal or use his best Fast Draws, and Cecilia should use Arm. Down, Hi Shield, Slow Down, and any of her hi level attack spells. Rudy’s Fury Shot will blow this enemy away as will any High Guardian pretty much. You’ll get the Gemini Circ. (Gemini Circuit) and a teleport will emerge, so take it.
Escape and teleport back to Adlehyde. Rest up and save, spend about 100,000 on your Phaser, and then go to the castle. Emma will be here and she’ll get reports about Sweet Candy having the second Gemini Circuit – but they’re under attack and the ship sinks. Back at Adlehyde the meeting adjourns.
Leave and teleport to Ship Graveyard. Go to the beach and get the second Gemini Circ. – yep, it’s that easy. Teleport back to Adlehyde and go to the ARMs shop to tell Emma. Now you’ll be able to travel above mountains with the Gullwing.
Ancient Altar
West a little of the Giant’s Cradle is the Ancient Altar. Fly over the mountains, land, and walk there for the powerful Sword Rune.
Pandemonium
Fly to the southeast and you’ll see an island over there. Pandemonium Castle is here.
Go north to the stairs up. Keep going north until you get a Mind Gem (recover MP per step / turn). South a little, east, and hit the jewel to switch the doors. Keep going until you see a Mega Berry on your left and a save point to the north. Keep going and you’ll see Harken turn into Elmina, someone from Jack’s past. Alhazad and Turask show up too however.
He has a Horn Spike for 1400 one a character, Shield, Poison Breath (Poison on each character), and Cut Down for 1200 on each. Use your Phaser, if it’s maxed it’ll do a bit more damage than the Rocket Launcher. Casting Arm. Down and Slow Down is essential, and he’ll often waste turns on Shield on himself to recover from Arm. Down. As long as you have him slowed you should be able to heal from his powerful attacks. You get a ton of gella for defeating him.
However you are trapped by Alhazad after this. Now you have to control Hanpan, ugh. Talk to him, and then take him through the hole and the first exit you see. Go east, north, and east again and through the next hole. Take this all the way north and then up the east stairs. Go through the door, push the lever, and then you regain control of Jack.
Get the Magic Carrots, Secret Sign, and Lucky Card, and to the northeast. The door is locked, so you’ll need to switch.
With Cecilia, go up the stairs and hit the red switch you see. Back to Jack now, since he can continue up the stairs. Hit the switch on the right and go south to a blue locked door. You’ll have to switch with Cecilia, hit the switch, and leave her cell and wait in front of the red door on the left. Switch to Jack once again to continue to the red switch on the east wall. Hit it, switch to Cecilia, and move her past where the red door once was. Continue a long ways with her until you reach a switch and then a door to a new area with a staircase up. Get on the blue switch, and switch to Rudy.
Use the save point east of you, get the Bullet Clip, and continue along until you reach a blue door with Jack just west of you. Switch to Jack to hit the switc, and then have Rudy continue along. After a few areas you’ll get to a point where you are going west and the first north path leads to the Demon Prophet. He challenges you to a fight but back down and return to your cell. Actually, just wait at the blue door nearby. Jack needs to hit the switch again and then continue to the blue floor switch. Rudy can now do the same as well. The party joins once again.
Go down Jack’s west path and bomb through the wall for two Crest Graphs and an Ambrosia. Now return to where you met up, and take the south path (Rudy’s way here). You are looking for that middle area that leads to the Demon Prophet. This time, tell him you’re leaving.
Demon Prophet is a tricky customer. He has a “will be stuck in ice / rocks” attack that takes off around 1200-1500 on one character. That’s all he did, was that. Because of how fast he is though you’ll want to cast Slow Down or use Heal Blade with Jack when necessary. Just use your Phazer / Rocket Launcher, Jack’s best Fast Draw’s, and Saint and Hi Guardian attacks with Cecilia. Demon Prophet will fall backwards in slow motion afterwards.
Upstairs, have Hanpan hit one blue switch so you can continue. Now you can save and go north again (or rest up if you want to do that). The north path is long and arduous.
Shazam will stop you eventually. He has Keen Silf (1000-1200 on each) as his really only dangerous attack. His others will be mediocre on one member. Just cast Slow Down so that he can’t compete with you in terms of agility, and then just unload whatever you have left as far as ARMs and MP goes. Saint and holy based attacks are probably your best bet, and by the time your Force’s are full you should be able to kill him with Fury Shot / Hi Guardian / Sonic Vision. Another enemy who gives up tons of gella.
North more to see the Dark Teardrop. It is going to be used like the Elw’s use their pyramids. You’ll end up in Adlehyde with a woozy Jack.
Arctica Castle
Rest up and save. Fly to the northeast to Arctica Castle, northwest of the Photosphere. Grab the Full Revives and go up the stairs. Take the south path for a Nectar and two Mega Berry’s. Go north (the west duplicator door has two Secret Signs) and you’ll be outside. Southeast for the Wild Bunch ARM for Rudy. If you take the northeast path you’ll reach another Duplicator Door that has two Secret Signs.
Go outside and take the middle path, and go right for a Lucky Card. Left a little and have Jack look at the throne. He’ll get the Black Feral and the Void fast draw. Take the northwest path, and go through the stairs until you get to a Save Point.
Keep going along the path until you reach Lady Harken. This battle shouldn’t be a problem for you even though only Jack is involved. Heal Blade is always there for you, just remember that Harken is faster than Jack generally. Use your best ability’s and Sonic Vision will make quick work of her. Steal a Secret Sign (you may win one also) and after about 20000 HP, you have a victory.
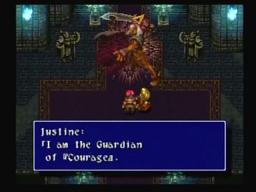
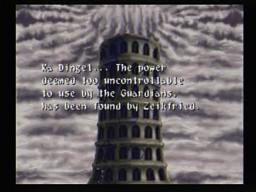
Harken dies but the Lion Idol shatters, revealing the Courage Rune. Take the Boom Getter in the left room and then take the stairs up in the right room. You’ll be outside and a scene about Ka Dingel. Take notice of it’s location. It’s where you need to go to.
First though, rest up. I suggest Baskar Village, because then you can go to the altar to get the Hope Rune while you’re here. The Dragon Idol will shatter and Zephyr the guardian of Hope emerges.
Head to Adlehyde to rest up, and build up your Wild Bunch ARM (although there is a better one). Save and take your Gullwing just south of Rosetta Village to see Ka Dingel. Land, call your Earth Golem, and go in.
Ka Dingel
Boomerang and Luceid
are here waiting for you. Not that they are easy this time, but their moves definitely don’t have the same luster as they did the first two times. Their attacks are the same except for a Zero Armor Attack (1000 damage to one) for Boomerang. Double Boomerang Dynamic is the one that takes off nearly 2000. Of course just use your highest ATP ARM (Phaser likely) and best Fast Draw on Luceid until she’s gone. Slow Down on Boomerang would be a good idea. Just keep everyone healed and unless Fury Shot / Sonic Vision / Hi Guardian when the time comes and you should be able to put these two away then.
Boomerang and Luceid cover for you as you go to Zeikfried up Ka Dingel. Return to get the Saber Fang though.
Back inside, take the left or right path to get two Mega Berry’s, then go back up the stairs. Go to the southwest and through the lit-up passage, and left to bomb through the wall. Hit the switch up ahead and go south all the way. Now, go east to another door that leads to a Nectar and Lucky Card.
In the north room you can get up top to the right. Take the northeast exit and keep going until you reach another switch on the ground. Go south all the way now until you can go west and then northwest for an exit. Keep going here until you get to a split, and then go east and south to get a Magic Carrot. In this area, go southwest for a Full Revive, and then southeast for a Full Revive and Magic Carrot again. Take the northeast path, then go north and down the stairs for a Mega Berry and Magic Carrot. Continue south and in this room, push the statue south a little and then to the west onto the blue glyph to open the door in the Full Revive / Magic Carrot room. You can take the middle path with the stairs leading up.
Grab the Magic Carrots and go south. Take the right path and up the stairs. Get the Full Revive and Mega Berry, and then go to the left path and go up the stairs for another Full Revive and Mega Berry. Push the statue into the pit, go down the stairs in the previous room, and enter the room on the bottom to push the statue in the northwest corner.
Continue into the next area and up the stairs. Take the north path going east, and then go south and west and hit the first two switches you see (the middle and right one). Jump off the ledge to the southeast, and then walk west and north. You’ll see two levers, so hit the east one and the door will open and you can go up the stairs.
Grab the Ambrosia in the southeast room, and then go up the stairs for a Nectar and a southwest exit. Keep following the path as it goes east and north for stairs up. The path in the middle of this room (just southwest of you) leads to a Metal Shield. Take the left stairs going up now.
Grab the Ambrosia and bomb the purple orb to continue to the northeast, and take the stairs going up. Just head east and up the stairs again. More orbs to bomb, but the second orb you’ll need to lay a bomb and then quick walk south past the purple barriers so they don’t block you (or else you’ll need to use the Clock). Another dark area where you’ll need to go west to see the stairs up. Take the second stairs to the east and you’ll see 8 levers. As you see when you push one lever, the levers next to it move also. You need them all facing the right way. So to begin, hit the mid-right, lower-right, up-right, up-middle, down-middle, upper-left, lower-left, and middle-left. All the levers will be facing to the right now and you can continue and save.
Rest up because the real Alhazad is ahead. Alhazad Symphony is the real issue here, doing about 1200-1400 damage on each member. His Super Transmitted Mega Crash attack does about 1700-1900 on one character too. If he casts Slow Down on you, cast it back on him (or Quick on yourself). As for most bosses around this time, just rely on Rudy’s strongest ARMs and then unload Fury Shot / Sonic Vision / Hi Guardian (Hope Rune) to blow Alhazad away. Jack is purified after the battle and learns the Double Attack Force. Take the dimensional elevator to Malduke!

Side Quests
Most of these Side Quests can be done even before Ka Dingel. However I suggest you even go further into Malduke before doing most of them (don’t worry, you can return to Filgaia from Malduke). For the sake of keeping Malduke not split up and in one area, the side quests will go here despite the above.
Hayokontons
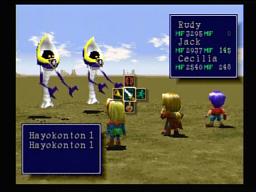
Your pursuit of Sidequests should begin with the Hayokonton random fights on the east islands of the Ancient Arena. There are three small islands and occassionally you’ll come across a pair of Hayokonton’s that yield an absurd amount of EXP / Gella (80000 / 60000 if Lucky Card is used!) However, these enemies are not easy kills by any means. They have 50,000 – 60,000 HP, take off a decent amount of damage, and use Human Experimentation to mess up your status. Confusion is what you need to protect against the most (they like Direct Voice) so it may be wise to have Jack equip an anti-confusion relic so that he can cast Heal Blade on people when necessary. To deal with the high HP, use Fury Shot / Arch Smash, Trump Card with a Hyper-ed Jack, and Hi Guardian with Cecilia. The proceeds should first be used to max out the Arch Smash to turn Rudy into a bonafide monster, and all of your Secret Signs should be dumped on the Trump Card.
There is also the matter of stealing Duplicators / winning them from the Hayokonton’s. This is difficult because it is hard to use Hi Prison on them, so the Hi Prison – Lucky Shot trick doesn’t work so well.
Adlehyde
Talk to the guy in the pub for a Dispellado (after you’ve pumped all the money possible into Adlehyde).
Go northwest of Baskar Village to the stone formation. Use the Dispellado on the Northwest, Southwest, Southeast, Northeast, West, South, East, and North to get the Illusion Temple to appear. Enter the Illusion Temple and you’ll get the Chrono Rune after meeting Dan Dairam. Elmina i also revived.
Black Market
In Adlehyde, go to the weapon / item store. You should have the Black Pass(from Gemini’s Corpse) and if you use this on the bookcase here, you’ll reveal the Black Market. The weapons here are probably obsolete, but the armor is likely useful unless you have each character’s final armor. Oh yea and there are Goat Doll which you’ll be buying plenty of if you wish to do these sidequests. You will need to constantly switch them in as these tough monsters kill you.
Saint Centour – Zed
When speaking of tough monsters, we should start with none other than Zed – Monster Z. Have plenty of Goat Dolls and be as high in levels as possible before attempting this.
You’ll want to get Slow Down off as soon as you can, otherwise Zed will be going before you. His Doom Bringer takes off around 1500 on each character, but it’s his multi-person 3000+ damaging attack that is the problem. If you are underleveled it will kill you and you will need Goat Dolls to live. Arch Smash should be maxed and you should be using just that with Rudy. Jack should be using Trump Card and hopefully Cecilia can get a Hyper off on Jack. She should immediately cast Slow Down and then heal. Zed drops the Doom Bringer sword. It’s a powerful sword but it makes your Luck go to Worst. Also, let him leave – he means well.
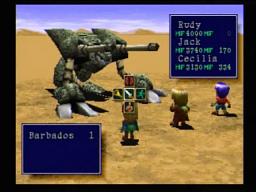
Barbados
In the southeast corner of the map is a really long patch of desert. You want to land by the signpost and use the Ocarina to summon the Earth Golem. Now walk southwest of the signpost and just walk around this area for a while and Barbados will appear.
He likes using Acid Missile (500 on each), Linear Rail Cannon (1500-1700 on each), and Land Master (1500 on one). He really has no instant kill attacks so Goat Dolls are absolutely essential. As usual, the trick is getting Slow Down to work on him so that you can heal when needed. Arch Smash and Trump Card should do just fine, and Hi Vortex is best (Barbados is weak versus wind). By the time you get Fury Shot / Sonic Vision / Hi Guardian up, he should almost be dead. Dist Dims (weapon for Cecilia) is your reward.
Leviathan
If you’ve repaired Adlehyde (at least a few 10,000 gella) you’ll be able to talk to Drake in the very northeast building. He’s got a ship for you outside.
Teleport to the Ship Graveyard. Go southwest on your ship to the dark blue formation and travel around here. It may take a short while or a really long time, but in the southeast part of this you’ll get a “something is rising from the depths!” message and Leviathan pops up. The trick seems to involve you going up and down perfectly in that southeast corner for the message to pop up.
Leviathan uses Reactor Torpedo (1800-2000 one), Deep Sea Cyclone (2000 damage on each), Aurora Destruction (1500 each), and Trident (1000 on one).
You’ll definitely want to cast Slow Down so that you can control the fight. Basically use the same strategy as Barbados but use lightning elemental instead of Wind / Vortex. The Pret-A-Porte is your reward. The Pret-a-port is Cecilia’s best armor.
Boomerang and the Ancient Arena
Enter the arena and for 1000 gella you can fight battles. Medea is the first one. He’s a joke with 10000 HP only.
Badnews is the second enemy and it begins to get difficult now. Cast Slow Down and Armor Down but beware the attacks of this physical beast. His regular attacks take off around 1800-2000 and his Brutal attack does about 3000.
Javawalk is the third enemy. He doesn’t seem as difficult although his Antimatter Bomb at least hits everyone (for only 1000 though).
Riversider is a treat. Have some Goat Dolls for this one. He is fast as hell too (Slow Down, of course). His Brutal Attack is basically an instant kill but his regular attack along takes off 2000. He also has the most HP – needless to say, that Duplicator you win will be well earned.
Boomerang Flash
If you have the Saber Fang from Boomerang at Malduke and have beat the Arena once, you can fight Flash Boomerang. Be sure to have plenty of Goat Dolls and full ARMs for this one.
Have the Goat Dolls ready after Rang Flash is done talking. Zero Count Execution kills one character or does 2500-3000 damage. Evil Sword Luceid only does about 800-1000 to one character. Shadow Boomerang Maximum does about 3000-3500 to each character.
Slow Down will be essential here as it usually is. Then, use Life Guard or Goat Dolls. Hyper on Jack so he does maximum damage with Trump Card, and then keep pummeling him until you can do High Guardian / Fury Shot / Sonic Vision, and that sort of thing. Rudy’s Divine Blade is the victory spoils for defeating Boomerang.
Angol Moa
Go to the top of the Ancient Arena by the Duke. See the blue mirror? Use the P Glove to punch through, and then use 5 Duplicator’s to get north. Keep going north despite the warnings and rest up before you sit out the tremor.
Angol Moa is huge. His 7th Moon attack takes off around 3000 to each. His physical attacks take off half that (and to one character) and he also wastes turns Guarding. When you get a chance, use Slow Down and then Hyper on Jack. Cecilia should then be using Remedy most of the time while the other two use Arch Smash – Trump Card. Angol Moa has such a ridiculously high defense that Trump Card + Hyper won’t even do that much. 7th Moon though likely makes this a Goat Doll battle, at least for a few characters, but if you can pull it out you get the Juggernaut for Jack.

Abyss
The Abyss is the scariest place in the game. Getting here is random, and the enemies are the toughest in the game (regular enemies and the boss here). To get here, go to Baskar Village and save. Have like 50 Goat Dolls if you want to live. Go northeast to the Elw Pyramid and right in the teleporter until the screen turns red.
You’re in the Abyss. Continue south and go until you reach 5 levers. Hit the second one from the right, and then the far left two. Go south now all the way until you reach three gold statues. Push the outer two forward and the middle one to the side.
Follow this path and keep going north to a Duplicator Door. Follow this path a ways until you get the three best helmets in the game – Dead Heat, Ruby Tiara, and Texas Number.
Go back to the Duplicator door and go straight south through the wall. As soon as you get to the next room, take the right path (upper balcony) and follow it to the far west. Go down the stairs for an Amulet and go north into the next room. Do not light the nearby lanter, just go north to the maze.
Go left first for an Orb of Life. Northwest of this is a Mystic Slate, and then go northeast and east a few until you can go north for a Power Boost. Just east of this for another thing to grapple onto and one last Duplicator door.
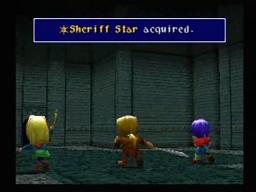
Keep going to the north to find a big square. If you want to fight the most insane battle on this game, play the Guitar of Maya with Jack. Ragu Ragla will appear, or Raguragula. You will want a Goat Doll on everyone considering the potential of Ragu Ragula’s attacks. Definitely use Slow Down so you can at least go first.
Zero Armor Attack does about 3000 damage to one character. He did this attack the first four turns against me, so I didn’t lose anyone. After that he pulled out Volcanic Bomb to wipe everyone at 7000 each. He didn’t really do anything other than those two, but it’ll get to the point where you can’t keep up with the healing to survive the Zero Armor Attack (since Cecilia needs Goat Dolls not the Necronomicon). If you can Hyper Jack, his Meteor Strikes should do about 5000 damage (Trump Card will only be useful if he’s full HP or close to it).
Rudy should strictly use Arch Smash and Bullet Clips on it if he runs out. Cecilia needs to get Slow down to work at least once to get the jump on Ragu. If you can survive long enough (his HP isn’t that high, although it’s higher than any other boss likely) you’ll be the victor, and the main thing you’ll be happy about is the Sheriff Star, which makes all of your stats jump on whoever equips it.
New Moon, Malduke
Take the southeast path to stairs going down that are blocked by an alarm. Bomb it, go through the stairs, and go right through the tunnel. You’ll come to a Bullet Clip and the best ARM, Arch Smash.
Return to the beginning and bomb the alarm on the west side this time. Go through, get the Nectar, use the P. Glove on the purple thing, Grapple across and go through. Bomb the alarm and flip the switch in the next room.
At the very beginning, take the middle path going south so that you can save your game. Back north, take the staircase down (to the right) and take the left path through the northwest door. Keep going left into a room, and then go to the lever in here to push it. The door below opens so take it. Grab the Guitar of Maya, the last tool for Jack (and everyone for that matter). It will summon monsters (either random ones instantly or bosses in secret places).
Back to the fourway intersection just before this, and go south. Take this all the way until you see some damage spots on the ground and a big tube to the left. The damage spots don’t do much damage, so just take the big tube all the way to the east, get out, and hit the lever. Jump down and enter the newly opened door. More X’s to go through and then a doorway which leads to pipes.
Take the east fork first, and then keep going northeast until you see a Nectar. Take the down path all the way for another statue. Have Jack search it and prepare for a tough battle. Two Fesel Zeins are here and if Jack wins he gets his ultimate attack, the Trump Card Fast Draw. Their Huge Blow’s can take off around 1000-1200 so make sure Heal Blade / Potion Berry’s are ready. Go back in the tubes now.
Go to the beginning of the pipe maze, and take a left and work your way to the northwest. A Silver Blade is here, a good weapon for Rudy. A Nectar is just east of this, and a Princess Rod to the southeast. Another treasure to the south; a Violator for Jack. Head just east of this to that opening in the middle that leads to an exit north.
More X’s to go through, and then falling bridges. At the end, you’ll want to be in the mid-right spot so you can Grapple across and go down the stairs. Take a right and save. Flip the blue switch and go north to teleport.
South to the first big room. Go to the northeast in this area and keep going north. You’ll eventually reach a tablet that speaks of Lucifer and Sado. This is a completely optional boss I’ll remind you (one that you’re likely not prepared for unless you’ve done lots of sidequests outside of here). But go south from this tablet and east, then north all the way to a fire to put out. Rest up, and play the Guitar in the center here.
Lucifer
appears. He likes Beam Fencer (3000-4000 damage per member). His regular attacks only take off 700 or so. Sephiroto does about 2000 damage to each character. As long as Beam Fencer doesn’t come out too often, you can probably survive this fight without the aid of Goat Dolls. Slow Down will help although you may go first anyway. As always, Hyper Jack when Cecilia doesn’t need to Heal, and then use your high Force ability’s. Your reward is the Jade Wilder for Jack, his best armor by far.
Go a few rooms back and take the southeast exit and jump down the ledge. Touch the blue switch to make it red, then jump down another ledge, and there will be an exit on the west end here.
Head to the southeast of this place to bomb a rock and climb the ladder. Go to the northeast, and then you can enter the center structure for Assault Coat, Jolla Poncho, and Filgaia Robe. Too bad only Rudy’s is worth keeping (and only for a bit). Go through that southeast path again, dropping down and flipping the statue back to the blue color. Now as you drop down and get back to the underground area, you can go west to a rock blocking another ladder. Blow it up and then run to the southeast corner. Go down the ladder and then straight north to step on a switch. Return to the northeast path and go through this one more time, jumping down the ledge to switch it back to the red color, and then hit the switch on the left side now. You can go through the center to the Arms treasure. Go south all the way and then northwest in the big room to exit back to Malduke.
Go to the Mine Area now, so flip both switches after you save. Another optional Golem boss is coming. Go south and take the east path down the stairs. Then, take the west stairs. Bomb the rock to the left and go down the stairs in the south.

Sado is down here. Put out the fire, rest up, and play the Guitar of Maya. This is a pretty weak golem so you can likely find time to steal a Bullet Clip from him.
Black Hole Bullet takes off around 1200-1500. Armageddon does about 1500-1700 on everyone and Megid Flame does about 1500 to one. None of these attacks scream Goat Doll so you can take this one out earlier if you can slow it down. Hyper and Trump Card can make short work of the 50,000 HP. Your reward is the Braver Vest for Rudy.
Go back north and take the northeast stairs. East of here for some stairs down and then take the southeast stairs. Go straight south, taking the path that is slightly to the west. This small room holds the Eye. To ensure it is the true eye, go to where the stairs were for Sado and go in front of that eye you revealed. If it shines blue then it’s the real one.
Residential Area
Flip the green switch on the left. Continue until you make it to the stairs going up.
As you enter the town, go north and use the Radar by the tombstones. You’ll find the Wings here. Nothing else to do – if you didn’t know where to look this would be difficult for you to get.
Return to the traffic area, save, and go to the previous room. Go left all the way to a staircase. Grab the Nectar’s on the side here and go north. Set the Eye in the center, the Arm on the right and the Wings on the left. Enter through the door, get the Magic Carrots, and go down the stairs.
Follow the path as it goes north, east, south, west and north again to a new room. There are alarms here that send Berial at you. Genocide Beam only does about 1000 to each character, and that’s it’s best attack. This is by far the easiest golem, which is also why you don’t get anything for beating it. Far to the north in this room is an Ambrosia, and south for some stairs down. The far right room in the next place is an elevator down to Ka Dingel, but take the middle path to reach Ziek.
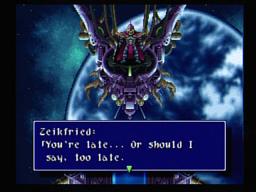
Ziekfried is pretty similar to the first time you fought him, maybe a little more difficult. You’re probably decidedly better than he is here, and it might not even be close if you finished all the side quests. Zeik’s best attacks take off 1000 on each, so cast Remedy and just keep up. The key is not to waste all of Jack’s MP on Trump Card or all of your bullets on Arch Smash (though you should be prepared to refill both whenever, since this is the end).
Ziekfried turns into Motherfried. Her Inferno can do around 1200 to each. Dark Ray does even more, at around 1500-1700. Sayfert’s Galaxy is between these two at about 1400-1500 each. You should be able to survive without Goat Dolls here. Use your best attacks, and if Jack is Hyper-ed his Trump Card should be doing 9999 if he’s well rested.
It looks like all it stll lost for Filgaia. The Teardrop and Guardians fight Filgaia’s decay and darkness. When you regain control, go south and east when you can. The elevator is here so take it.
Zeik Tuvai is here to stop you though. This is the ultimate form of Zeikfried. He’ll use Confuse, Sleep and Silence often. Proton Beam can destroy a single character but you should be able to survive 2400-2600 damage at this point. He is not especially powerful but he can heal himself for huge amounts, so hopefully you can do a lot of damage (and with Arch Smash and a Hyper-ed Jack using Trump Card, you can). Heal if you get low and cast Awaken to reduce the chance of falling asleep. This is the last version of Ziekfried – you finally win after this is over.

Thanks a lot, thumbs up! :)
Thank you very much for the guide. One of the best games I’ve ever played in my life.