Zelda Twilit Princess Walk Through
Sacred Grove
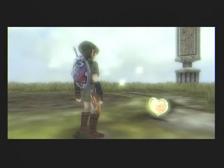
As you leave the Temple of Time move the statues to reveal a Poe and a Piece of Heart. If you leave before doing this your Dominion Rod will lose it’s effectiveness and you’ll have to wait until it’s restored.
Kakariko Village
Enter Renado’s house. He tells you of Shad, a friend of Telma. You get Renado’s Letter and you are to give Renados letter to Telma at her bar. Telma sends you off to the doctor’s officer with an Invoice. Show it to the doctor in the northeast part of Hyrule Castle Town. Well it turns out this guy can’t help you but he gives you some clues on the Wooden Statue. Go into the back of the Doctor’s Office and move the box to the corner – you can sniff and forget the Reekfish Scent and you’ll learn the Medicine Scent.
Leave town and then re-enter and follow the scent. It leads near Telma’s Bar to her cat Louise. Undead Dogs stole it from her. Leave Hyrule Castle Town to the south and you’ll encounter about 12 Undead Dogs. Use a charge attack – they aren’t too violent and after you defeat them all you’ll get back the Wooden Statue.
Show this Wooden Statue to Ilia and she’ll regain a little bit of her memory. The gorons then have a plan and mark a spot on your map beyond the Bridge of Eldin.
Bridge of Eldin
Warp here and run northwest until you see a tunnel (look south as you run west). Darbus will punch through some boulders here and you’ll be at a secret village. 20 Bokoblins are here and it’s a combination of the archers and melee attackers. Bow and Arrow works best and be sure to check the sides for all 20. Afterwards you meet Impaz. He gives you Ilia’s Charm.
Kakariko Village
After you have warped back to Kakariko Village and display the Ilia’s Charm in front of (who else) Ilia. After a bit of reminiscing you get Horse Call so that you can get Epona whenever you’d like. Ilia then hints at what you have to do – bring your Rod to the hidden village.
Hidden Village (Eldin Province)
Return back here (Bridge of Eldin – northwest). As a wolf charge through one of the southeast buildings windows. Clawshot onto the netting and then you’ll be on the upper area of the building – have your wolf charge through an eastern window and you’ll be by a Cuccoo and a Howling Stone. For the Howling Stone this is a more complicated song. It starts in the middle and then bottom at 1, middle at 3, top at 4, bottom at 5, top at 7, middle at 7.5, top at 8, middle at 8.5. This is the last hidden ability and we’ll get it in front of Hyrule Castle later.
Talk to the Cuccoo with the Wolf Link and you’ll start talking to cats (must talk to all 20)! Finding all 20 can actually be difficult. Reaching the southwest one on the balcony is tough. More or less you need to check every building and every alley – so talk to all of the ones on the ground (and the one on the boxes just ahead of you) and then start using your Clawshot to get on top of buildings. Once you find 20 talk to the Cuccoo and you can get a Piece of Heart by Impaz’s. Also once this minigame is over Clawshot to the northwest building to kill a Poe on the north side.
At Impaz’s house show him the Dominion Rod and he knows you’re the Messenger to the heavens. He gives you the Ancient Sky Book.
Kakariko Village
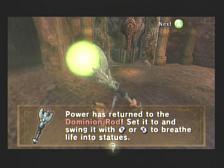
Warp back here and go to Renado’s Basement. Show Shad the Ancient Sky Book and then he’ll restore power to the Dominion Rod. You also have lots of marks on your map.
Bridge of Eldin
As you run north look to your left (west on the map) and you’ll see a statue. Clear the Bokoblin Archers and then move the statue with the Dominion Rod. Make sure the statue doesn’t fall off by release control of it and then go on the spot it was on. You will find One Sky Character. You need more though.
First of all go to the north end of the bridge and get that statue and bring it south. There is a place on the west end of the south bridge that you can set the Guardian Statue in and then jump on the Guardian Statue and further west so that you can go up a ladder and get a Piece of Heart.
Faren Province – Faren Woods South
Warp to South Faron Woods. Go north west of Coro’s Lantern oil refill and you’ll see a stone you can blow up. Go deep into this passage and you’ll see another statue you can control and move out of it’s hole – get the one Sky Character. Don’t leave this area quite yet. You can make use of the statue again so bring it south and you’ll see a hole in the ground that would fit it perfectly. Get on the stone near it and do some midna jumps up some trees. At the top continue west into an area with a Piece of Heart and then warp to Lake Hylia.
Lake Hylia
Take the normal flight at Fyer’s. Go through Farbo’s and then northeast to the red dot. You’ll see a Guardian Statue on a ledge – use the Dominion Rod to pull it out and then put it right under the vines – use your Clawshot and then you’ll be on the ivy and drop down to the statue – jump across and pick up the Once Ancient Character for the book.
Kakariko Gorge
Just teleport here and run north to the red dot for one Sky character. Not much else to do but you can bring the statue a little southeast of where it stands and then climb up further south – you can now jump across these ledges but you’ll have to move the statue again once you use it the first time to position it under a second ledge. An Orange Rupee is your reward.
Hyrule Field West
Go southwest of the Hyrule Castle Town’s warp and then you’ll reach the stone area. You’ll see the guardian statue so move it east so that you can jump west onto the statue and then onto the ledge where the statue was. Get the one Sky character and then on the other side you can do the same thing for an Orange Rupee.
Since we did the final Howl we can go to the Gold Wolf in Hyrule Castle Town – head directly north from the center square and you’ll come to the final Golden Wolf so that you can learn the seventh and last hidden ability. He gives you the Great Spin – but you can only use it when your health is “brimming” full.
Gerudo Mesa
Head east after you warp here and you’ll see the dark ancient statue ahead. Pull it down and to the east a little, where you can climb up. On this structure jump on the statue and then further west to where the statue was standing. You will complete the Ancient Sky Book with all the missing characters. The chest on the other platform in this area is another Orange Rupee, if you want it.
Kakariko Village
Jump back down into the pit in Renado’s House to talk to Shad. Show him the Filled Sky Book. He’ll be upset and run off – but you can move the statue with the Dominion Rod now. Go to the back here and you’ll come across a huge cannon. Shad follows you. When you go up to it and try to Warp it, you can’t because Shad is there. Talk to him and he goes. Warp the cannon to Lake Hylia.
Lake Hylia
After you warp here go to Fyer. He needs 300 Rupees to renovate the cannon. Give it to him (those Orange Rupees) around the Sky City book parts should get you there if you’re having problems. Clawshot onto the back of it and you’ll be sent off into the Heavens.
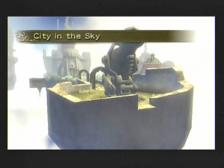
The City of the Sky
You will hear this is the sky city of the Oocca. When you gain control you’ll come to find there are powerful gusts of wind in this city. In the water as you land you can put on your Iron Boots and find a Red Rupee and Water Bombs underneath. Run to the north and you’ll enter the City in the Sky. The door is shut though so go east to the City Shop. Ooccoo joins inside and you can buy a lot of random stuff in here if you want.
Go back north but this time look up – you’ll see a Blue Crystal – Clawshot it and the gate opens. In the following room you’ll need to use an Oocca to fly across the gaps. Clawshot onto the Ivy to get on the middle – west ledge and then fly to the north and kill the Helmasaurs and leave north.
There is a giant Helmasaur King in this room. Just get behind them – they are slower but you can’t Clawshot their front away this time. After it is defeated go to the southwest part of the room and you can Clawshot your way onto the balcony there.
Drop down and start spinning on the south indentation. A bridge forms to the north. Clawshot onto the ivy heading north now and then get on the bridge (you may end up L Targetting a flying creature that can bring you wherever you’d like). Go through the west door (again be careful with the wind).
Take the west path and look up and Clawshot the west target. You’ll drop down in a cage with a Small Key. Clawshot the wall back and run across the bridge in the previous room. The dragon you saw before will come and destroy that bridge but just enter the east door.
Clawshot one of the Ivy pillars and climb around and drop down. Run east and past the blue tiles and through the east door.
As you enter take a right (travel south on the minimap) and you’ll have some Deku Babas to kill and a Spinner to Spin. Go across the bridge now and enter the locked door.
Run to the southeast part of the room and take out the Helmasaur – look northwest to see a crystal that you need to Clawshot and then return north and then east. With the Iron Boots on you can pass the first gust and then Clawshot past the blue tiles onto the ivy pillar up and to your right. Enter the east door. Get the Dungeon Map of the Sky City and then return to the previous room. Go south in this room past the blue tiles and through the south door.
Jump across the platforms as you head east. Watch out for the wind as it changes where it comes from. You’ll also see Tile Lurkers around – use that Gale Boomerang. Make your way to the southeast and enter. There are two Dinolfols in this room. Kill them with a Helm Splitter or Arrows (or knock them off the cliff) and you’ll open a gate with Oocca’s inside. Look up and to the south (on the wall) and you’ll se Ivy to pull up to. Clawshot there and then onto the chandelier inside as it’ll start some wind in the bottom part of the room. Grab an Oocca and wait for the wind to start blowing – jump straight north and the wind will make you hit the ceiling and you can continue through the top north door.
Grab an Oocca and fly far to the west to get a Purple Rupee ( you have to hit the two Wind spots). Get to the middle platform (where the second Wind Spot is) and grab an Oocca and fly north and then west. On this spot you’ll see another Chandelier you need to Clawshot onto. Do so and a wind spot emerges again – fly the Oocca east past the two wind spots and through the crack – enter the north door.
This room is tricky. You are at the top floor and below you are several floors that you can access by flying around with Oocca’s. Your first destination should be the first floor – east door. Be careful of the gusts of wind that come and go, and also the birds that will hit you off your Oocca.
Put your Iron Boots on and Clawshot onto the chandelier to stop the wind. Wind your Clawshot down and drop down eventually – you’ll start a battle with a sub boss the Dragon Knight. When he is about to attack – he seems to hesitate with his sword and shield – use the Clawshot to pull him towards you. Then start getting in Jump attacks. Repeat this process and he’ll fly out the window.
The fight is basically the same except the Dragon Knight flies out of one of the three windows in an attempt to surprise you maybe. You’re better off just aiming your Clawshot yourself – it’ll be quicker and more accurate. A few more Jump Attack / Helm Splitter combos and he’s dead. On the east side a gate has opened and you can grab the treasure – another Clawshot – so you have the Double Clawshot. Go on the far east Clawshot target and roll the Clawshot down – you’ll get a good look at the Ivy that you can climb up.
Take the west door and you’ll be at the multi-levelled floor that you had to use an Oocca to travel to the bottom. Now that you have the Double Clawshot though you can make your way back up to the top – you don’t want to go all the way up though. You’re looking for one of those Chandeliers that you can Clawshot and it’s on the west wall after you go up a level or two. Look up as you are travelling on this west side and eventually you’ll see a Clawshot target above you – Clawshot here and then look west and you’ll see the chandelier. A gate opens when you Clawshot it – lower your Clawshot and then use the Double Clawshot to grapple into the now-open gate.
This room requires fast use of the Double Clawshot. See the pillars with targets in the middle? You have to use these back and forth until you get to the last one on the other side – get off of it and grab the treasure (Compass) that you see. Take the nearby door.
You’re outside now and you need to Clawshot to the other side – stop and kill the Deku Baba’s with your Double Clawshot and on the far side you’ll see some Ivy you can Clawshot and climb up. Go through that west door now.
You’ve been here – run across the blue tiles and then Double Clawshot to the west door. In this room you have to Clawshot the Peahats along the way. You can get to the west side of the bridge now and enter the door.
Run to the west and clawshot the northwest target. Drop down onto a ledge and prepare to do those falling pillars with clawshot targets. It’s not hard and at the far east wall just drop down. Look north and you can Clawshot through the hole in the wall – look up and clawshot the farther east target – now you can look into that cubby across from you and Double Clawshot the grated area. Drop down and kill the Deku Babas and get the Arrow chest. Continue along and clawshot your way to a cage that you can drop down and you’ll be on another ledge. You’ll see Deku Babas on the roof here so Clawshot them. Clawshot to where the target is and Clawshot the Blue Crystal – it turns yellow and the gate opens – Clawshot into this area and start going up. Grab the 20 rupees south of here and then go north for the door.
Another Giant Deku Baba but you haven’t fought them in a while. Kill it with regular attacks and jump attacks and once the head is gone, throw a bomb in it to kill it. Kill all the little Deku Babas as well. Clawshot the west target and then the ivy that you can see – be quick because the pillar will fall.
Continue along this way and you’ll get to a very thin bridge – slowly go across it and get the arrow chest and you’ll eventually have to kill an orange Deku Baba and you’ll be at a dead end. You can grab the ledge and go across (can’t jump on it though) but Keese will attack you. Because of this you may want to kill the Keese first and then grab across – it is a Piece of Heart but another Deku Baba guards it. Return back to the other side of the ledge and look up to get on a platform with the Clawshot – clawshot onto the following platform and look north for some Ivy to climb to. From this ledge – look to the middle and Clawshot that target – lower from here and you’ll be on a platform with a Dinofols. Kill it and exit south.
Look up. You see a Peahat flying around eventually so Clawshot it to ride it north – clawshot onto another peahat to Clawshot past another wall. Go west for a Red Rupee. Look south and you’ll see an island with a Peahat but you need to wait for another Peahat (one further east) and Clawshot it and ride it south – drop down and get the 50 rupee chest and the Poe with Wolf Link.
Get back on that Island Peahat and then the one that goes by the island – but stay on this Peahat for awhile as if you lower the chain you can pass through the wall flying north – immediately L target the next Peahat and get on it. You’ll need to lower the chain and pass through the wall going north again but stay on all the way to the north ledge (if you fall off you can get back on the peahat and there are bombs on the floor and Deku Babas). Enter that door on the east eventually though.
Grab onto the first Peahat you see and then Clawshot to three more. At the fourth one change your direction to the southwest and a few more Peahats this way and you’ll be at a door. Enter the door and get the Piece of Heart on the other side.
Back in the Peahat room, just L Target the first 5 Peahats and drop down. You’ll see Ivy to the northwest so grapple up it right away. Turn into wolf link once you’re on the ledge and go across. Run counterclockwise (take a right once you get off the rope) and you’ll reach some Ivy. Shoot the Skullwalltula’s and put an Arrow in the Buzzard across from you.
Climb up the ivy, go across and get the Red Rupee. Turn back into the wolf and head across the tightropes until you get to an island with a Poe and a Purple Rupee. Return back to the first tightrope where you initially went counter clockwise – this time go clockwise and shoot the Buzzards along the path and you’ll reach a door (on the east side but facing the center structure).
In here, defeat those damn King Helmasaurs and careful of the wind blowing around. Latch onto the cage on the south wall and then roll the Clawshot down a little. Look ahead and you’ll see a chandelier you can Clawshot onto. Put your Iron Boots on and the chandelier will act as a switch, shutting off the fan blowing up. Drop down and grab the Big Key for the City in the Sky. In the southwest you can drop down to a different area.
Use the Clawshot on the upper wall and then descend below past the fan. Don’t drop down but instead look north and you’ll see a chandelier – Clawshot there and get those Iron Boots on. A fan begins to blow. Drop down and go through the north door. Here you’ll have to use the Clawshot on these rotating cages until you get to the other side. If you make it all the way to the fan’s cage you can drop down for a Purple Rupee. Drop down a little bit and go through the north door.
There are two Dragon Knights that are here to kill you. Just use the Clawshot strategy from before, they should go down easily – just make sure the other one isn’t charging you when you’re fighting one of the two. After this look up on the south wall and you can pull yourself on the cage. Clawshot the other way now but go up (on the rotating caged thing that isn’t rotating). Look around and you’ll see a crystal that is blue, Clawshot it so that it is yellow and it will rotate. Now just Clawshot your way up until you get to the last rotating platform that isn’t rotating. Another crystal needs to be Clawshot and turned yellow and then it’ll rotate and you can clawshot above the door and enter.
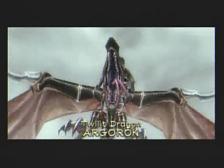
Clawshot your way onto the caged grating and then to your right on the ivy. Climb the ivy and a boss fight ensues against Twilit Dragon Argorok. He is suspectible to your Clawshot, his tail that is. However you need the Iron Boots on to damage him.
You’ll pull him to the ground and destroy some of his armor. He basically rushes you for his first attack and you probably won’t be able to get his tail here. The second time he comes at you he’ll blow wind at you but with the Iron Boots you won’t get moved and can Clawshot onto him after L Targetting. Keep those Iron Boots on to drag him down. Two of these hits will send him into his second phase.
Twilight Dragon Argorok his armor off, it begins raining and several Peahats appear. You’re going to need to fly to the top of these pillars – just Clawshot between two of them. At the top you’ll climb up and then L target the Peahats. Now you can go clockwise or counterclockwise – just try to avoid his fire breath so go the opposite way and if you’re fast enough you can get to the back of him. When you can see the flashing red thing on his back you’ll want to Clawshot onto it but L Targetting is kinda hard so you’ll need to pause and actually aim the Clawshot to do it. Once you pull onto him start attacking like mad and he’ll go down and you’ll repeat. Towards the end he’ll switch it up and start blowing fire at you the other way, so anticipate this and when you see him stop breathing fire in one direction, immediately change yours and you’ll be ahead of him.
Get the heart piece and the final piece of the Twilight Mirror, the Fourth Shard.
Very nice and complete walkthrough well done