Kakariko
As stated when you return, your destination is the light spirit Lanayru. However there are things to do in the Eldin Province still. Talk to the Goron outside of Barnes’ bomb place in the north part of town. Have him launch you up, and then go up the path and get launched up by the next goron you see. Climb the ladder and talk to Talo. And minigame with Malo starts.
You are to use your Bow and Arrow to shoot various things. For your efforts Malo gives you a Piece of Heart. Also since you participated in this minigame, Malo will sell you the Hawkeye for 100 rupees at the Malo Mart. Now you can zoom in with your bow and arrow, and it’s now more like a sniper rifle. You need both of these equipped at once for this effect.
Barnes Bomb Shop
Enter Barnes Bomb Shop in the north part of town. You can see he’s selling bombs. He has two that aren’t out yet but he has 10 for 30 rupees. Unfortunately you need a bomb bag premium kit with bag and bombs for 120 rupees! That was a little more than we thought initially but take it.
Go to the southwest part of town and you’ll see a boulder against the south wall by the eldin spring. Use a bomb to blow open a hole and run through. Jump into the deep part of the water with the Iron Boots and get the treasure, it should be another Piece of Heart and it should be enough to fill up another full one for you.
Go back to where you blew that boulder up. Look up to see another boulder, a more brown one. Go to your items and to your bombs specifically and you’ll get the option of pressing R to have the Bow and Bomb combo. Use this and shoot that boulder, revealing a Piece of Heart. This should be your 1st / 5 so use that Gale Boomerang to pick it up.
Hyrule Field North Eldin Province
This is where you fought that jerk King Bulblin. I got some mail from the mail guy, about the bomb and about a kakariko shop. See those boulders ahead of you on the right? Blow them up and leave Epona and start venturing up there. Continue south jumping across paths and going up the ivy. Follow this until you get to a boulder that you need to arrow / bomb.
Continue along until you get to a heart piece – you’ll have to look down for a treasure and jump to it, that’s the heart piece.
Back to Epona. Start riding about north from the entrance and then veer off east towards the dirt area and look for a gold glow. Slowly walk up to this creature, it’s a Male Grasshopper. With Epona ride to the northwest corner of the map and you’ll see a gold glow. Fight the Leevers off and then slowly walk up to it – it’s the Female Grasshopper.
Go to that bridge that you fought King Bulblin on. See the gold glow just as you enter the south part of it? It’s on the east side and with the Gale Boomerang you can get it right next to you. Pick it up, it’s the Male Phasmid. On the other side of the bridge, go to the east side of that and you’ll see a huge boulder. Blow it up and get the rupees then stand near the wreckage. Look at the east wall. A bit above your head you can see a gold glow, if you’re close enough you can lock on with the gale boomerang and pull it close. It’s a Female Phasmid.
Go across the bridge and further north, using bombs to explode the boulders and move on to the next area. When you do, three twilight beasts come by the bridge and destroy the middle part of it. Rush back there and kill all three at the same time. The only good you get out of this is the Hyrule Field – Eldin Province Warp. Take Epona and hurry along the path until you reach a barrier of Twilight.
We are at the border of Lanayru Province. This is the last fused Shadow that we need. Get off Epona and agree with Midna to go into the final twilight.
Entering Lanayru Province – Twilight
Run along and kill the keese along the way. You’ll come to a bag, that of Ilia. Now forget the Youth’s Smell (talo) and choose to memorize the Ilia Scent. Turn your senses on and follow that scent until you get to a new area of Hyrule Field. You’ll see a castle here, hmm.
Follow her scent to the very southwest. Eventually it’ll veer east into Hyrule Castle Town.
Hyrule Castle Town
Talk to the spirits if you wish but keep going east on the minimap and follow that scent. It veers all about once in town but generally it is heading south until you see it head into a building, the Telma Bar. Ilia is hanging out in here and you’ll hear about a spirit in Lake Hylia. Ilia is overlooking a poor Zora Child.
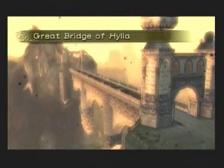
Listen to the soldiers again and then leave the bar. We are to find the Lake Hylia light spirit. Head west out of town (you can’t go south). When you reach the Hyrule Field go west. You’ll come to a big sign about Fyer and Falbi’s Watertop Land of Fantastication Flight-By-Fowl. Whatever, head southwest to the Great Bridge of Hylia. The Great Hylian bridge is over Lake Hylia which seems to be just a puddle almost. Go along the bridge and a Twilit Bokoblin Archer will ambush you and burn the bridge. You need to leave, fast. Push a box again the wall (make sure it’s flat not slanted) so that you can climb up and jump into Lake Hylia.
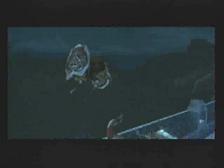
Seems like there is a problem in Zora’s Domain. Go out towards the house with the dude hanging out. Talk to his spirit and then you’ll see an enemy. It is a Shadow Bird Rider and he’ll be sending Flame Arrows at you. You’re going to want to pounce and chomp on him a few times to get him down. After that you’ll steal his ride, the shadow bird.
Midna and Link are flying on the bird now. This part is annoying – you can’t hit anything or get hit by anything or you’ll fall. Watch for the arrows, falling boulders, and generally it’s just hard to not get hit as you’re avoiding these arrows and whatnot. Before you know it you’ll be at the very north with a light tunnel.
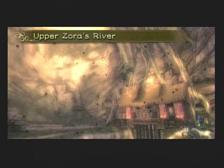
You are at Upper Zora’s River. Up ahead is a boat rental to Lake Hylia. Go west on the minimap past the snowy ground and to the northwest exit.
Zora’s Domain
You are now in Zora’s Domain. It has frozen over once again. Go north upon entry and when you reach a bunch of icicles and a steep snowbank, step on top to do some LTarget Midna jumps up the mountain. Run along to the west when the jumps are done and you’ll reach another ledge to do some L Target Midna Jumps. At the top you reach a point with three shadow beasts (a barrier surrounds the area). Kill the one by itself and use a combo attack on the two. Use your senses on the ice after the battle to see all the Zoras are frozen under water. You can warp now – so do so, to Death Mountain.
Death Mountain
Look in the Eldin Province for Death Mountain warp. Right by you is a gigantic molten rock. Go up to it and press Z and then warp it to the Lanayru province, Zora’s Domain. It’ll burn the ice.
Zora’s Domain – Lanayru Province
Talk to the Zora’s but most will be in shock. Make your way south to leave but Rutela a former Zora Queen will speak with you. She wants you to save her dearest, Ralis. If you save her son she’ll give you a means of dealing with the water. Go south down the water path and jump into Lake Hylia.
You’ll wash up next to the spring of Lanayru the Light Spirit in Zora’s Domain. Go in and get the third Vessel of Light.
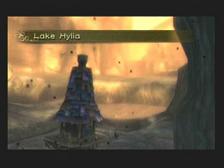
Lake Hylia
As you leave you’ll see a bug go to your left. Put your senses on and chase it up. Kill it and get the first vessel of light. Further west is a platform where you’ll fight three more shadow beasts – they are a bit away so it takes some smarts to get two of them for a jump attack. You now have a teleport to this spot.
In the northeast of this room is another bug, a flying one. Swim across (go by the islands its more shallow and you can basically run) to get there.
Back to that spot where you fought the shadow enemies. From here go south and work your way east to the bug in that corner. You’ll have to dig this one out to defeat it.
Back at shadow beast spot – go northwest now and to the back of the house you see. With your senses you see a flying bug and it’s hard to hit – once you do hit it that’ll be 4 vessels of light. Go before the house and you’ll see some things you can blow. The howl sequence you need is already displayed but basically howl at the top, then the bottom, then the top, then the bottom and you’ll get that shadow beast to fly you around again.
The route that the shadow bird takes is the same but you have four bugs you need to get along the way. Have your senses locked on for most of the flying sequence and you’ll see them – lock on with L and press A to dash through them – you don’t need to collect the tears of light they just appear with you. If you miss them just teleport to Lake Hylia and do it again.
Talk to the lady nearby and then kill the bug that appears. Go to the bridge you see and a howl will come up – at 1 you do the bottom note, at 2 you do the middle note, at 2.5 you do the bottom note, at 3 you do the top note, at 4 you do the middle note and at 5 you do the bottom note. It can be a little tricky but once done you’ll be teleported to the golden wolf. You need to perform this again in front of him to confirm it and then you are to meet this golden wolf again later with human link.
Go north a bit and you’ll hear of Prince Ralis and the waterway in Hyrule Castle. Follow these two into Hyrule Field via their route.
Hyrule Field
Look to your right for some stairs and then run west to the next screen. Go south and attempt to head into the east gate but of course three shadow beasts block your way. Not difficult, you’ve fought about 15 batches of them by now. Run into Hyrule Castle now.
You can see the lone bug in this area. It is to the southeast, beat up some crates and kill the bug and it’s yours.
Press Z and have Midna warp you north to Zora’s Domain. A bug is to your southeast now, charge against the nearby wall to get its attention as it’s a flier. Go out of here via the south and jump down the big waterfall. With your senses on get on a lilypad and either jump attack or charge attack the two flying bugs nearby. Then go to the east end and exit, and climb the hill to get to another bug. While still on this east end you’ll see you can do midna jumps in the southeast. Be careful not to fall around here but you can get to the upper areas of both the east and west ends. There is a bug on each end. The west end is hardest to get to as you’ll get to a point where you can get a Red Rupee chest or do about 10 more midna jumps to get west. All of these should put you at 15 Tears of Light, one short of 16.
Lake Hylia
Warp to Lake Hylia. You can see the last bug in the lake going haywire. Make your way to the northeast to this bug in the water. It is actually a gigantic Dark Insect Queen. Careful of this electric beast, it will shock you and knock you off your lilypad.
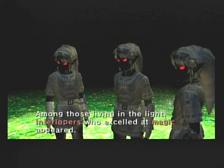
Stay on one at all times pretty much although you may need to jump off to dodge her at times. She will also swim around at ridiculously fast speeds so you’re going to want to wait until she subsides from doing this and jump on her and chew her up when she stops. After about three of these chew sessions she’ll flip over on her back. Jump on top of her and do a Midna Charge attack to kill all six legs and destroy her for the final Tear of Light. You are then transfered to a Zora’s Domain with light. You are Link again, speaking with Lanayru. You hear about a temple in Lake Hylia. Link also hears of past battles and the Triforce and of powerful sorcerers that are interlopers. This magic is accessible with Fused Shadows. This is pretty creepy but you need to make quick and go to the Lakebed Temple in Lake Hylia.
Lake Hylia – Link
You are Link now at Lake Hylia. Run along to Fyer The Clown and he’ll shoot you up into the air far to the north. You only had to pay 10 rupees for that.
Before you enter the nearby building Midna will have a revelation – you’re going to need the ability to be underwater if we wanted that third fused shadow in the third dungeon. We need to save the Prince Ralis. Enter that building and you’ll be in Falbi’s Flight-By-Fowl building so save your game. A minigame awaits you and you’ll need to pay 20 rupees so it’d be best if you could save incase you fail.
Talk to the goofy guy Falbi in here. Gives him the 20 rupess and grab a cuckoo. Look down and see the blue-grey thing below with several platforms? Well you’ll went to jump on the second-further one (not the spinning platform which is the furthest away). This treasure you’ll get is a Piece of Heart. Hop down to the other floors to get 50, 20 and 10 rupees on each floor. Go back to the Clown Fyer’s shop to get sent back up there.
Go to Falbi’s Shop but go through the back door. You’re now near the Hyrule Field and the Hylian Bridge. Run across the bridge, I got a letter at this point. Two of them. One is from Barnes about a new underwater bomb he’s created. The other was about Lanayru Tourism, like some of the things to do around here. Go to the bridge and look to your left. On the east side of the bridge is a Male Mantis for you to catch – on the south side is the Female Mantis. You will need to look behind the last tree branches in the south end. Boomerang her your way. Go north now near the next area but spot the grass before the road narrows – blow this grass to summon Epona to your side.
Now you can ride her north. Continue to take the north splits and you’ll have to bomb through a few walls to continue on. Eventually you’ll get to the far north tip on the minimap and you’ll have to bomb in and walk in. Jump into the big lake and go up the eastern ramp. You’ll see a gold Male Dragonfly against the far wall so boomerang it to you and catch it.
Go to the west end now and take the foot path going south that is parallel with the river.
Upper Zora’s River
Go to the north part of this place. You’ll see a door to the Fishing Hole.

Fishing Hole
Well, this is where you fish. Go to the east part by the bridge and you’ll get fish often. After a bit you’ll even catch an Empty Bottle. In the shack is a cute babe named Hena. She runs things around here. Talk to her a few times and Lure fish with the canoe. Take the canoe north of where you start off and you’ll see a Piece of Heart on a ledge. You’re going to need to line up your fishing reel to lure it in. It is yours to keep when you get it. Now you can continue to fish here but leave for now.
Upper Zora’s River
You are here once again but go east towards the shack. See the bridge? If you’re running east towards it you’ll see the Female Dragonfly. Throw the Gale Boomerang at it to catch it.
Talk to Iza in the northeast and run around this area – three twilit beasts will be around you. Spin Attack them of course and then talk to Iza. She needs your help – agree to it. Use Bomb Arrows to shoot the nearby boulders and then you’ll be in a boat. This is a very scenic part of the game, going down the cavern with a canoe. Towards the end you’ll see Iza’s partner and you will be informed that you have to shoot the boulders ahead (twice) to advance. Do this and follow her afterwards and you get your bomb bag for your efforts.
Swim over to the clown’s place and get back on top. Summon Epona with the north grass and then start riding towards Zora’s Domain and back to Iza’s Boatshop. Save and talk to her. For twenty rupees you have a shot at getting the Giant Bomb Bag. The Giant Bomb Bags hold up to twice as much as normal (so 60 bombs). To get this you need 25 points (out of 30 total I think). Make sure you don’t hit stuff with the canoe or you’ll lose points unfortunately. Of course that’s why you saved so you could reload if you messed up. You need the Clown’s help to get back up and get Epona with the grass.
Ride north and east when you can toward Hyrule Castle Town. See the plateau with the ivy and the Gold Wolf to the left of the entrance? Go here to engage in another battle against a knight to teach you something. You will learn the Back Slice this time. The Back Slice Hidden Skill is kinda hard to learn as you have to sneak around your enemy and hit B fast.
To the south, do you see those white flowers? Search around them for a bug the Male Butterfly. Travel north on Epona to the North part of Hyrule Field.
Hyrule Field North
Travel eastward and you’ll see a rock and a tree near eachother. On the tree a gold shine shimmers, and put that gale boomerang to use to snatch the Male Stag Beetle. Ride to the very north edge now but stick to the west wall – you’ll see a suspicious boulder near the end so blow it up and enter. Not much you can do, so exit and look on the wall to your right. See the Female Stag Beetle? Well Boomerang it and get it.
Lanayru Province Hyrule Castle Town –
Yes it’s time to head inside the castle town. Talk to the old guy who wants money to restore the Hyrule Castle. Give him as much as you can, trust me. I gave him 260 for now. If you give him a total of 1000 rupees that a Heart Piece for you (an expensive one no less). Leave Hyrule to the south.
You’re outside in front of Hyrule. Go to the west on the minimap and you’ll see two sets of three trees. Go to the southern one and you’ll see a Female Ladybug. Catch the female ladybug and then let’s look for the male ladybug. It is on the east side, by a huge mesa. Lots of crows are around here (kill them all for a bunch of rupees). Walk slowly up to the flowers in front of the mesa for the Male Ladybug.
Hyrule Castle Town – Agitha’s Castle
Go back into town now after you get the ladybugs. Take the west substreet and go in Agitha’s Castle. Agitha is inside and she’s invited all 24 golden bugs to her party – but you are to collect them all. Give her one of your bugs (since Butterfly is the odd pair – you have one only – i give her that one) and then she rewards you with the Big Wallet . You can have 600 rupees now thankfully. Keep talking to her – if you give her a bug, she gives you 50 rupees. If you give her a pair, you get an Orange Rupee. That’s 100 rupees! Max your 600 rupee wallet out and return to the priest to give him some cash. You should have 19 bugs (9 pairs). When the priest donations reach 1000 you’ll get that Piece of Heart and then pocket the rest of the bug money.
Go to Telma’s Bar in the east part of town. There is a hurt Zora here, with Ilia. Ilia is having a memory loss I guess. You are to help the Zora and go to Kakariko. After some scenes you’ll see King Bulblin and it’s time to start riding Epona toward the bridge that he is on.
Hyrule Field
Out on the big bridge west of Hyrule is King Bulblin. He won’t be bested as easily as e was last time, instead he has a two-sided Shield so you can’t attack him. But you do have a bow and arrows so shoot him right in the center and he’ll veer left and right – he can still knock you off so avoid him and go to the other end and charge at him again and do the same thing. After a few shots he rams into the side and is thrown off the cliff. You receive the Gate Keys.
This part is terribly annoying. You have to fight an endless amount of birds and Bokoblin Archers on Boars. The last part is the worst as the bird will always impede your progress. It’s all about timing – make sure you kill the enemies right before the turns or your horse and carriage will get turned around at the worst time and it’ll take even longer.
Kakariko Village Eldin Province
The zora has passed through the worst of it. Some more scenes and talking. Telma will tell of you of a group. There is a passageway from her bar into Hyrule Castle even. After this you see a scene. Follow the Zora Queen to the Kakariko Graveyard
Kakariko Village Graveyard
She stops at the east-most grave. The Zora Sapphire image disappears as does the grave, revealing a place to crawl through. The Zora Queen is at the other end and she stands at a fish-like tombstone of the Zora King. She opens this tombstone to reveal the Zora Armor. This Zora Tunic allows you to breathe underwater – but you are more vulnerable to fire / ice. The Zora Queen disappears and you can equip the armor. Great, well Midna reminds you we should be worrying about the third Fused Shadow at the Lake Hylia Lakebed.
Leave this area and you’ll see how much faster you can navigate water – you swim faster, no oxygen problem, you can dive deep, etc.
Kakariko Village
Remember that kickass letter we received from the postman about Barnes and his new bombs? Well go to his shop in the north part of town and see what he’s talking about. First of all you need an open Bomb Bag to buy the Water Bombs. This means you have to go to the nearby counter and sell the bag that has the least amount of bombs in it. Keep one bag full of regular bombs and then buy Water Bombs with the other bag.
Zora’s Domain
Enter Zora’s Domain from the northwest path (so that you’re in the upper part. Bomb your way north so you can get to where all the Zoras were frozen. You then need to use those Iron Boots and go to the bottom of this area (north part of Zora’s Domain). Use a Water Bomb here to explode the boulder (the flaming boulder you brought over here) and talk to the Goron you just freed to get another Bomb Bag, your third Bomb Bag.
Lake Hylia
Make your way down here again so that you can get that third Fused Shadow. I did the Iza Boat Shop game to get down here. Go towards that purple dot and get your Iron Boots on. You’ll see the entrance to the Zora Temple here. Use a Water Bomb on that spot in front of the gigantic pillar blocking the entrance – a geyser will start shooting water up now. You’re going to want to place another Water Bomb on this geyser so that it rises up and blows open the rock just as it detonates. Go through this new opening.
Lakebed Zora Temple – Lake Hylia
You are now in the Lakebed Temple. You can only use your sword in this water with the Iron Boots. For now just swim as north as possible and then swim up to get out of the water. You are now on land. Get the treasure behind you for some much needed Water Bombs. On the west side are some arrows. Go up the stairs and jump back down through the center so that you jump on that switch hanging – this will open the gate and you can continue to the next room.
When you walk in a stalactite will fall to the ground. Get your Bomb / Bow combo ready and shoot the others (straight ahead in the fat part). Run down the path and jump up the next two ledges until you see a Helmasaur. These little things will charge you fast and can protect from the front (these guys are why you learned the Back Slice). Keep climbing up and if you go east near the door you’ll find some booty and 10 Water Bombs. Enter the door.
This is a large area as you can see. Where you are though, just go straight ahead to fight a Lizalfos. They are tough fighters at this point so you’ll need to be on your best as you L target them and fight. Defeat this one and enter the door. Go right down the stairs in this room and hang a left. You’ll have to fight some Tektites but these spiders aren’t much of a threat if you have the timing down for a jump attack. At the end of this path is a 20 arrow treasure. Move back a little and jump onto the switch – if you miss, climb back up and do it again. Jumping on these various switches will rotate the stairs. For now go back up those stairs. Take a right and follow the path to the east to find Ooccoo again. Go to the very west now to see a door, but look behind you and jump on that switch to rotate the stairs again. Go down the stairs and take a left for the Dungeon Map of Zora Temple. Go back to that door facing east near you and enter.
Fight through the Helmasaur (good practice with them) and go through the door.
First let’s run straight ahead without jumping off and pull out the bow / bomb combo. Shoot down the two stalagmites you see. Go down the passageway north. Climb that Ivy you see and take it to the left and get off. Look around and you’ll see a treasure a few platforms away. Also see a water geyser move a platform up and down periodically – well time it so that you can jump on that one and get the Small Key in the treasure. Go back west a few screens to the room with the rotating stairs.
Go up the stairs and take a right, and go through the door that is locked. Fight the Helmasaur in the next short entryway and then go through the door.
Take a right when you enter and grab the Water Bombs in the chest. Look on the ceiling to shoot some stalactites down. Climb on the stalactite that is near the center wall and climb that ivy up and then to the left and get down on the thin ledge you see. Look around you’ll surely see a gold switch you need to jump on. A gate will open when you do this. Go to the north end of the room and through the door.
You have a huge thing in the center of this room. When you jump on it, a Lizalfos jumps to to intimidate you. Kill him off with a Jump Attack and Ending Blow or whatever works. There is a door in the southeast – take it.
A quick right when you go through and you’ll see two keese – kill them and grab the Small Key. Go back through that center area and to the north part of the room that had the Small Key. Take a right when you get back to the north end here, and a boulder will bar your way – not for long, but when you blow it up with a bomb two Helmasaurs charge you. Take them out but as they are together you may have some issues. Continue east and through the door.
You’ll meet Bubble Bugs in this room. These creatures warrant some bomb bow action. Go east through the locked door and take a quick left. See that Ivy? Jump across and climb up it, and then start going along the path on that side of the room. You’ll fight about three Tektites and will come to 10 Water Bombs. After this chest climb up a nearby ladder and you’ll see a treasure to the east. But jump that direction onth the handle and that will open a gate. Start going down that winding path and the water will take you to the bottom. Go to the center part and press down on another handle to open another door. Staying on this floor, go back to where you used the key to open the locked door and you’ll see a door with water flowing into it. Go in.
Run through killing enemies you see until you get to the southeast – enter the door there and don’t go past the wheel in the water.
This big thing in the center is moving in circles. Drop down and you’ll see three circular platforms spinning in circles, like a ride at a carnival. Climb the ivy over to that end where you can climb up some ledges and Ivy to reach the top. From here you can jump on these moving platforms and you want to get off at the north ledge and go through the door.
Take a right and grab the Small Key. Defeat the weak Chus after you get it and return back to the previous area. Ride a circular platform to the east panel and enter the door.
Open the locked door and go down into the water with your Iron Boots. On the left is a Red Rupee and on the opposite end against the current is a 5 bomb set. Further to the west is a boulder that you can blow up with Water Bombs to continue westward. You’ll see a Shell Blade enemy and Shellbades like to block a lot and are only susceptible to your sword when they open their mouth.
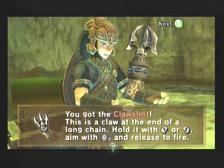
You’ll reach a new area after a short time walking. Get those Iron Boots off and swim to the surface. You’re in a dangerous area, as you defeat three Tadpoles but look up to see a Giant Frog. This boss will release many more Tadpoles on you. Defeat all of the tadpoles and then he’ll try to jump on you. Evade him of course through spins and whatnot and then his tongue will be vulnerable. Attack it with jump attacks and ending blow eventually. After this you can shoot him in the tongue with the bow bomb if you’d like and it’ll open him up for more attacks. Once the Giant Frog dies you get a Clawshot. Zelda veterans know all about the Claw Shot or Hookshot. You can attack enemies or more importantly latch onto different things like treasures and indentations. It’s very useful overall. Use it to exit via the south (shoot the red thing).
You have to deal with the Helmasaur when you get in. It’s a simple Clawshot use to remove the armor and then kill it. Go straight ahead to exit and then take the west exit in the next room to get to the rotating stairs room.
The water rises as you get in and you hear a magic noise. Run up the stairs and when you’re at the top, look back and up at the ceiling. See the shiny chandelier? Use that Clawshot to get up there (target the red dot) and you’ll get a Piece of Heart. Clawshot to the top north part and jump on that lever to switch the staircase. Go to the lower west room now and enter this way – the water should be travelling through the west door.
Some Tektites are here to greet you. Kill them and slowly walk through. Go through the door.
See the treasure to your right? It is 10 water bombs and is accessible if you use the Clawshot on the target above and lower yourself. The pots further ahead are Yellow Rupees each but we need to get on the ivy in the northeast portion of the screen. Shoot up there and you’ll need to move nearby to some more ivy that leads to the door in the northwest portion of the minimap.
Kill the Bubble Bug to the right of you and go the opposite way (west) to get to a water geyser. Look up and shoot the stalactite with a bomb bow. Jump on it and jump across the path so you can continue. Kill the Tektites and then you have to Clawshot to the door.
Kill the two Bubble Bugs in here. Hawkshot onto the ivy and climb it to the north and drop down. Clawshot to the ivy across and begin your way up, taking care of the Helmasaurs as you go. Go all the way up for 10 bombs as a treasure. As you get to the top climb the ladder and jump on the handle to open a door. Look to the center and Clawshot to the treasure you saw earlier. It is The Compass.
Ride the path all the way down and go to the middle of the area on the bottom. Release that handle for another sluice gate to be released. Use the Clawshot to get to the southeast door to exit.
Jump off the ledge and you’re in some water. Go out through the east end past the water wheel (before it is a red rupee in a treasure – use iron boots). Past the water wheel is a door to go through.
Lots of stuff going on in this room. Defeat the Lizalfos in the center and jump to the southeast to exit.
The chest to your right is a Red Rupee. You’ll have to fight some Chus but get it and return to that center room with all the stuff moving around.
Drop off the right side here and you’ll see some ivy and a place to land anyway. You’ll need to ride a moving platform to the west end. Kill the Keese as you’re waiting, and then you’ll need to clawshot onto one of the targets on the west panel. From here, wait until you’re above the far west ledge so you can drop down and enter the door.
Jump into the water with the Iron Boots and sink all the way down. You’ll find a tunnel that leads to the upper left and center parts of the room. Look up after you kill the Jellyfish and you’ll see a ledge. Take the Iron Boots off for a sec until you get up to the ledge and put them back on. You see a boulder and some fish enemies rushing you. Kill a fish enemy near the boulder and it acts like a Bomb. Go through this hole now with the Iron Boots and blow up the boulder with some more Water Bombs. Swim to the surface, get on the ledge and exit.
Kill the Bubble Bug you see and then Clawshot onto the wall to open something up. Lower the chain of the Clawshot and you’ll come to the Big Key. Head through the west door with the Iron Boots. Now you have to swim back through that boulder you blew up and get to the east edge of this water maze. Enter to get back in the room with the two circular platforms spinning about.
Latch onto the west targets and drop on a platform that isn’t moving. As you are closer to the east targets you can use one of them and jump onto either a platform that isnt moving or one that is, and clawshot onto the ivy or something to get to the east door. Go straight past the Tektite and Water Wheel into the staircase room. The water level will rise here. Use the Clawshot to get to the east part of this room (hint – clawshot the ivy) and then jump on the handle on the lower east side. This rotates the staircase of course so we can exit through the east door.
Continue past the Helmasaur in this room and through the door. In this room the water level is so high that a wooden bridge floats up allowing you to get to a new area. Stand on the switch in the south area with that bridge and a gate opens up, but not fast enough for you to get through. You’ll have to Clawshot through and kill the Lizalfos on the other side and a Piece of Heart is your reward. Hookshot out of this gate and go to the west end to exit.
You’re close to the room with the rotating staircase. When you get there, jump into the pool and swim to the center. A Boss Key Door is here so use your Boss Key for the Zora Temple. Get some Fairy’s and hearts here and jump down when you’re ready.
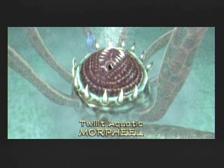
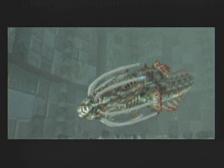
Twilit Aquatic Morpheel
Put those Iron Boots on and walk to the center. This jerk appears in the center. He reminds me a little bit of the second boss in the dark world in Link to the Past. Anyway, you’ll need to Clawshot the eyeball and attack it preferably with a jump attack or quick slices. Watch out for the Bomb Fish and especially the tentacles – its hard to dodge with those damn iron boots on and when he catches ya, you have to get rid of the Iron Boots so that you can flee. After a few hits he comes out of that center area and changes his look.
Take those damn boots off because you have to fight him swimming around. This part is done horribly in my opinion as the bosses animation will always catch you even if you swim really far away from him. When he chews on you it takes off a heart. Not to mention the fact that you can be pressing A as fast as possible and you won’t catch up to him because the game didn’t give this area enough space so that he basically cuts you off from getting a good position on him. You’re going to need a lot of patience and luck to catch him with a Clawshot. When you do start attack wildly – you need to do this about three times to put Twilit Aquatic Morpheel away.
After the fight you get the last Fused Shadow. It’s time to confront Zant the King of Shadows. Get the Heart Piece and talk to Midna. It’s time to go outside.
sooo not helpful. was looking for help in killing the rider. the bird keep throwing me when i try to jump attack. i was hoping for CLEARER help.
I can give you some more advice about the battle. Z-Target the enemy and then use sidesteps to evade the arrows. Then after a few arrows you will have to be prepared to use the jump attack because the rider will fly at you. That’s your chance to do damage by pressing A fast. Sometimes it will catch you though, just try to vary your timing with pouncing if that happens.
Also, try to be more polite when making comments here next time :)
how do i get bombs at the point when you need to get the fused shadow because i can’t get to kakariko villiage?
very helpful! thank you! :D
Thanks very helpful i am very glad that this website was created better than the others thanks for the tip
Thank you for your awesome walkthroughs! :D
A tip: Try to swim over him, right behind the head. Never got munched on when I did that. :)