
Hyrule Castle Town
Warp to Hyrule Castle Town. You’ll get a letter from Barnes about new bombs. For now head to Malo Mart to get your Magic Armor if you have the rupees. Not only does the thing cost 598 Rupees but it takes Rupees to use the thing – otherwise it’ll provide no defense and you’ll be slow as molasses. So in reality this armor isn’t that good of a deal for you.
Before continuing onto Peak Province we should get some things now available to us. Take a west exit out of Hyrule Castle Town and then you’ll be in Hyrule Field West. Go north out of the area and then circle west (so you’re on the far northwest part of Hyrule Field West) and you’ll see rails on the side. The northmost one curves up and allows you to get a Piece of Heart. First of all ride the Spinner south and you will make the first jump automatically – unless you mess with the controls. After this first jump you need to jump left and right to make sure you make it all the way.
Bridge of Eldin
There is another Heart Piece. Go to the Bridge of Eldin – Eldin Province and head north. You’ll make your way west automatically and soon you’ll see a Wooden Bridge. To the right of it (north wall) you’ll see some tracks going further north. Get the Spinner on these and you’ll make your way to a grass patch – you can dig here to reveal a cave. Inside are three Stalfos guys – Kill all three with Bombs / Bomb Arrows and get the Piece of Heart treasure.
Hyrule Castle Town – Telma’s Bar
Go here to learn of Ashei’s whereabouts. She’s at Snowpeak Mountain.
Zora’s Domain – Snowpeak
Go south to the waterfall and jump down. On the west side a path to Snowpeak has melted and is available. Up ahead at Snowpeak you will see Ashei. She tells of a beast around Zora’s Domain. Ashei then gives you Ashei’s Sketch of the creature Ashei saw holding a red fish. This thing steals red fish from Zora land.
Display Ashei’s Sketch to the zora just before Snowpeak. It tells you the red fish is a Reekfish. Only Prince Ralis is capable of catching these fish generally. So of course, warp to Kakariko Village.
Kakariko Village – Graveyard
Warp here, turn back into a human, and go east into the Graveyard. Crawl through the hall further east into the Graveyard. Swim across and you’ll meet Prince Ralis. Use the Ashei’s Sketch and he’ll identify the Reekfish and give you the Coral Earring so that you can capture it. Now you can catch Reekfish. They are near Mother-and-Child Rocks and are Red.
Zora’s Domain
Warp back here and go to the waterfall. Jump down and swim to the east shore. Fish around here and with the new lure you’ll catch a red Reekfish in no time. After you catch the Reekfish, smell it and forget the Poe Scent and you’ll learn the Reekfish Scent. Now we have something to work with.
Snowpeak – Peak Province
Ashei is gone this time around but you can see the orange / red scent with Wolf Link’s senses. Up ahead is your first taste of glacier-jumping and you can’t fall in the lake in this one. Keep following the scent for a good while and White Wolfos will jump you, about 3 of them. Keep running unless you want to test your might. A bit after this you’ll clearly see a Poe if it’s nighttime. Kill it of course. Follow the scent some more and you’ll reach a wall (scent goes up a cliff). Continue around the cliff but instead of wrapping around keep going straight and you’ll reach a tree and a poe. Have your Senses up so you can see the Poe from afar and run up to it and kill it. Now go back to where the scent went up the cliff and wrap around to follow it.
You’ll eventually hit another intersection and if you go right (west) you’ll reach two more trees and you’ll see a poe at the southern one. It’s hard to tell if it’s night time here so if it’s not then just get it later. Follow the other trail and you’ll get to the scent again but you’ll reach another area you can’t pass – run into the wall and a drift falls and you have your way up. The scent leads to a Howling Stone for your wolf.
This one can be a bit difficult to catch on with. It starts at the top, then at 1.5 its in the middle, 2 it’s at the bottom and 3 it’s at the middle for 2 beats. It picks up at 5 on the bottom and then 5.5 at the top 6 in the middle and 6.5 at the bottom. Do this for the Gold Wolf and there will be a Gold Wolf for Hylian Link at the Kakariko Graveyard.
Follow the scent south now. It leads to a wall you can dig under so on the other side go west and up a ladder. Climb your way up now and kill all the Ice Keese that try to freeze you. Once you exit turn into Wolf Link again and start following the scent. Some Shadow Beasts will intercept you so kill them. This should be easy even with the Ice Keese bothering you.
You’ll come to a Yeti named Yeto and he’s going to slide to his house where he’ll tell you more about that piece of Twilight Mirror he knows about. Let’s not do this yet though as since we have the Peak Province Snowpeak Top Warp we can go to Kakariko Graveyard to get that Gold Wolf ability.
He’s at the east end of the graveyard. He tests your Mortal Draw and then he teaches you the Jump Strike ability. Basically this is like the Jump Attack but instead of pressing A you hold A for a second and then release for a more area-covering jump attack. You have one hidden skill left to learn.
Back at peak province climb that ramp in front of you and ram into the tree. Of course a snowboard drops from the tree and you are to jump on it with Hylian Link and ride it down the path. There’s not much you can do except gain a few rupees but it’s pretty satisfying. Just make sure you don’t fall off – the objective is to get to the beast guy’s house. Once you get near it, go up that spiral mountain just south of his house. At the top (if it’s night) is a poe.
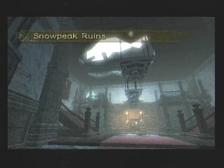
Peak Province – Snowpeak Ruins – 5th Dungeon
Here you are, Snowpeak Ruins. A Poe lies before you so kill it and steal it’s soul. Go north through the door.
You’ll meet Yeto’s wife Yeta. She tells of the cursed mirror in the third floor bedroom. She gives you the map of the mansion and tells you to go to the east door.
Yeto is making some soup for his sick babe. In the south part of this room is Ooccoo. Go northeast to exit.
This room requires you to situate some blocks. Push the first one (southwest) to the east. Now go to the northeast and push it west, south, east and south onto the switch. Go through that southwest door that opened (not the one you started in).
You can’t pass to the right through the ice so you’re going to have to dig west into a bigger room. There is a Red Rupee chest in the south part of this new room. North of this (about northwest of where you entered) is a chest submerged in snow, so dig it out and get the small key. Go east and exit through there. North and key into the room.
Kill the three Freezards in this room. The Freezzard can take off a ton if you’re mistakenly wearing the water suit. Go through the northeast door.
Try to exit to the south in this room but Ice Warriors will bar your way. They aren’t that hard but may prove meddlesome with their numbers advantage. They can take some hits but keep throwing Jump Attacks at them. Go to the next room and get the treasure for…an Ordon Pumpkin. Take the southwest exit.
Climb up the barrels and jump off to the south and exit to the south. Give the Yeti the Pumpkin from Ordon for his soup. You can take some of it yourself in a bottle and drink some to recover 4 hearts. Talk to his wife in the room west of here and she’ll mark down a different spot that she thinks it might be in. She then opens up the northwest room for you.
This is a large room. Kill the White Wolfos and then a cannonball is in the northeast. Go northwest of here to the corner where you’ll spot a window. Go through the door.
Lots of Freezzards in this room. you’ll want to kill them all and then look for the Cannonball (it’s circular and laying in the middle of the path) and bring it to the north cannon and load it in. Now flip the cannon so that it’s facing south and you can put a bomb in the north part of it. After you do this it shoots south destroying a bunch of ice blocks. Go through the south door that is available.
This room can be a pain. It’s likely you’ll fall off a few times. Use the Clawshot to get those pesky Ice Keese and then Clawshot the Freezzards as soon as you see them. To get over to the southeast corner for the Compass you’ll need to avoid the icy support beams. The other chest is a Red Rupee.
Back a few screens to the large courtyard area. Have your senses out when you get out of the window and you’ll see a place to dig – a Small Key is here. Open the western door. Pull the lever down on this side and then get a Cannonball and put it in the slot here. Return to the other side and press the lever to get the cannonball in the courtyard. Take this cannonball and put it in the center cannon and have it face north – shoot it by placing a bomb inside. The Gigantic ice structure has been destroyed.
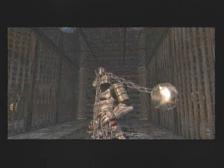 Run straight ahead in this hall but the Armored Lizard will come after you. Hopefully you have some healing supplies because this guy is hard. He constantly swings the Ball and Chain and this is deadly considering he is invulnerable unless he swings at you. It’s rare he does this so you’ll have to illicit him by going near him. Fortunately if you get really close to him you’ll be out of his range and if you slowly tease that you’re going away from him he’ll throw the Ball and Chain and you can start hitting his weak spot – his tail. Jump attacks are best but regular ones are fine – he doesn’t have much health but this will last a little while. Search the weapon to acquire the Giant Ball and Chain. Go north to exit.
Destroy the Ice ahead of you with the Ball and Chain. Get the Ordon Goat Cheese treasure. Return the Ordon Goat Cheese to the Yeti. Before you leave this room though get the Orange Rupee after destroying the steel armor. Back to the male Yeti (Yeto) and he’ll add the Ordon Goat Cheese to the soup – it now recovers 8 hearts! Yeta marks down another spot and opens the west door for you.
Back to the first room. Now that you have the Ball and Chain you can destroy the sets of armor on the west/ east sides of the first room. They’re camouflage and hard to see but the middle one of the east side of the wall hides a Poe. More treasures lie beneath the others even an orange rupee (100 rupees).
Go west of Yeta. Destroy some ice with your Ball and Chain and then a Freezzard will attempt to disallow you from passing. Wait for it to spray it’s ice near you and then follow it back up – it’ll go up high enough so that you get the opening to throw the Ball and Chain twice into the Freezzard. It’ll blow up into three little Freezzards so destroy them too. At the top is another Freezzard leading to the same result, and then some ice that reveals a cannon. After the cannon is revealed go north and enter.
Quickly whip your Ball and Chain at the Ice Warrior to your left. Hit the Chandelier with the Ball and Chain to get it rocking and then ride it to the opposite end for a Small Key. Leave through the south back into the last room.
Go to the south end of the area and blow up the floor where it looks flimsy. Drop down, grab the Piece of Heart and Clawshot back up there. Use the east wall to exit with the key.
Destroy that ice next to you first thing. Now you can Clawshot back up here should you fall (could happen). The Ice Warrior to the East will throw a javelin of ice at you when you rock the chandelier and attack to jump over there – so either Ball and Chain him before you jump over there or dodge his attack and get to his platform and worry about killing him then. Get back on that chandelier and wait for it to settle down – start using the chandeliers to jump south (it’s hard to time them to have them both close to eachother at the same time). At the very south is a Piece of Heart if you make it that far. Go through the east door to exit.
Tons of little Freezzards in here. Kill them fast with the Ball and Chain and then Ball and Chain your way east through the Ice. A Poe emerges so kill it fast with the Wolf Link. North to continue on.
In this room push the block you see north and then jump down. Destroy the Ice block and the switch that was enclosed by ice. You now have two switches and three blocks (one block is on the switch from the previous time you were here).
Let’s say that the block you just used the Ball and Chain on to get rid of the ice is Block 1. Block 2 is the southmost one on the switch and Block 3 is the one that is 1 spot north and 1 spot east of Block 2. Push Block 2 north past the middle switch. Push Block 1 south, east and then north so that it hits Block 2. Now go back to Block 2 and push it west, south, east and north to be on top of the middle switch. Climb up the blocks in the northwest and make your way to the top. Now exit to the southwest.
Kill the Ice Warrior just east of you. Jump on that bridge that leads to the northeast and the hole in the wall, and then Clawshot through the hole. Go through the east door to exit.
Of course there is an ice patch to the left as you enter that reveals a Clawshot target. Hit the east chandelier and then hit the chandelier south of that so you can get on the south ledge. A Small Key is in that little treasure there. Go through the south door.
This is the Block Puzzle – just exit south. Go through the key door in the northwest part of this room though – after you kill all of the Freezards. In the following room you’ll have two gigantic Freezards to kill and then a lot of mini Freezards that spawn afterwards. Knock down the two giant blocks in the west part of the screen. However take the north exit.
Smash the ice to your left to reveal a Clawshot. Run left and then north and jump into a new room. You’ll be in the west path of the Courtyard – You’ll need to go back in the Courtyard and then go south, west and north to be in that west path again. This time though push the block north and you’ve made the room a lot bigger and easier to access. Put a Cannonball on that south Cannonball Transfer thing and then go through the south door. Pull on the lever to bring the Cannonball up the ramp past the cages and into the Cannon you see. Position the cannon east and drop a bomb to shoot. Go towards the opening now.
Okay in this room, take the Cannonball and put it in the north panel and then go through the north door to get it in that room. Take the cannonball in this courtyard and bring it to the center cannon. You can now aim it to the northwest to destroy the Freezard that wouldn’t let you climb all the way up the ladder. So, jump down and head west then north up the ladder. You’re up here so go through the northwest door.
Lots of Ice Warriors in this area. Use that Ball and Chain to destroy an Ice Warrior and go through the north door. Hey wow, inside is the Bedroom Key also known as the Big Key. As you leave towards the Courtyard you’ll be stopped by Yeta. She’s had Yeto’s soup so she feels better. She slowly shows you the way up the path and to the Big Key room, the Bed Room.
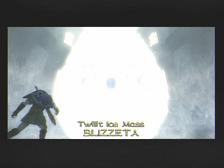
Snowpeak Ruins – Twilit Ice Mass Blizzeta
This is spooky. Yeta looks into the Twilit Mirror and turns evil. Twilit Ice Mass Blizzeta is huge. At first she can be pretty easy. All you have to do is throw the Ball and Chain at her and she’ll shrink and ricochet around. The best alternative for dodging her attacks is to just pummel her with well-timed Ball and Chain attacks. Use the Ball and Chain and then pause for a second or two depending on how fast you sent her ricocheting off some wall. After about 7 or 8 hits with the Ball and Chain, Ice Mass Blizzeta changes her form.
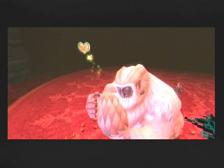
She has about 10 or 12 Ice Barriers blocking her now and they do two attacks – the first attack is that they all attack you one by one so if you keep running and rolling away you should dodge them all. Then they line up over you and try to put you in the middle of their circle because that’s where Twilit Ice Mass Blizzeta comes down. The best way to get at her in this stage is to take out roughly half of her barriers (if you take down all of them she just regenerates them) and then try to line Link up with the holes in her barrier so you can turn around and throw a Ball and Chain at her when she lands. The key is getting good vision of her and her barriers above you during her second attack. After three attacks she’s done for. Yeto runs into the room and saves her. Lots of yeti love going on and Link can pick up the pieces to restore his hearts…ew.
Get the Heart Piece at least and talk to Midna.
You rock this walkthrough helped me alot with everything. Thank you so much for everything.
this walkthrough helped me alot thx!
This helped a lot thanks! I LOVE TACOS!!
No problem, glad I could help. This page gets a lot of hits so the Snow Peak Ruins must cause problems for people.
When I eat, I have fun like you wouldn’t believe.
Bears are dangerous, you should not hand-feed them bacon.
Bruno’s tight pink underwear looked quite swell on the greedy dwarf.
The cowboy screamed Whoops-Hooba!!! And opened a can of cow beans.
Oh, and thank you.