City of Ancients
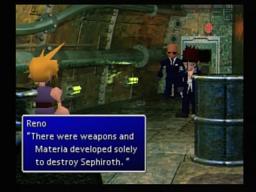
After Cloud decides to continue, your party will start outside of the place to rest in the City of Ancients. You are to walk to the northeast. Cloud will see visions of Sephiroth.
As you head to the northeast screen, don’t jump up the bone spikes yet. Walk northwest and around to the east to get the Viper Halberd. Now go up the bone spikes by jumping up them.
Corral Valley Cave
Soon you’ll be in a cave. Climb the left path up and then climb up further. You’ll see a treasure to the west so get it, it’s a Bolt Armlet. Now go right and you can take a path going down for the HypnoCrown that you saw earlier. The Hypno Crown allows your Manipulation rate to go up. Go up now and get the Megalixir on the right and then go west and further up. All the way to the west but go south for a Magic Plus materia. Now climb the ladder all the way north to exit. Grab the Power Source and go north.
Thankfully you’re on the world map now. West and north a little on the world map and you’ll see the Icicle Inn.

Icicle Inn
Lots of nice weapons in the west building. The building east of this has a video and a Turbo Ether down the south stairs. The far east building has a Hero Drink and Vaccine. Also take the Glacier Map on the wall right by these treasures. Visit with the people at the Inn and Bar and then go north to try to exit.
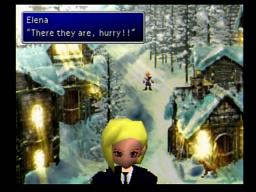
Another stupid minigame rears it’s head as Elena comes up to you. You have a chance to dodge her punch but most of the time she’ll just punch you before you can move.
Either way Elena will roll down the hill or you’ll end up in the lab. Afterwards, go out and head to the snowboarder’s house. The little kid will allow you to take his Snowboard now. Make sure to grab the map in the east house and save.
Time to snowboard down the hill. Collect the balloons for points, but really they serve no purpose. Depending on the path you take you’ll end up in different spots. Go right then left preferably to end up near the hot springs.
Great Glacier
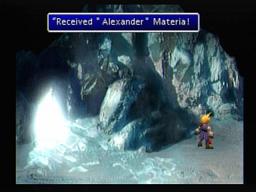
This is by far the worst place in the game and most confusing. If you took the right then left path while snowboarding, then begin going east. Soon you’ll reach a huge fork, so go northwest. You’ll reach some thin land and a Hot Spring. Search the Hot Spring. This is an important step in getting Alexander. At this point I’d just wait until you pass out (cloud passes out after a certain point) and then you’ll end up at Holzoff’s house. This is where you go to continue but there are still items to be had in the Great Glacier, such as All Materia, Elixir, Safety Bit, Mind Source and Alexander Summon Materia. Alexander is most important – so as you pass out, go south to enter the maze. Go due east, and make sure put sticks out to show your progress. Soon you’ll reach a linear area where you go straight east for a few screens. Eventually you’ll be going south in a mountainous area and you can see an east path to a cave. Inside is a Snow and she is protecting the summon. If you touched the hot spring you can fight her for alexander. She’s not too hard, just attack or use high level fire spells. The Alexander Materia is a tough one to get and now it’s yours. I’d probably run around until Cloud passes out now unless you want to try to backtrack back.

Gaea Cliffs
Holzoff will give you the scoop as to how to continue north. You’ll need to keep your temperature by pressing square. There is no difficulty to this, as you basically press square until the temp is 38, and then you climb. Just hold up, and when you get to the next floor press square to 38 and go on. After 5 or so floors you’ll be in a cave.
Go north right away to a new area. West and south to get to the top part of the first area. Go south and east through a wall for a Ribbon and then north for a Javelin and an exit. Take this and go under the tunnel and all the way up until you can push an Ice Rock. It’ll destroy an icicle.
Now go back to the first area and go north via the bottom floor. You can now continue north to a new screen and then east to another one. You’ll be outside now and you have to climb but now you have some options. At the first fork, go up to the next ledge and rest up. Continue up but you’ll have to detour right quick. Just continue north at this point, veering to the left a little at the end and going in the cave. Watch out for Malboro’s they’ll use Bad Breath and screw you over.
Go east for an Elixir. North of here is a save point. You can’t get the northwest treasure or the north exit but the northeast exit is open. You’ll be on the outside now but there is only one path to take. Grab the Fire Armlet to your right as you walk in.
As you go west you’ll have four battles against enemies and a big icicle in the back. After you win each battle the icicle will drop and you have a chance to drop down – don’t do so until they’re all down though. Even then you shouldn’t do it because there is a Last Elixir at the far west. Jump down to the first floor and you can get the Speed Source in the northwest, then save and take the now-open north exit.
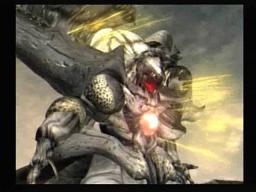
Grab the Enhance Sword and follow the path until you get to some more gaea cliffs. Climb up them and then save in the new area. Dip your hands in the pool nearby to restore your hp and mp. Continue east when you are ready and you’ll reach Schizo. As you can see, one side of this beast is fire based and the other ice based. Ice 3 and Fire 3 would work on them obviously. Expect to heal often and after you kill each of the heads it’ll result in a bolt-like attack for 1000+ damage on each. So, don’t kill it off with low HP. Your best Limits and summons like Bahamut / Alexander will do you best. A Dragon Fang is your reward.
Go back to rest and save and then leave south. Another area to climb and then you’re at The Crater.

The Crater
Run west down the crater and talk to the sephiroth goon. Keep going west and a few areas from now you’ll see a bright red summon, this is Neo Bahamut. West to rest / save and then further west to exit.
Shinra is near. In the next area you’ll see two sephiroth goons so speak to them for a Hi Potion and Ether. To cross the wind here, make sure to run across after it’s completely done blowing – not too soon or else the gales will still blow you off.
Go north in the following pass and get the Kaiser Knuckle along the way. This next area is much harder because you have to dodge the bolt coming across the screen in addition to waiting for the wind to die down. Just get close enough so that you can run through fast.
Rest up and prepare for a boss. You’ll see Sephiroth slaughtering some goons and then he’ll disappear, but of course Jenova appears. This is Jenova Death and it likes to use Red Light often. Hopefully you have fire protection or absorption. Jenova is her usual self, not taking off too much but having a ton of HP for you to chew up. Just use your best summons and stay in Haste mode, and watch out for Silence. You get a Reflect Ring for defeating her. When you can, go north for an MP Turbo, Save, get the Poison Ring and go north again.
Lots of scenes ahead with Sephiroth, Nibelheim, Cloud’s real memory, and weapons. Sephiroth then tricks whoever you gave the Black Materia to. More big scenes. The party escapes with Shinra and Cloud is messed up.

Captured in Junon
You’ll gain control of Tifa and will look outside with Barret. Turns out Barret and Tifa will be executed and then you get to bring Barret to his jail cell. Save along the way.
Tifa is sent to be executed first. As the guard leaves you’ll see he dropped a key by Tifa’s feet. Fortunately Weapon attacks and all the guards leave. This leaves Scarlet open to some poison by Cait Sith and then a battle ensues. It should be easy – then try to open the jail door with Barret but you can’t.
Meanwhile Weapon is attacking Junon. You’re going to need to take Barret and Cait out to the top, and along the way you meet Yuffie. Continue up the lift and to the east and then it’ll switch to Tifa.
You have to use your feet, hands and head to get the key. First use your feet, and then your feet and face to get it in her mouth. Then do the face and left hand, and then it should be easy from this point on. Take Tifa out and keep climbing down. You’ll be on the large cannon, go to the end of it.
It’s time for a slap contest with Scarlet. Press circle really fast to win, and then run to the end of the cannon. The Highwind and Barret will save Tifa.
Highwind
Climb up, then go to the southeast in the next room. Further east to the main area. Talk to your party members to learn more about the situation and Cloud. Talk to the pilot or Cid until he tells you to go to Operation, so leave and go there. You can form a party, save, etc. Now you can go back to the pilot and fly around.
You’re free. Thank god.
You are to find Cloud. This is not an easy task as you don’t really have any clues, but you do have the Highwind so go to the Icicle Inn to hear about Mideel in the southeast. Then, take your Highwind to the southeast part of the map to find Mideel on it’s own continent.
Mideel
Enter Mideel and soon Tifa will see a cat. Then, she overhears a conversation about Cloud, and goes into the Mental Hospital to see Cloud. He’s gone insane and Tifa stays with him.
Back on the ship Cid is declared the new leader. Talk to everyone a couple of times and eventually Cait Sith will inform you on Shinra’s plans to collect Huge Materia in Corel and Fort Condor.
Put a party together and go back into Mideel to get some things. If you have Mimett Greens you can give them to the white chocobo and it’ll yield a Contain Materia. Also check the weapon shop for some goodies both for weapons and armor.


North Corel
Fly to North Corel. You’ll learn more about the Huge Materia so eventually rest up and take your party back towards the reactor (through the train tracks). Just as you get there, Shinra is leaving with a train.
Cid can drive anything of course so you’ll start chasing after him. You need to press the up button and triangle and switch off between the two – the faster you can do it the faster you’ll catch Shinra’s train. Then you have to start fighting battles in each cart – having Hyper is especially important here to get Limits up fast. The first is against a Gas Ducter and the next is against two Gas Ducter’s. The Wolfmeister has a ton of HP so do your best to use water attacks to make quick work of it. Finally, there is the Eagle Gun which is weak against Bolt but who also has a ton of HP. The last battle is against an Attack Squad so just hurry through it.
Now you need to stop the train. This part is weird because it seems like you only have to press it once or twice to get it going fast and then it stops. The controls are given to you so it should take a second or two to get the hang of it. If you can’t stop the train in time you won’t get the Huge Materia and you will need to buy the Ultima Materia for 50000 Gil. However if you stop the train and save North Corel you’ll get the Huge Materia and will be given the Ultima Materia for free.

Fort Condor
This is where the other available Huge Materia is. Enter and you’ll hear Shinra is pulling out all the stops. More or less this is a test of how much money you have, and you don’t really need much to be able to support them to victory.
Maybe this is your first time doing it – if so, here are some basic ideas before you start. Defenders, Attackers and Fighters will do the bulk of your work although the Stoners and TriStoners can be helpful if positioned well (try to cut off a path or two to your base by having one of these units protecting). As you can see you can only start so far up the map, so try to get as many Defenders and Attackers as you can near each of the three paths because the enemy will use them all. The key is timing and matching up weaknesses / strengths, both to take advantage of an enemy’s weakness and to keep your own units away from their weakness.
The only times this really gets hard is when a plethora of Wyverns comes through (at the end) and then the very end when the Commander comes out. Basically, send everything you have at it and get some stoners and tri-stoners set up to do damage on him since he’s slow. After winning, a strange light shows itself and the Condor goes down.
As you go outside you’ll see a baby fly away and a Phoenix Summon Materia lying on the ground. Go down the ladder and talk to the older guy who initially asked for help. He gives you the Huge Materia. There is another Huge Materia in Junon but for now the party suggests seeing Cloud.

Mideel Lifestream
Go see Cloud in Mideel and talk to Tifa. Soon an eruption occurs and go outside. Ultima Weapon is here. This guy is not fun, some of the attacks he uses (like Ultima Beam) take off near 2000. Magic Barrier might be nice if you want to survive. Also note that you don’t have to beat it but survive about 3 turns. Watch out though because even his intermediary spells like Quake2 take off 1200.
Weapon has retreated but Mideel is going to be gushing with Lifestream soon. The party escapes and Tifa and Cloud nearly do, but fall out just as they near the exit to the village.
When you regain control with Tifa, run north to the first Cloud. He’s near Nibelheim and it’s time he learns the truth from Tifa about what really happened. It was never Cloud that came to Nibelheim with Sephiroth – it was Zack from Gongaga, like Sephiroth showed.
The plot should be easy to follow at this point with Cloud’s leads. Eventually you’ll see that Cloud was in Nibelheim 5 years ago but was in uniform as he was embarrassed about not being a member of Soldier. However Cloud is the one that kills Sephiroth at the reactor.
Cloud realizes his true past and comes out of the Lifestream with Tifa to join the party again. Cloud makes an announcement to the team and then you regain control of him and can form a party. Cait Sith alerts you of the last Huge Materia in Junon supposedly. Do note that you can still visit Mideel for weapons despite it being destroyed.
Junon
Just enter and go to the far northwest to pay the guard 10 gil to use the Elevator.
Take the left path right away and head down the street – you’ll notice the large gun is gone. Keep going and take a left in the building to see some soldiers. Follow them to the elevator and fight a battle and then get off.
More shinra battles as soon as you get out. Continue along the path that the dog isn’t guarding. A few more screens and you’re at a save point.
Underwater Reactor
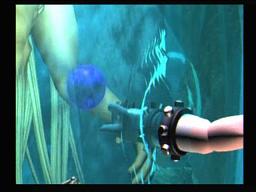
Take the elevator by the save point. Enter the following room and then the one after that and you’re underwater. You may wish to fight around until you see a Ghost Ship. Why fight this enemy? Because if you Morph it you can get a Guide Book, which is very important for a fight later on against a weapon. Completely optional but worth your time if you know you’re going to do it. The thing is, Ghost Ship has an attack that throws a character out of the fight with a plank so if that’s the Morph character you’ll have to fight another battle. Also Morph only takes off like 120 so you’ll want Sense out so that you can know when you’re getting close to being able to kill it with Morph for the Guide Book.
Continue through the laboratory. Don’t those sharks look fake? Use the underwater elevator and get out. Save when you see it.
More shinra enemies in this new area. In the next place you’ll see the Huge Materia as Shinra is taking it out.
In the next area you see Reno and he has a friend, the Carry Armor. This boss is pretty difficult as it starts off with Lapis Lazer for about 1500 on each member. Immediately you’ll want to get Cure 3 and Regen to restore that, and then M Barrier to reduce the move in the future. It will also grab a character with an arm or attack. So, start off with Haste and your best Bolt spells / Trine / Ramuh. Ultima, Neo Bahamut, Alexander, and your limits will do a fair amount of damage too. There is nothing to steal but you do get a God’s Hand afterwards.
Go west for a Battle Trumpet and then northeast to a closer area to that far submarine. Grab the Scimitar and Leviathan Scales to the west first though. Now fight a few Shinra battles (you can steal 8inch Cannon from them) and you’ll be on the sub.
As you get in, more Shinra enemies to devour and then a save point.
You don’t have to kill the Shinra enemies ahead, they’re your Shinra friends that did the dance with you. Take them prisoner or kill them and then Cloud mans the controls.
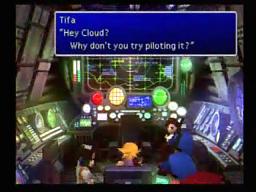
Not sure about this minigame. Basically, you start off next to the red enemy ship carrying the Huge Materia. Follow it with Triangle to speed up but don’t speed past it. Square is to shoot so when the target is bordered with red, shoot square like crazy. You’ll probably get hit from behind by other Shinra subs that you can kill if you want. Once you destroy the red shinra sub you win though and you get the Shinra Sub to use whenever you like.
Please note that you’ll see a Green Sub from time to time floating around the sea. You won’t want to encounter this thing unless you want to die really fast. This is Emerald Weapon, and we’ll fight him much later (he’s an optional, american-only boss). Anyway, if you just want to recover that Huge Materia that you sunk, go to the southwest of Junon and you’ll see the red sub (along the way are some other paths like to the Crashed Gelnika and some others).

Rocket Town
Re-enter Junon and go to the top part. After getting off the elevator, go north and east to the top of Junon with the airships. The Shinra take the last Huge Materia to Rocket Town so leave and fly there. It’s Cid’s rocket so you might as well bring him along.
As you near the rocket stairs, Shinra enemies fight you. A few battles and then you fight Rude. Regen and Haste would be good to cast right away. He likes to use and counterattack with Grand Spark on all of your characters. Use Ultima to eliminate the front line then use your Limits and best summons to get rid of Rude. Some more Shinra goon battles and then you can bring Cid to the cockpit.
He prepares an escape pod as the rocket nears Meteor. The party remembers the Huge Materia and then Cloud has a chance to release it above. Climb the east ladder and go up to it. You have to guess the passcode based on Cid’s hints within 3 minutes. It’s pretty tricky. If you want the answer, I can give that to you though. Circle, Square, X, X. Go down the ladder and then south all the way. Down another ladder and the oxygen tank blows up on Cid. Shera helps him up and they take the escape pod as the rocket is destroyed going into Meteor.
Cosmo Canyon
Return to Cosmo Canyon as Red XIII suggests. It is decided that Bugenhagen should go to the City of Ancients to see for himself.
Before you go, you’ll store your Huge Materia up at Bugenhagen’s, so search the blue materia south of you to get Bahamut ZERO. Bahamut Zero is one of the best summons in FF7.
City of Ancients
Fly here, and take the left path when you enter. Bugenhagen will look at that thing in the center and you’ll get a hint at what to do – look for a key that is blocked from the sun. Fly to Junon and get in your submarine.
Crashed Gelnika
Go due west of Junon and north a little, going west through the wall to see the Crashed Gelnika. Again, careful of Emerald Weapon along the way.
This is entirely optional but it’s a good tim to do it. The enemies are hard for this point though, but the rewards (for some characters) are exceptional. Take the save and go north.
Go north and east for a Megalixir and then south and east for an Escort Guard (great armor). On the ground in the northwest is Yuffie’s Conformer. In the northeast is one of the best yellow materia’s in the game, Double Cut (which later turns to 4x cut).
Back to the save point and rest. Go west for Heaven’s Cloud and then to the next room to see some Turk’s (unless you’ve already killed them).
Make sure to steal a Touph Ring from Reno and Ziedrich from Rude. Choco / Mog can help to paralyze either of them. They don’t do much to you besides attack and Neo Turk Light. Use your best summons and Ultima to take them out. The Touph Ring is +50 Vitality and Spirit and the Ziedrich is some pretty decent armor. Return back to rest and save and continue.
Go ahead now for a Megalixir. Stay on the top and go to the back and east. At the end is the Spirit Lance. Go down the stairs now and east towards the open ship door. You’ll see a red summon on the ground, it’s the Hades Summon Materia. Grab the Highwind to the southeast and the Outsider in the southwest.
You may as well Save and leave. There is nothing much to do here and despite the tough monsters it’s not the best to level up here (they don’t yield that much EXP / AP). When you leave Emerald Weapon may be outside waiting, if so just go back in and hope it doesn’t load next to the Gelnika when you leave again.

Lucrecia’s Cave
Further north of the Gelnika is an intersection that leads to Lucretia’s Cave or the City of Ancients Key. North leads to the Key to the Ancients and west leads to the Cave, as you can surface and put Vincent in your party for a scene. We can come back in Disc3 to get Vincent some nice things.

City of Ancients
It’s time to return to Bugenhagen with the Key of Ancients. With the Key in hand, Bugenhagen will unlock the music box and a picture of Aeris will show. Cloud knows what to do now so leave.
Meanwhile Shinra unveils the Sister Ray weapon which use the huges gun that was at Junon. Leave with Cloud and attempt to get in the Highwind.
Diamond Weapon at Midgar
Unfortunately, Diamond Weapon (the one that attacked Junon) is making it’s way to Midgar. The party is unsure of what they are going to do but Cloud decides to take weapon out. Fly over to Midgar and wait for the Diamond Weapon to come over. Getting prepared for this battle would be a smart idea since it’ll be one of the hardest you’ve fought yet. Have someone with Barrier / All, Haste / All, Restore / All, Ultima, Comet, and your best summons. Someone with a protect against Silence / Ribbon would be smart.
Diamond Weapon is immune to physical attacks although you can Mug him for Rising Sun and use Limits on him. Other than that, get Regen/ Haste up and then use Ultima and your best summons. When Diamond Weapon begins his countdown for Diamond Flash you can use physical attacks on him. Diamond Flash is going to take off a few thousand though and Silence anyone who survives, so you need to make sure your Ribbon-carrying character has high HP and will survive the blow. Cast Cure 3 right after with that character and it might be a good idea to have Regen working just before the countdown ends. After this he should be easy to defeat since your Limits are probably maxed out, and at this point a Meteorain will probably kill him. No items for winning but look at that EXP / AP.
After the battle some crazy scenes happen between the Sister Ray and a retreating Diamond Weapon.
Final Cave
As the party take the Highwind to the Final Cave now that the barrier is gone, Reeve will find out that Hojo is going to use the gun again to give Sephiroth more Mako. So the party has to go to Midgar right now to stop Hojo. In Midgar, Reeve has no control over Scarlet and Heidegger.
Midgar
Just prepare your party and fly to Midgar. When you get near, an automatic parachute sequence occurs. Note that if you try to fight Ultima Weapon at this point (which you can in the open water southeast of Junon) it’ll eventually fly away to Midgar forcing you into parachuting into Midgar.
Anyway, head for the exit and save in the following area.
This area is a little tricky to navigate. Go all the way east for a Megalixir and Elixir. Now take the southmost stairs going down and then go west and up the next set when you get down there. Grab the Aegis Armlet and go back down. Try to continue running east but you’ll fall to the bottom floor. Go west and climb up.
East to enter a new area, and then west for a Starlight Phone and east for an Elixir. Go down the stairs south of you and take the tube to the southeast. This leads to the Max Ray for Barret. Return to the previous area, climb up the ladder and walk up the north stairs. Save and go in.
You’re in the tunnels now. Start going south if you want weapons (or north to continue). Go south for a long long while and you’ll see a Power Source at sector 3. Sector 2 has a Guard Source and 1 has a Mind and Magic Source. Next you’ll be at a dead end with a save point and W-Item.
Now if you go back north past the ladder, the Turks will quickly catch up to you. You can fight them or pass up on it, but you may as well fight them. Steal a Minerva Band from Elena, Touph Ring from Reno and Ziedrich from Rude. If you fought the latter two enemies in the Crashed Gelnika this is your second opportunity to steal these items (and having 2 Touph Ring’s is a good thing).
Anyway, this battle can be difficult if the Turks decide to gang up on a certain character. Your best Summons and Limits are the most useful to attack all the enemies at once. Just set up the usual Haste, Hyper / Fury and Regen. Barriers may help too. Return back up the ladder to save and rest. Now continue northeast for a while until you reach a dead end, and then back up and you’ll be taking the northwest exit to see a ladder at the end.

Shinra Headquarters
Cait Sith runs out to tell you Sister Ray isn’t here. Keep going in and take the elevators to the highest level, and then use the southeast elevator to get to floor 63. Go north for a Glow Lance. Now, to floor 64 for Cait Sith’s best weapon. Go to the north part with the lockers and search the northwest section to find HP Shout. Return back to floor one and take the stairs going up. Take the northeast exit for the Gift Shop. The 2F gift shop has Master Fist and Pile Banger to the northeast.
Walk out of Shinra now and go south back to the sewers. Go south a screen and when you get another chance, take the northwest path this time. Climb up the fence and run ahead, but you’ll be stopped by Proud Clod. Take out the Jamar Armor first then Proud Clod itself. Using summons or attack / all Limits to start off might be helpful although the Jamar Armor protects Proud Clod. Proud Clod doesn’t have anything too special at first, lots of different attacks though. So you should be able to get Haste and Regen up quick and stay in control for the majority of the fight. Once Proud Clod nears death it’ll get on it’s hands and knees. Continue the onslaught, you probably noticed at this point that Proud Clod is just too slow to accrue damage on your party. Your reward is the Ragnarok sword.
North for a Mystile and Elixir and then save. Put Barret in your party (even if you don’t want him – you’ll see why). Climb the ladder and speak with Cait. In the next area you’ll see Vincent before you run up some more stairs. Up the stairs for a shiny green treasure, the ultimate weapon for Barret Missing Score. Note that this chest is only here if Barret is in your party, so switch him in and then back out if he’s not in already.
At the top, go east to Hojo. After some talking and new information, a battle begins. This is one of three, so be prepared to conserve your magic. It’s also the easiest of the three as he only has his Bad Rap Pods attack. Shortly he’ll be dead and Helletic Hojo appears with two hands. This enemy takes off more and uses Confu, a terribly annoying effect. Don’t unload everything you have, but you can start to use your good attacks now.
Lifeform Hojo NA is where it really gets difficult. Lifeform-Hojo doesn’t look intimidating but it can cast status effects on everyone now and it’s attacks are relentless. Regen is good to have on because Lifeform Hojo will use a combo physical attack that will give you about 3 or 4 different ailments. Unload everything you have, your best summons, best limits, and so on. You get a ton of EXP and a Power Source for your endeavors.
Some scenes with Tifa and Cloud and the parked Highwind. Soon the entire party will join Cloud and Tifa to North Cave for the final battle with Sephiroth.
