Laila Belle
Give the Corporate Peon in area 1 the Werewolf Fang. The Black Pass is then yours. With this, you can do all sorts of great stuff, sacrificing your levels of course. But you can really get your top characters leveled by farming low levels (to 40 or so with the back 3) and then exchanging 100 of those levels for a 20 level apple. Quickly, you’ll have level 80-100 characters. Just level the weak characters up in the back during the optional dungeons.
Mithysmere
Before you go here, buy one school outfit for each character (each character has two options at the black market, it doesn’t matter which one). Go to area 10 (assuming you’ve talked to Pastel already) and put the uniforms on everyone. 3 Hresvelgr‘s will appear. They are level 48 and rather easy, but get on the Earth ley point to ensure that you can blow them out quickly. Return to Pastel for Terrace Tiara, a badge that allows you to use no MP.
World Map Sol Niger’s
Southeast Filgaia’s Sol Niger is northeast of the TF System Tower G, at approximately x 969 y 519. These three aren’t that difficult, though they do have a nice evade. Their HP is low and attacks weak. They do have good elemental defense so it may be a longish fight, until Solais Emsu comes out. Stay on the northeast hex at the end for Ambrosia.
Southwest Filgaia’s Sol Niger is easiest to get to from the Hillside Ruins Go southeast and look toward the beach at x 203 y 127. This one is tricky because it has ley recover on any ley point. So you will need to use Shut Out or just manually push him into a corner, forcing him into a non-ley hex. Keep pummeling him with physical attacks, finest arts, and Solais Emsu.
Head to Laila Belle and go east for the northeast Filgaia Sol Niger. These three have ley regen, but much less HP. However these three also like to inflict Misery status on you, so be prepared otherwise they could route you. Of course, do your best to shield them from the ley points. Solais Emsu really does wonders here so long as you can get one or two Sol Niger’s close to death, it’ll do the rest. The hex just southeast of the wind ley point has a Great Apple.
Last but not least, the northwest Sol Niger. Go to Orsaeous and then travel south with Asgard. There are a few Sol Niger’s here, both are weak against earth and fire though so it should be easy. No ley regen. Stay on the wind ley point at the end for an LVL Apple.
Adult Mags
In Harmonde, there are those dirty mags on the ground by the Rocketeer. Give someone the Moon Medium, and then save. Go up to them with the three boys (hopefully they’re all high level) and they’ll get in a fight with 8 Adult Mags. Fortunately, this battle shows how effective Gather can be, by using this on the Adult Mags to get them on the Earth ley spot, you can bomb them with Heavy Crush on the Wind ley spot. Stay on the north spot (fire ley hex) to get RES Apple. Your reward for this battle is Night Princess.
Mount Chug Chug
Take the area 2 elevator the area 14. From here, climb a ladder and go southwest where you can power point a new exit.
Grab the Potion Berry x5 and then use the Duel Sign on the big crystal. You will be facing three Que Sera Sera. They are weak against water and earth, so if you can get on the earth ley point it should be smooth sailing, as you can lessen the magic damage and cast Solais Emsu when the time comes. End at the north hex for DEF Apple. You get part of the Golden Angel.
Go down a few floors and use the Exodus Orb.
Decrepit Path (s)
Go to area 3 and use the Anchor Hook on the boulder twice to get it on the switch. Beware for the crystal as when you use the Duel Sign, Ape Man Junma and his 280000 HP show up. This guy is the definition of a brute, with a 3000+ regular attack and 5000+ plus attack. He doesn’t employ a whole lot of strategy, so just get locked down on a ley spot that you can take advantage of him with and go from there. 200000 is a lot of HP though. If you remember, end on the middle hex (water ley spot) for ATK apple. You also get Golden Angel for this.
Temple of Rejection
At area 8, anchor hook across. Get the Red Pepper and Magic Pot, and then fire the left crystal and freeze the right one.
Now go to area 12. The water is running, and you can freeze it. Jump on it and over to the luminating crystal. Inside this one is a cute little guy named Chaugnar Faugn. This guy has another 100000 compared to Ape Man Junma, and has some instant kill attacks basically. His other attacks do decent damage, and he can gather your party too. Basically though the strategy is the same in this battle compared to the last.
Inferno
Teleport to the Inferno, or if you haven’t been here, go to the northwest part of NW Filgaia. Grab the Duplicator x2 chest and go to the purple teleport. In area 2, go straight to the teleport. Area 3 requires lots of Anchor Hook use to get around, go grab the Lucky Card and make your way to the northeast corner for the portal.
Head to the middle of area 4 and get Ryan’s Shield and Cordyceps x5. Return to area 4 and take the other path. Run straight ahead and you’ll be at a teleport that takes you to area 6. Jump attack the switch which reveals a path to Holy Berry x2. Take the nearby teleport which brings you to area 7, in front of a duplicator chest (Warp).
Return to the previous room and take the east warp. Stand on the switch and then go to the spinning bridge. Anchor hook to the north for Mega Berry x5 and take the northwest teleport for Vital Force (duplicator). Take the path just east of this now for area 8 and a save point. There is a rotating bridge and an anchor hook – take the anchor hook until you can drop down on the bridge, and take the first west portal. Same idea in area 11 but the bridge is now a small platform – take the east portal when you can.
Back in area 8, but a different part. Jump to shoot the jars, one has a Holy Berry, and then step on the switch. Use the nearby anchor hook spot to get back to area 11. Take the very northeast path to come to area 13.
The nearby duplicator chest is a Full Carrot. It’s going to be tricky but you need to get to the southwest corner via anchor hook for the portal. Area 14 has lots of stuff, like Great Apple, Neutrino Medal, Holy Berry x8, Gella Card, and the Sol Niger. These two Sol Niger’s don’t have the most HP, but aren’t weak against anything and they are super fast. Fortunately their attacks aren’t too great so you should be able to stay alive.
Return back to area 11 after you get all the above. Use the Anchor Hook to make your way to the southwest portal. In area 12, look low to find a power shot treasure, Ambrosia. Anchor hook across and get Hi-Devastate x5 and Castle Wall.
You have to go back to area 8 (north exit in area 2). Take the east exit after using the anchor hook. In area 9, use the anchor hook to get to the upper area where there are jars and a Neutrino Medal, the second one here. That northeast portal leads to a Dragon Fossil and Spike Boots (duplicator). The southeast portal leads to 18000 gella and the northwest leads to a switch. You can also jump and shoot the Wonder Booster from here. Go towards the save point, using the anchor hook and moving bridge to get there. Save your game of course, and use the anchor hook to get all the way across to the area 15 teleport. A tough monster is here. First get the MAG Apple and Neutrino Medal in the jars, and then use the Duel Sign on the luminating sphere.
You’ve just released Mictlantecuhtli. He’ll be Mick from now on. He likes to use Giga Crush, which will maul pretty much any character, even the level 90 ones I had in there. Just try to get on the fire ley spot and do your damage with hi blast and heavy crush. He also has a Candle in the Wind maneuver that will drain your HP to 1. You’ll want to get Lucadia off when he does this to you so that you can replenish everyone. Just survive this battle and you’ll get the Recovery Program after. Use the Exodus Orb now.
Tartarus
Take the northeast portal in area 1. Freeze bullet the area 2 crystal and a platform switches. Take the nearby portal, and near the jars in area 3 you can jump and shoot the treasure for Ancient Blade. It may take a few tries. Take the other portal here, and then the northwest portal in area 4.
In area 8, you want to quickly fire bullet the south crystal and then jump back so you can continue on east. Take the southeast path in area 9, skipping two portals along the way. Continue on in area 7 to a new portal to area 9. There is a duplicator chest (Speed Star) and a crystal that you should use the freeze shot on.
The platforms are different, so you can take the southwest most exit now. This leads to a Great Apple, and nothing else. So go back and take the middle path that you just passed. There is a Dragon Fossil here, and then use the northeast portal. Area 10 now, with a Ley Change duplicator chest and a save point near you. Now go northwest.
Shoot the jars in the northwest corner for another Neutrino Medal. Go back now and take the east-most path. Continue on until you reach area 5, where you should fire-bullet the crystal and then climb up to the southwest exit. Another Neutrino Medal in area 14, and the Sol Niger. There are three of them, they all have 57500 HP and halve every element save for fire. Because of this, it will be a long battle. Their attack aren’t the biggest problem – causing Misery status was more annoying.
Back to area 5, and then all the way back to area 10. This is a few portals. Save your game, jump up the new platform, and take the northwest path. Use the standard shot on the crystal and take the southeast exit. Shoot the jars for a DEF Apple and you can power shot the treasure for Punching Glove. The crystal should be frozen, and then you can take the east exit. Continue this way until you reach First Security.
Return to area 11 now, and take the northeast exit. When you get to area 9, take the north exit until you reach area 8. Use the regular shot again on the crystal. This will allow you to get Turbo Drive and Giga Spark.
Back to area 11. Take the middle north path, shooting the Monopoly Gourd and Goat Doll. Take the middle portal to area 15, where there is another Neutrino Medal and another scary boss. Much worse than the Inferno boss.
This is Angol Moa, King of Angolmois. Level 97, 100000 HP and not weak against anything. If you don’t have 8000+ HP you’ll never survive The Seventh Moon. Chances are you won’t, but if you have a Mountain Medium user you can use Invincible right before he pulls it off. This character will have to be fast though.
Cocytus
Cocytus is in southwest Filgaia. Go through to area 2 where you can save.
Lots of paths here. The bridge moves every once in a while. The west path to area 11 was open when I ran up there. Continue on to the area 12 warp, and then go straight ahead for Shamil. Look to your left and follow that path to the Sol Niger. There are three level 80 or so Sol Niger’s, but you start off on their weak point (earth ley point). Have your healer go a spot north and hold ground while the Sword and Sky users bomb away. Psychedelicer is dangerous if your HP is low from Gravity Earth. The key is staying around half way in HP so that gravity earth puts you in red, allowing the sea medium user to heal.
The northwest path at the save point portal split leads to area 13. Go northwest, shooting the jars for Neutrino Medal along the way. Area 14 has a Metal Suit for Chuck, and then return to the big split.
In area 2, take the northeast path to reach area 3. Another Neutrino Medal and a portal that leads to Virtuous Guard. Return back, and take the southeast exit to reach area 7. Another Neutrino Medal and a teleport to area 8, where Seed of Eden lies.
Take the east portal now. This leads to area 5, which has a RES Apple and the area 6 teleport. Goddess Breath is the treasure here. Finally, take the southwest portal and shoot the jars for Holy Berry. In the next area is Cromwell.
Now that you have checked every path, save, and check the new portal at the very top of area 2. Go in and you’ll see a luminating crystal. Duel Sign it and you’ll find three Lycanthropes. These guys can do a fair amount of damage and may kill a few characters before they get in danger. If this happens, you’ll be forced to use Full Revives of course. Just use Jump or Replace to get on the southeast hex, the wind ley point. Then you can spam your magic and heal. Solais Emsu is extremely helpful here as the enemies can heal themselves by 10000, so it’ll allow you to whittle their HP down all at once. Finish on the north ley point for a MAG Apple.
Your reward is the Sonar Kit. You can now see hidden items on the world map.
Abyss
This is the scariest of the four optional dungeons. You can gain levels really fast here, obviously, with some of the highest leveled enemies around.
Save your game and continue to area 3. Take the west portal, and then the northwest portal in the next area. Continue on until you reach some jars with ATK Apple. Move through several portals until you are at area 17. In this area you can shoot the boulders so that you can use them as steps to get up. Take the northwest exit, and then when you get to area 9, take the south exit. Shoot through a wall, take the south portal, and you are in area 29. A few things here like a duplicator chest (Dragon Fossil x2) and two Sol Niger’s. These guys aren’t weak against anything (they at least halve every element). Solais Emsu will help, as will Finest Arts. Just stay healed and win this war of attrition.
Exodus Orb out and save.
Within the Abyss is a Wild ARMs legend, Ragu Ragula. To get him to come out though, you need several items on the world map. In northeast Filgaia is the Jasper Pillar at x 528 y 957. Southeast Filgaia has the Holly Crown at x 95350 y 510, which requires Asgard to destroy a rock. Northwest Filgaia has the Obsidian Spear at x 292 y 667, which again requires Asgard destroying a rock. Finally, southwest filgaia has Sacred Shroud at x 33350 y 183, south of the Isolated Path.
Okay, back to the Abyss and save. In area 3 take the west portal and area 2 take the middle. Take the southwest teleport in area 11 and this leads to Heavy Knuckles in area 23. Take the middle path to area 14, and then go south to area 20. Shoot the wall and then go through with the southeast exit. Take the middle north path in area 21.
Area 24 is an ominous room. Grab the Cat’s Paw (duplicator) to your left and then go forth to drop the four items down; Sacred Shroud, Obsidian Spear, Jasper Pillar, and Holly Crown. A new teleport emerges. Behind the crystal in area 30 are two more duplicator chests – Marksman Badge and Punching Glove.
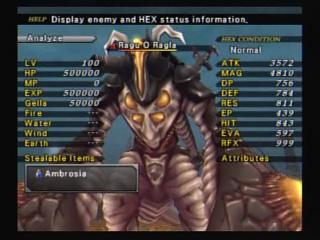
Use the Duel Sign on the crystal when you are ready. No guts no glory. Be prepared with lots of nice badges (Sheriff Star, 100% orange, chick badge, etc) and luck. Ragu O Ragla has his own music and is the king of monsters. 500000 HP and 3500 ATK. Giant Impact will take off about 6000 and his 1 trillion degree move will basically annihilate your party unless they are on the water / fire ley spot and with a chick badge. You could also have a Mountain Medium user use Invincible, but that’s hard to rely on considering the fact that you’re dead if Ragu goes before you. 100% orange badge on your healer is your best option – that way your healer will have roughly 5500-6000 HP, which results in 55-60 hits from Ragu.
You should be able to kill him within this time, so long as you have the Full Revive stock to keep reviving your other characters. For your victory, you obtain The Omega. The Omega gives you a critical hit with every attack.
I have the Werewolf Fang but the Corporate Peon won’t take it. I just finished the TF tower 0.. do you have any idea why he doesn’t take it?
I need the black pass.. D:
first u need to give him the wine , u get the wine from working to the guy in gounon inside the house working too, so , u help him , and do this 3 times , and after this , u win the wine :)
i need golden angel please help me
I gave the werewolf fang to a guy in laila belle, but he doesn’t gave me black pass, why?